


– 3 –
In-ceiling Mount (Closed Type)
Make sure to also consult the In-ceiling Bracket Closed Type Instruction Manual.
1
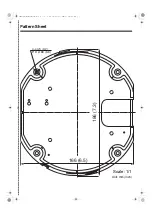
Draw a circumference on the ceiling using the
supplied drop-prevention cable (A) as compass, and
drill a hole for installing the in-ceiling bracket.
●
Pull out the cables from the ceiling.
2
Pass the supplied screws
a
and washer
b
through
each of the power board unit screw holes (B) and
fasten them loosely using washers (4 places).
3
Align the arrows (C) of the same color (blue) on the
power board unit and the in-ceiling bracket, and
mount the power board unit. Tighten firmly the
screws (B) loosely fastened in the previous step.
●
Pass the video cable
(D)
through the bracket cable
hole as preparation for the next step.
4
Attach the supplied safety wire (E) to the ceiling
beam, for example, then connect it to the
bracket-top hook (F).
5
Connect the video cable and pass the connection
cables through the bracket.
6
Insert the bracket into the ceiling hole and fix it
using screws (G) (2 places).
7
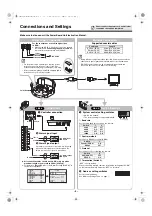
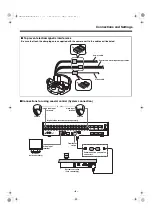
Connect the cables and set the switches.
☞
See “Connections and Settings” on page 5.
8
Align the arrows (C) of the same color (blue) on the
camera unit and the inner side of the bracket, and
push the camera unit until they click.
9
Align the SANYO logos on the supplied bracket
cover and the bracket, and push the cover until they
click.
■
How to attach the drop-prevention cable
(accessory)
Fasten the drop-prevention cable
(A)
to the hooks
(H)
on
the bracket and its cover, then slide the cable as shown in
the figure.
■
To remove the camera unit
1. Installing the power board unit
2. Installing on the ceiling
H
A
H
B
5
4
4
6
A
a
b
E
G
G
D
F
F
E
G
G
1
2
B
B
B
7
9
6
3
C; Blue
C; Blue
8
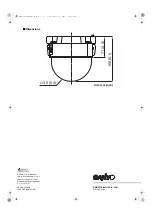
φ
192 mm/7.6”
VA-80ME
Bracket cover
Safety wire
Screw
a
, washer
b
(for power board unit)
Drop-prevention
cable
Accessories
L5BU2_XE(INSTALLATION).book 3 ページ 2007年8月1日 水曜日 午前11時7分


