background image

Video Search


English

29

Search Procedure

<Search example>

In this section, the following conditions are used to 
explain the search procedure.

• The cameras and recorded videos to be 

searched:

Camera Nos. 1 to 4; alarm and normal 
recordings

• Searched period:

18 hours from 12:00 pm, Jan. 10, 2006

1

Set the screen mode to 4-part split 
screen mode and display the live videos 
from camera Nos. 1 to 4.

In searching the recorded video, the 
cameras from which the live video is 
displayed are searched.

MEMO:

You can search recorded videos from 16 
cameras simultaneously in the 16-part split 
screen mode.

2

Select [Search Image] from [Edit] in the 
menu bar.

The [Search Image] screen appears.

3

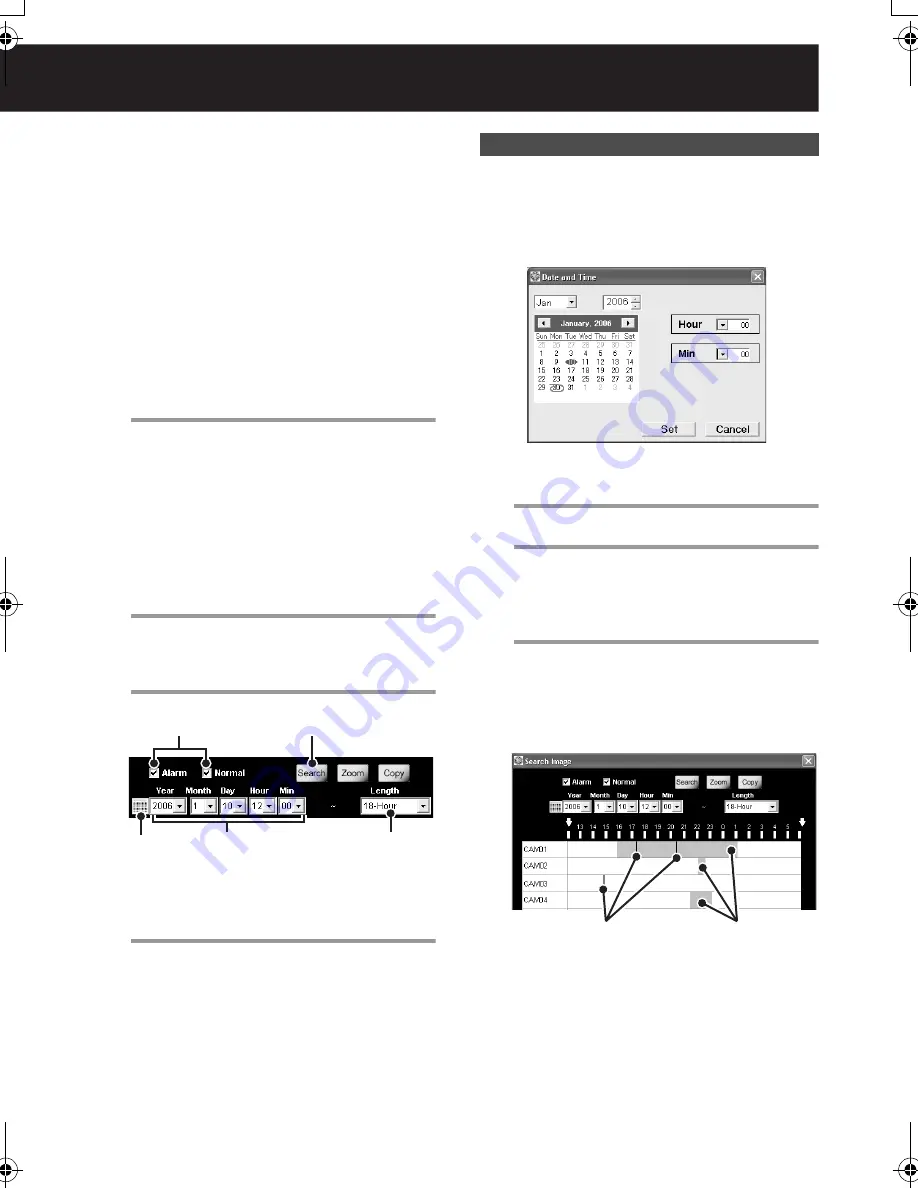
Select the [Alarm] and [Normal] check 
boxes.

4

Specify the beginning date and time to 
“2006/1/10/12/00” using the [Year/Month/
Day/Hour/Min] pull-down menus.

By clicking the calendar icon on the left end, 
you can also specify the beginning date and 
time from the calendar in the [Date and Time] 
dialog.

Selecting the month and year displays the 
calendar of that month. Click the date, specify 
the time using the [Hour] and [Min] pull-down 
menus and click [Set]. This sets the beginning of 
the date and time and closes the dialog.

5

Set the period to “18-Hour” using the 
[Length] pull-down menu.

6

Click [Search].

This starts searching the videos recorded 
by alarm and normal recording for the 
specified period.

7

The search result display

The search results are displayed in the 
search result area. The alarm recording 
video is shown as the red bar, and the 
normal recording video is shown as the blue 
bar.

3

6

4

5

Calendar 
icon

Using the [Date and Time] Dialog

Alarm recording
(red)

Normal 
recording
(blue)

L9EBB_WA(VA-SW3050)(GB).book  29 ページ  2006年4月21日 金曜日 午後4時25分

Summary of Contents for VA-SW3050

Page 1: ...INSTRUCTION MANUAL VA SW3050 Network Recorder ...

Page 2: ... the Recording and Playback Controller 26 Printing and Saving Video Images 27 Printing Video Images 27 Saving Video Images 27 Video Search 28 Search Procedure 29 Zooming in on Search Results 30 Playing Video from Search Results 30 Saving Video Found in the Search 31 Checking Alarm Status 33 Backing up Recorded Data 34 User Registration 35 Registering a New User 35 Changing the User Password 36 Del...

Page 3: ...t monitoring tasks System Requirements The system requirements for the VA SW3050 are as follows PC IBM PC AT and compatibles OS Windows 2000 Professional SP4 Windows XP Home Edition SP2 Windows XP Professional SP2 CPU Memory When the number of cameras connected is 4 or fewer CPU Pentium 4 2 0 GHz or higher Memory 512 MB or more When the number of cameras connected is between 5 and 16 CPU Pentium 4...

Page 4: ...3050 starts 3 In the License Agreement dialog select the I accept the agreement option and click Next Be sure to read the license agreement thoroughly before proceeding the installation 4 In the License information dialog enter the serial number and click Next The serial number is shown on the envelope containing the installation CD ROM Example 1234 5678 9012 3456 5 In the Select Destination Locat...

Page 5: ...n dialog for installing them appears automatically before and after the setup wizard Clicking Yes in the dialog and following the instructions on the screen install the NET Framework components along with the VA SW3050 To uninstall the VA SW3050 software open the Add or Remove Programs window from the Control Panel and select Network Recorder to begin the uninstall procedure MEMO Uninstalling the ...

Page 6: ...s below USER ID admin PASSWORD admin Note For security reasons be sure to change the password for the admin user from the factory setting value see page 36 If an invalid user ID or password is entered three consecutive times the dialog displaying the authentication error message appears Clicking OK closes the login screen automatically 4 Click OK When you start the software for the first time or n...

Page 7: ... and the task tray icon disappears The camera can also be accessed concurrently by multiple admin users via Web browsers However when the user who uses the software performs one of the following actions other Web based concurrent admin users are disconnected Camera registration Clock settings Alarm settings When Windows XP Firewall or some other firewall program is active on your computer the comp...

Page 8: ...P Address or URL When changing the address or URL use the camera search function see page 8 2 Port The default setting can be 80 or 443 depending on the SSL setting 3 SSL When you use the SSL communication for accessing the camera select the check box corresponding to the camera 4 Camera Password Enter the password for a guest user configured on the camera The default setting is guest 3 When you u...

Page 9: ...rch Camera dialog The addresses are displayed in the order of the MAC addresses 2 If there are any overlapping IP addresses in the Search Camera dialog select the camera s for which the IP address needs to be changed and click Edit The Edit IP Address dialog appears 3 Enter new IP address To change the IP address for a camera you must first change the subnet mask and default gateway values for the...

Page 10: ...pdate the displayed image click Reload MEMO When the camera has not been registered or is not registered appropriately a communication error occurs and the image is not displayed 3 Click Close This closes the window 4 Enter the camera title It is recommended to set the title according to the camera location and so on for easier management on the display The title can be up to 16 alphanumeric chara...

Page 11: ...for all cameras 3 Reload button Reloads the setting information Camera Title Quality Resolution to display Note When registering cameras on two or more PCs If you don t want to change the contents set in the camera after inputting the IP address and camera password load the current setting information using the Reload button 4 Copy button Copies the settings for the selected camera and retains the...

Page 12: ... information display buttons that are frequently used 3 Video display area Displays the live video and recorded data You can use the button on the tool bar to select the number of cameras to be displayed single screen 4 part split screen or 16 part split screen see page 15 MEMO In the following cases only the following message is displayed respectively with no video When image signals are interrup...

Page 13: ... camera Right clicking the video displays the context menu The context menu enables you to perform the following commands without using the controller or menu bar Information Displays the camera information Record Camera Record Stop Camera Starts or stops recording Save Image Saves the video image Play Live Starts or stops playing Play Rec Controller Displays the recording and playback controller ...

Page 14: ...earches videos Page 28 3 View Full Screen Live View Displays the video in the full screen mode Page 15 1 4 x 4 Live View Displays videos in the 16 part split screen Page 15 2 2 x 2 Live View Displays videos in the 4 part split screen 1 x 1 Live View Displays video from a single camera Controller Camera Controller Camera Control Displays the camera controller Page 17 Play Rec Controller Playback Di...

Page 15: ...p Sets the alarm recording Page 23 Delete Data Menu Setup Deletes recorded data Page 42 Others DATA Storage Menu Setup Configures the options for storing videos on HDD Page 41 Proxy Menu Setup Sets the proxy server Page 43 Clock Menu Setup Automatically adjusts the time Page 43 User Registration Menu Setup Registers the user Page 35 Start Up Menu Setup Automatically activates this software Page 44...

Page 16: ...le this function 4 Screen change buttons Switches the displayed page forward or backward manually 5 button Stops the playback for all cameras simultaneously and displays live video 6 button see page 33 The color of the button indicates the alarm status Clicking the button opens the Alarm dialog for viewing the alarm history and image 7 Print button see page 27 This button allows you to print out t...

Page 17: ...ng operation mistakes If the camera has a panning tilting function click the video in the single screen mode for exploiting the function Clicking the video in the single screen mode changes the camera orientation so that the point where you click is located at the center of the image AChanging the camera orientation Click on the video BChanging the camera orientation and zooming in Double click on...

Page 18: ...n horizontally and vertically Changes the camera orientation diagonally Scans the monitored area end to end vertically or horizontally and stops at the current camera position Starts or stops the sequence auto panning or tour action mode respectively The tour action mode is not available for some models Displays the configuration menu for the camera Applies the registered configuration for camera ...

Page 19: ...anual supplied with the camera Zooms in or out Adjusts the focus Performs automatic focus adjustment Adjusts the iris level Select an appropriate number from the pull down menu and then select the setting between ON and OFF Closes the camera controller Displays the configuration menu for the camera Moves the cursor up down in the configuration menu Moves the cursor to the left right in the configu...

Page 20: ...ly by specifying the start and end times Use the Timer Setting screen to configure the timer recording Page 21 Alarm recording The alarm recording starts live video recording automatically triggered by an input signal from a device connected to the camera such as door switch or infrared sensor Recording on the PC s hard disk drive directly Records the post alarm video after the alarm signal for sp...

Page 21: ... selected click 2 in the controller This stops recording and the a red mark disappears MEMO You can perform recording operations while playing the video You can also use the menu bar or context menu to display the recording and playback controller or to start and stop recording 1 Select Record All Camera from Record in the menu bar This starts recording for all cameras and the a red mark appears t...

Page 22: ...mes for recording under the Start and Stop columns respectively 4 To enable the setting select the On radio button under the Set column When you configure multiple timer recording settings use the same procedure steps 2 to 4 for the other timer setting rows You can configure up to 8 timer recording settings per camera 5 Click Apply This saves the settings for timer recording 6 Click OK This comple...

Page 23: ...d time for the end of recording Example The timer recording is performed for 30 consecutive hours from 16 00 on Saturday through 22 00 on the next Sunday MEMO Only one setting can be made with the timer recording for over 24 hours Clicking Over 24H again restores the normal format By setting national holidays or anniversaries as holiday holidays are treated as Sunday and the timer recording is per...

Page 24: ...itable when giving priority to the recording time In this method the pre alarm recording is not available Alarm area Set this option to PC Alarm Duration Post Set the recording duration per alarm recording During an alarm recording no other alarms will be processed This recording method can set the recording rate high and is suitable when giving priority to the recording rate In this method the pr...

Page 25: ...area 0 5MB increase capacity Alarm Duration Pre Post 10 90 raise the ratio Quality Super Fine lower picture quality During alarm recording the alarm video being received from the camera is displayed Since there is a time lag before video is received the displayed video will differ from the live video 1 Select all check box Selecting this check box in the title row selects all the check boxes corre...

Page 26: ...videos currently played and all the live videos of the cameras for which the recorded video is played are displayed again Whether normal or alarm recording all the recorded videos are played in chronological order When you play the recorded video next time the playback starts from the point where the playback stopped last time When you play the recorded video next time after exiting from the VA SW...

Page 27: ...he time scale panel The Recording and Playback Controller 1 Displays the beginning of the alarm video currently played If you click the button when the position near the beginning of the video is played this button displays the beginning of the previous alarm video 2 Displays the beginning of the next alarm video 3 Plays the video frame by frame in reverse direction during playback pause 4 Plays t...

Page 28: ...ngs under the Options menu see page 44 Saving Video Images You can save the video image from the camera you selected in JPEG format 1 Right click on the video image you want to save while playing live or recorded video A red frame appears around the selected video and the context menu is displayed 2 Click Save Image The Save As dialog appears 3 Specify the target folder and file name for saved ima...

Page 29: ...for specifying the beginning date and time for search C Length Specify the duration from the beginning date and time for search 3 Hour to 7 Day by using the pull down menu 3 Operation buttons Search button Performs searching for the specified period Zoom button Zooms in to enlarge the search result Copy button Saves video from the specified period 4 Search result area The search results are displa...

Page 30: ...he beginning date and time to 2006 1 10 12 00 using the Year Month Day Hour Min pull down menus By clicking the calendar icon on the left end you can also specify the beginning date and time from the calendar in the Date and Time dialog Selecting the month and year displays the calendar of that month Click the date specify the time using the Hour and Min pull down menus and click Set This sets the...

Page 31: ...ng all the videos from the searched cameras simultaneously in the current multi part split screen The video is played back from the double clicked point at the playback speed of the camera video currently selected The cursor line moves according to the playback point During playback you can perform the playback operations using the recording and playback controller Before performing the operations...

Page 32: ...folder Note When you use the Image Viewer only the most recently saved video file in the folder is displayed If you want to save and view two or more video files change the target folder every time you save the video file MEMO The path for the target folder Default C Program Files SANYO VA SW3050 File name convention CAM camera number _ the date of the first image in the video _ 4 digit serial num...

Page 33: ... select the lower resolution the displayed video image becomes smaller Frame rate Specifies the frame rate at five levels Image No The number of the currently displayed image out of the total number of images appears here 2 Playback operations Top Jumps to the first image Previous Plays the video frame by frame in reverse direction R Play Plays the video in reverse direction Still The playback pau...

Page 34: ... indicator turns blue 1 Camera number buttons The color of the button allows you to confirm the alarm status for the camera Red From the newest alarm to the 4th newest alarm Orange Between the 5th and 8th newest alarms Yellow Between the 9th and 12th newest alarms Blue 13th or older alarms or no alarms so far Gray No camera registration Clicking the red orange or yellow button displays the newest ...

Page 35: ... stored on the PC 1 Specify the target folder for backup Click Browse and select the target folder for backup in the Browse For Folder dialog Note Be sure to specify the target folder for backup that is different from the one for saving video see page 41 2 Click Backup This starts copying the data to the folder you specified 3 Click Close This closes the Backup screen 1 Specify the folder to be re...

Page 36: ...from 4 to 16 alphanumeric characters The password is case sensitive 3 Enter the same password again for confirmation 4 Click Add The new user is added to the User ID list A When you register multiple users repeat steps 1 to 4 MEMO To configure the operating privileges for individual users select the user in the User ID list A and click Edit B The Edit Authentication screen appears see page 38 5 Cl...

Page 37: ...s highlighted in the User ID list and is displayed in the User ID box A 2 Enter the new password 3 Enter the same password again for confirmation 4 Click Change The Change Password dialog appears 5 Enter the current password 6 Click OK The dialog confirming the password change appears 7 Click OK Completes the password change 2 3 A 4 1 5 6 7 ...

Page 38: ... User ID list is targeted for deletion 2 Click Delete The dialog confirming the deletion of the user ID appears 3 Click Yes The user ID is deleted from the User ID list 1 Note The user admin cannot be deleted Only the password can be changed The user ID for a registered user cannot be changed When you want to change the user ID for a registered user delete the registered user at first and then reg...

Page 39: ...amera remotely 5 Camera Menu Setup 1 4 For changing the camera settings 6 Menu Setup For configuring settings for the Options menu Only set this operating privilege for administrative level users MEMO In the default settings check boxes 1 5 are all selected The operations under the menu from 2 to 5 cannot be performed without the privileges enclosed in parentheses A Select All button Selects the c...

Page 40: ...s White the camera has been registered Gray the camera has not been registered yet Clicking the camera number highlights the selected camera on the camera list 3 enabling the camera title to be confirmed 2 Test button Clicking the button switches to the Check Camera Layout screen enabling actual videos displayed on each page to be confirmed Click Return to return to the previous screen 3 Camera li...

Page 41: ... target position are exchanged MEMO When you select option 1 the camera number in the target position is deleted from the pattern diagram but not from the camera list When you want to display the deleted camera number again drag the camera number from the camera list directly and drop it into the target position When you move multiple camera numbers repeat steps 1 and 2 3 Click Set Saves the layou...

Page 42: ...isk space according to the remaining capacity When the remaining capacity of the hard disk space reaches the specified limit the available space is considered to be run out 3 Set the recording option when the hard disk space runs out Overwrite Overwrites the oldest video data to continue recording Rec Stop Stops recording After deleting recorded data to free up hard disk space the recording operat...

Page 43: ...ded data Selecting either of the options deselects the Not Delete A radio button Click the Delete All B radio button Click Select Date Time C radio button and select the date and time using the Year Month Day Time spin buttons The recorded data older than the specified date and time is deleted When you delete the recorded data for multiple cameras repeat steps 1 and 2 3 Click Delete The confirmati...

Page 44: ...an be adjusted automatically by retrieving the correct date and time information from the NTP server 1 NTP Server When using the automatic clock adjustment function enter the domain name or IP address of the NTP server 2 PC This is a PC setting When the check box is selected date and time information is retrieved from the NTP server and the PC internal clock is automatically adjusted at the follow...

Page 45: ...This option can be used to warn the user by buzzer Selecting the check box enables the function to activate the warning buzzer on the PC when the status specified with the following options occurs 1 When the alarm is detected Alarm Clicking the Alarm button in the tool bar stops the buzzer 2 When available space on hard disk runs out Disk Full Clicking the screen stops the buzzer 3 When image sign...

Page 46: ...TSC 25 fps PAL Resolution 720x240 NTSC 720x286 PAL Note The values contained in the table above are only for reference purposes The exact values depend on the system configuration or operating environment When you record the video in higher quality or multiple users access the camera simultaneously the recording may not be performed in the specified frame rate TV format Quality Video data size KBy...

Page 47: ...option other than PC Pre Post 0 100 10 90 20 80 30 70 40 60 50 50 Rate When Alarm area is set to PC 1fps 2fps 3fps MAX When Alarm area is set to the option other than PC NTSC 1fps 2fps 3fps 5fps 10fps 15fps 30fps PAL 1fps 2fps 3fps 5fps 8fps 12 5fps 25fps When you set the Resolution option to 640x480 the available options are 1fps 2fps and 3fps Quality Basic Normal Enhanced Fine Super Fine Resolut...

Page 48: ...s Operating System For the sake of brevity in this manual the word Windows is used for referring to both Microsoft Windows 2000 Operating System and Microsoft Windows XP Operating System Intel and Pentium is a registered trademark or trademark of Intel Corporation and its subsidiaries in the United States and other countries IBM and IBM PC AT are trademarks of International Business Machines Corpo...

Reviews: