5
U
NPACKING AND
I
NSTALLATION
:
1.
Remove contents from the carton.
2.
Read all instructions carefully.
3.
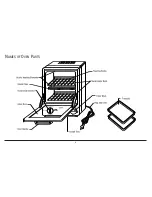
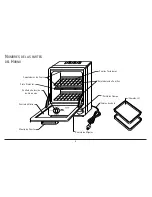
When using the trays, place trays on top of racks.
4.
Make sure that the removable crumb tray (located in the bottom of the
unit) is inserted properly and pushed in until it locks.
G
ENERAL
D
IRECTIONS
1.
Each toasting rack must securely be held in place by the rack holding
rods all the time.
2.
When using trays, always position trays on top of toasting racks. Do not
use trays unless toasting racks are in the toaster/snack maker.
3.
Do not overcrowd trays, as food will not cook evenly or completely.
Trays may warp due to excess weight.
4.
Trays may be lined with aluminum foil for quick and easy cleanup. This
will also help prevent the food from discoloring or staining the trays.
5.
Food residues left on the trays and toasting racks may burn. Be sure to
wash the trays and racks after use.
6.
The timer knob should be set in the OFF position when food is placed in
the toaster/snack maker.
7.
When using only one toasting rack, set the oven selector knob to the TOP
RACK position and place the food on the top toasting rack.
8.
When using both toasting racks, set the oven selector knob to the TOP &
BOTTOM position and place food on both toasting racks.
9.
The crumb tray must be kept clean.
10. The automatic thermostat will maintain the correct temperature by turn-
ing the heating elements on and off. The elements will change from
white to bright red when in use.
11. To prevent overcooking of foods, do not leave the appliance unattended.
12. Do not place anything on top of the unit.
13. Do not use paper, cardboard, plastic or Styrofoam in the oven.

