background image

8

TOASTING OTHER BAKERY ITEMS

1. 

Make sure the crumb tray is in place.

2. 

Make sure the TIMER knob is set to the OFF position.

3. 

Plug into 120-volt AC electrical outlet.

4. 

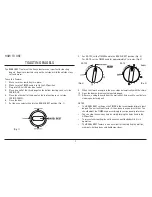
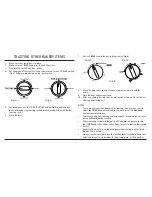
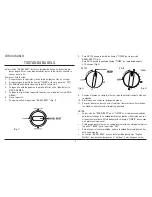
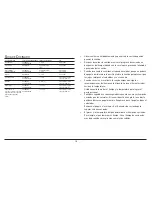
For one piece of toast, set the oven selector knob to the TOP RACK setting
(Fig. 4) and place bread slice on top toasting rack.

5. 

For two pieces, use the TOP & BOTTOM setting (Fig. 5) and place one
piece of bread on top toasting rack and the second piece on the bottom
toasting rack. 

6. 

Close the door.

7. 

Set the TIMER knob to the desired toast color (Fig. 6).

8. 

When the timer has expired, the oven stops automatically with the
chime.

9. 

Open the door and remove items.

10.  After use, unplug the cord from the wall outlet.  Allow unit to cool before

cleaning and storing unit.

NOTES:

These are the recommended times for toasting. However, you should
adjust the TIMER knob accordingly to the thickness of the bread and
your personal preference.

To prevent bread from toasting too long and over-browning, do not leave
oven unattended during toasting.

When removing food while the unit is still in operation, be sure to turn
the TIMER knob to the OFF postition. Now it is safe to remove the toasted
item(s).

Condensation may form on the oven door when toasting moist or fresh
breads. This is normal.

Always use the trays (placed on the toasting racks) for bakery items such
as buttered toast, raisin bread with sugar icing glaze, or filled pastries.

(Fig. 6)

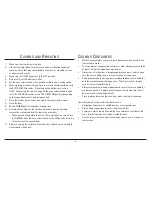
(Fig. 4)

SK-7S

SK-7W

(Fig. 5)

Summary of Contents for SK-7S - Space Saving Two Level Super Toasty Oven

Page 1: ...INSTRUCTION MANUAL TOASTER OVEN SK 7S SK 7W ...

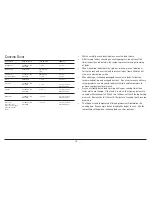
Page 2: ...em for future reference Important Safeguards 3 Names of Oven Parts 4 Unpacking and Installation 5 General Directions 5 Oven Selector Settings 6 How to Use Toasting Bagels 7 Toasting Other Bakery Items 8 Cooking and Reheating 9 Cooking Containers 9 Cooking Guide 10 Cleaning and Storage 11 Specifications 11 Warranty 12 Table of Contents ...

Page 3: ...fety precautions should always be followed including the following 1 Read all instructions 2 Do not touch hot surfaces Use handles or knobs 3 To protect against electrical shock do not immerse cord plugs or body in water or other liquid 4 Close supervision is necessary when any appliance is used by or near children 5 Unplug from outlet when not in use and before cleaning Allow to cool before putti...

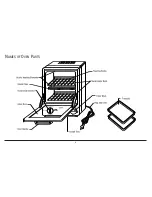
Page 4: ...4 NAMES OF OVEN PARTS ...

Page 5: ...lp prevent the food from discoloring or staining the trays 5 Food residues left on the trays and toasting racks may burn Be sure to wash the trays and racks after use 6 The timer knob should be set in the OFF position when food is placed in the toaster snack maker 7 When using only one toasting rack set the oven selector knob to the TOP RACK position and place the food on the top toasting rack 8 W...

Page 6: ...ing both racks Bottom Rack Only the bottom rack is operating in this mode Best for warming foods Top Rack The top and middle elements are operating in this mode Best for toasting cooking and reheating using TOP RACK Note The middle element may turn red when the toaster is in operation The bottom element may not be as vibrant in color while the top element may remain white Variation in color of the...

Page 7: ...ion Fig 2 For SK 7S set the TIMER knob for approximately 41 2 minutes Fig 3 9 When the timer has expired the oven stops automatically with the chime 10 Open the door and remove the toasted bagels 11 After use unplug the cord from the wall outlet Allow unit to cool before cleaning and storing unit NOTES The BAGEL BEST setting on the TIMER is the recommended time to toast bagels The unit will toast ...

Page 8: ...and remove items 10 After use unplug the cord from the wall outlet Allow unit to cool before cleaning and storing unit NOTES These are the recommended times for toasting However you should adjust the TIMER knob accordingly to the thickness of the bread and your personal preference To prevent bread from toasting too long and over browning do not leave oven unattended during toasting When removing f...

Page 9: ...nings against use in a range or toaster oven COOKING AND REHEATING 1 Make sure the crumb tray is in place 2 Use the trays placed on racks when cooking or reheating foods that contain a sauce that may spill or bubble over such as creamed chicken or macaroni and cheese 3 Make sure the TIMER knob is set to the OFF position 4 Plug into 120 volt AC electrical outlet 5 Set the oven selector knob to the ...

Page 10: ...n cooking progress do not reset the timer longer than indicated in the recipe to prevent smoking or burning of foods When reheating foods that may splatter place a piece of aluminum foil on the rack and over the food to prevent juices from hitting the hot element and creating smoke When baking or reheating packaged convenience foods follow the recommended time on package directions Since toaster o...

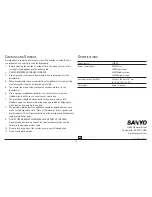
Page 11: ...ften with a damp sudsy cloth Stubborn spots can be removed using a sponge scrubber Wipe again with a damp cloth and dry thoroughly 8 The painted metal body of the appliance should be wiped after each use with a soft damp sudsy cloth Rinse off with damp cloth or sponge and dry thoroughly This will prevent build up of food residue and help prevent the discoloration of paint 9 DO NOT USE ABRASIVE CLE...

Page 12: ...ned in the appropriate model s instruction manual or B the repair of any product whose serial number has been altered defaced or removed This warranty shall not apply to setup installation removal or the product for repair or reinstallation of the product after repair This warranty does not apply to repairs or replacements necessitated by any cause beyond the control of SFC including but not limit...

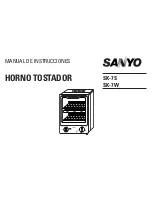
Page 13: ...MANUAL DE INSTRUCCIONES HORNO TOSTADOR SK 7S SK 7W ...

Page 14: ...s Importantes reglas de seguridad 3 Nombres de las partes del horno 4 Como ensamblar 5 Direcciones generales 5 Como trabaja su Horno Tostador 6 Como usarlo Tostando Bagels 7 Tostando Otros Tipos de Comidas 8 Cocinando y Recalentando 9 Cocinando en contenedores 9 Guía de cocinado 10 Limpieza y almacenaje 11 Especificaciones 11 Garantía 12 Contenido ...

Page 15: ...ción de seguridad modificando el enchufe de cualquier forma IMPORTANTES REGLAS DE SEGURIDAD Cuando se utilizan aparatos eléctricos deben de seguirse siempre ciertas pre cauciones de seguridad incluyendo las siguientes 1 Lea todas la instrucciones 2 No toque las superficies calientes Use las manijas o asas 3 Para protegerse contra descargas eléctricas no sumerja el cable el enchufe o el tostador de...

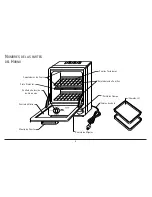
Page 16: ... DEL HORNO Calentadores de Cuarzo Plato Protectos Puerta de Vidrio Manija de Puerta Charola de Migajas Cable y Enchufe Perilla de Tiempo Charolas 2 Sujetadores de Parrillas Parrilas Tostadoras Perilla de Selección de Horneado ...

Page 17: ...a prevenir el decoloramiento de la comida o manchar las charolas 5 Los residuos de comida en las charolas así como en las parrillas pueden quemarse Asegúrese de lavar las charolas y parrillas después de usarse 6 La perilla del tiempo debe de estar situada en la posición de apagado OFF cuando se ponga la comida dentro del tostador 7 Cuando se utilice solamente una parrilla ponga el selector del hor...

Page 18: ...or Solamente Sólo el calentador Inferior está operando en esta modalidad Esta modalidad es la mejor para calentar comidas Parrilla Superior Solamente El calentador Superior y el de en Medio están operando en esta modalidad Esta modalidad es la mejor para tostar cocinar y recalentar Nota El calentador en medio puede ponerse rojo cuando se opera el tostador Puede que el calentador inferior no sea ta...

Page 19: ... 7S ponga la perilla de tiempo TIMER por aproximadamente 4 1 2 minutos Fig 3 9 Cuando el tiempo se cumple el horno se para automáticamente y da una campanda 10 Abra la puerta y remueva los bagels dorados 11 Después de usarse desconecte el cable del tomacorriente Permita que la unidad se enfríe antes de limpiarla y guardala NOTAS La posición de BAGEL BEST en el TIMER es el tiempo recomendado para d...

Page 20: ...bra la puerta y remueva los bocadillos 10 Después de usarse desconecte el cable del tomacorriente Permita que la unidad se enfríe antes de limpiarla y guardarla NOTAS Estos son tiempos recomendados para tostar Sin embargo debe adjustar la perilla de TIMER de acuerdo al grosor del pan y a su gusto personal Para prevenir que el pan se dore demasiado y se queme no deje el horno desatendido mientras e...

Page 21: ...ADO 1 Asegúrese que las parrillas y la charola de migajas estén en su lugar 2 Use las charolas sobre las parrillas cuando cocine o recaliente comidas que contengan una salsa que pueda derramarse o burbujear como la crema de pollo o el macarrón con queso 3 Asegúrese que la perilla de tiempo TIMER esté en la posición OFF 4 Enchúfelo dentro de un tomacorriente de 120 volts de AC 5 Ponga la perilla de...

Page 22: ...s de voltear la comida o revisar el progreso de cocinado no ponga más del tiempo indicado en la receta para prevenir el ahumado o quemado de la comida Cuando recaliente las comidas esta pueden salpicar ponga un pedazo de papel aluminio sobre la parrilla y sobre la comida para prevenir que los jugos salpiquen el calentador y se cree humo Cuando se cocine o recaliente la comida empacada siga las rec...

Page 23: ...ciedad en las parrillas charolas y charola de migajas 7 La puerta de vidrio debe limpiarse frecuenemente con un trapo húmedo secándola también completamente 8 El cuerpo de metal pintado de la unidad debe limpiarse después de cada uso con un trapo suave y húmedo Enjuague con una esponja o trapo y seque completamente 9 NO USE LIMPIADORES CORROSIVOS EN NINGUNA PARTE DEL HORNO Una pasta hecha de bicar...

Page 24: ...les operados por el cliente como se explica en en manual de intrucciones apropiado del modelo o B la reparación de cualquier producto cuyo número de serie ha sido alterado borrado o removido Esta garantía no aplica para el gabinete o las partes cosméticas batería o el mantenimiento de rutina Esta garantía no se aplica en el ajuste instalación movimiento del producto para reparación o re instalació...

Reviews: