76
Chapter 5 Network Viewer & Capture
7
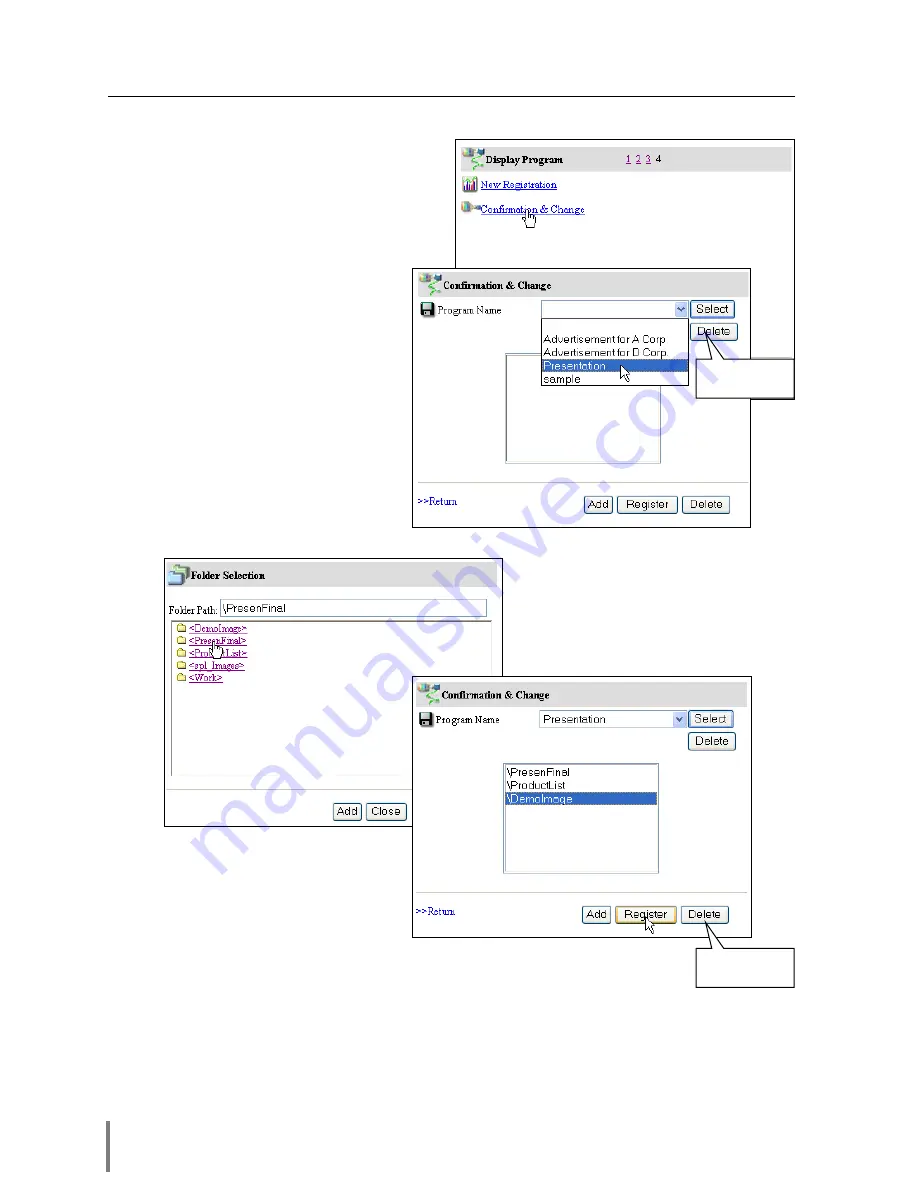
Program Confirmation & Change [4]
1.
Click on “Confirmation & Change”
linked text.
2.
From “Program Name” pull-down
menu button, select the program name
you want to confirm or change.
* Click
Delete
button to delete.
* Click
Select
button to confirm or
change the program. The registered
folder paths are listed on the text
area.
3.
To add a new folder which has
new images into selected pro-
gram, click
Add
button and then
add new folders in the folder
selection window.
* To delete the folder from the pro-
gram, select the folder path and
then click
Delete
button.
4.
After editing the program con-
tents, click
Register
button to
update the program.
Click
>>Return
linked text to
return to the previous control page.
* The folder paths are ordered by creation date, and the files in the folder are ordered by the
ASCII characters.
* To change the order of the folder paths, use the Program Editor software (
☞
p.75).
Deletes the
program
Deletes the
folder path
Summary of Contents for POA-PN02
Page 5: ...Chapter 1 Preparation 5 Network Unit OWNER S MANUAL ENGLISH 1 ...
Page 13: ...Chapter 2 Installation 13 Network Unit OWNER S MANUAL ENGLISH 2 ...
Page 25: ...3 25 Network Unit OWNER S MANUAL ENGLISH Chapter 3 Basic Setting and Operation ...
Page 37: ...Chapter 4 Controlling the Projector 4 37 Network Unit OWNER S MANUAL ENGLISH ...
Page 59: ...Chapter 5 Network Viewer Capture 5 59 Network Unit OWNER S MANUAL ENGLISH ...
Page 78: ...78 Chapter 5 Network Viewer Capture ...
Page 79: ...Chapter 6 Controlling the Multi Projectors 79 Network Unit OWNER S MANUAL ENGLISH 6 ...
Page 85: ...Chapter 7 Use of Serial Port 85 Network Unit OWNER S MANUAL ENGLISH 7 ...
Page 103: ...Appendix B FAQ 103 Network Unit OWNER S MANUAL ENGLISH ...
Page 113: ...113 Network Unit OWNER S MANUAL ENGLISH FAQ ...
Page 114: ...Printed in Japan 1AA6P1P3994 b IDJW SANYO Electric Co Ltd ...


