PLC-WXU10
19
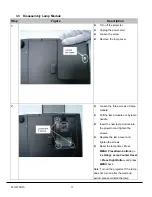
3.3 Disassembly Lamp Module
Step
Figure
Description
1
z
Turn off the projector.
z
Unplug the power cord.
z
Loosen
the
screw
z
Remove the lamp cover.
2
z
Loosen the three screws of lamp
module
z
Pull the lamp module out by lamp
handle.
z
Insert the new lamp module into
the projector and tighten the
screws.
z
Replace the lamp cover and
tighten the screws.
z
Reset the lamp timer. Press
MENU
,
PressDown botton>
go
to
setting> Lamp Counter Reset
> Press Right Button
, and press
MENU
back.
Note: Turn on the projector. If the lamp
does not turn on after the warm-up
period, please reinstall the lamp.
Summary of Contents for PLC-WXU10B
Page 7: ...PLC WXU10 4 1 3 PLC WXU10 System Block Diagram ...
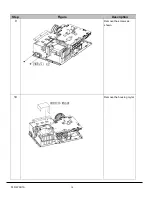
Page 17: ...PLC WXU10 14 Step Figure Description 9 Remove the screws as shown 10 Remove the housing mylar ...
Page 40: ...PLC WXU10 37 6 1 Mechanical Drawing M15 mylar 2 M12 ...
Page 41: ...PLC WXU10 38 6 2 Other drawing ...
Page 42: ...PLC WXU10 39 Projection Lens Assy L02 W07 ...
Page 43: ...PLC WXU10 40 W08 is the UV lens which is used to detect the temperature of panel W08 ...
Page 51: ......
Page 52: ... KJ3A Jan 2008 DC 300 Printed in Japan SANYO Electric Co Ltd ...


