background image

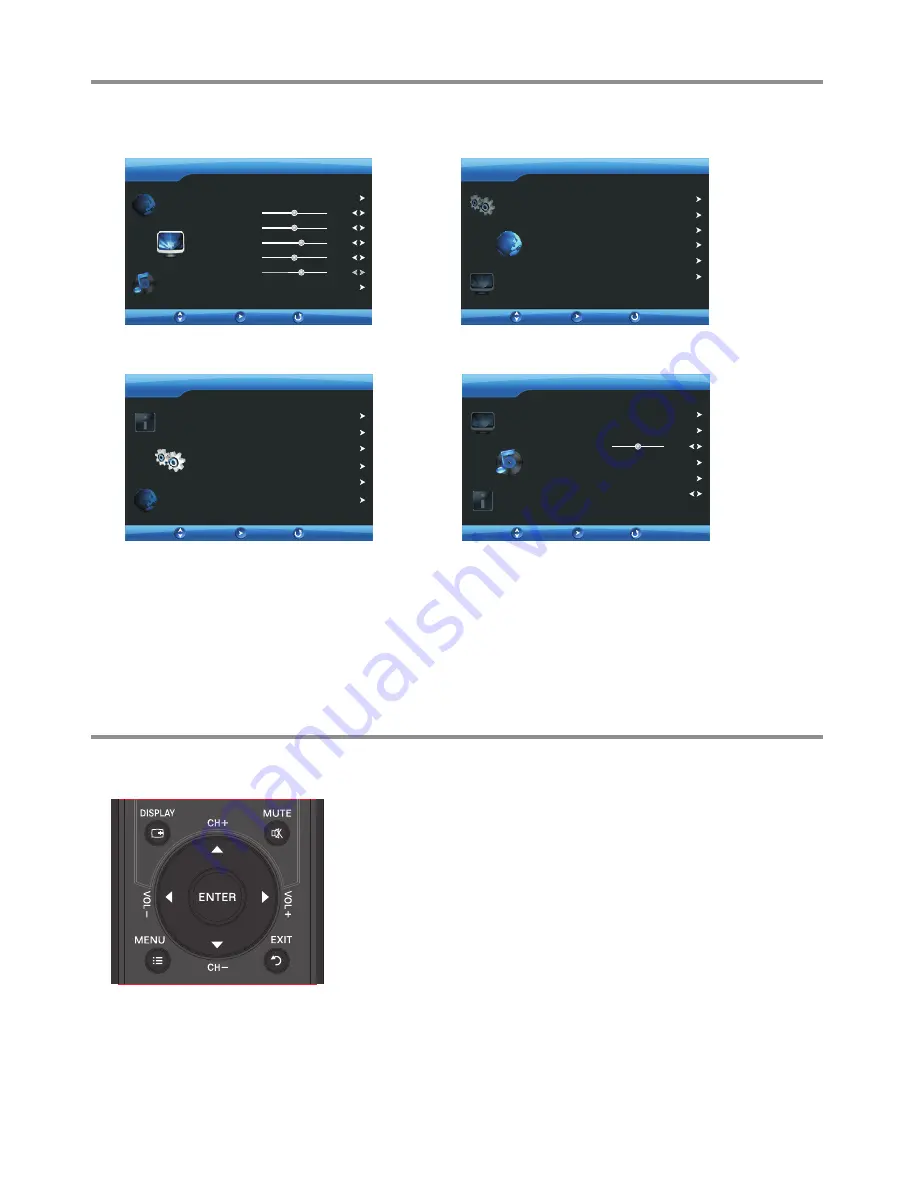
On-screen menu overview 

Basic Operations 

(Continued)

Move


VIDEO

Enter 

Exit 

Contrast

Brightness 

Sharpness


Color 

Hue 

Advanced 

Picture Mode 

User 

49
49

49

62

61

AUDIO

Equalizer

Surround

Balance 

AVC

Sound Mode 

User 

OFF

OFF

0

Sound System 

Auto Scan 

Channel Edit 

Manual Scan 

Color System 

AUTO

BG

OSD Menu


Sleep Mode 

Reset Setting

OSD Skin

OFF 

Blue 

Move


Enter 

Exit 

CHANNEL

Move


Enter 

Exit 

SETTING 

Move


Enter 

Exit 

VIDEO menu 

AUDIO menu 

CHANNEL menu 

SETTING menu 

!

 Press 

MENU 

to call up the OSD main menu.

– The screen will now display

 VIDEO 

menu

.

!

 Press 

6


or 

5

  one or more times to select menu, press 

ENTER

 to 

access the menu.  

– 

VIDEO,


CHANNEL, SETTING, AUDIO

 menu can be selected.

!

 From the menu, press 

5

 or 

6


to select item, press 

3

or

4


to adjust 

the selected item. If a sub-menu exists, press 

ENTER 

or 

4

to open it, 

then  use 

5


6


3

4

to  operate.  To  confirm  the  selection,  press 

ENTER

.   

!

 To return to previous menu, press 

MENU

.

!

 To close the menu, press

 EXIT

Using the OSD (on-screen display) menu

Note: 

·

Depending on the signal tuned, you may see different menu options on your screen. 
The above main menus are illustrated under TV mode.   

·

Menu items that are not selectable are grayed out. If without special indication, this 
manual is described under TV mode. 

·

The illustrations and on-screen displays in this manual are for explanation purposes 
(some are enlarged, others cropped) and may vary slightly from the actual ones. 

To operate the OSD menu:

Country

Others

Language

TT Language 

West Europe

English

Nicam

OFF

13

Summary of Contents for LCD-24XAZ10F

Page 1: ...INSTRUCTION MANUAL LCD 24XAZ10F LCD TV Before connecting operating or adjusting this product please read the manual completely Please keep this manual for future reference ...

Page 2: ...ls 5 Setting Up 7 Connections 8 Basic Operations 12 Memorizing the Channels Setting Channels 14 Adjusting the Picture Adjusting the Sound Adjusting Basic Settings Teletext Operation Adjusting the Computer Image Troubleshooting 24 Specifications 25 Appendix Installing the Stand 26 18 19 20 21 22 Using USB 22 ...

Page 3: ...n Ensuring the television is not overhanging the edge of the supporting furniture Not placing the television on tall furniture for example cupboards or bookcases without anchoring both the furniture and the television to a suitable support Not standing the televisions on cloth or other materials placed between the television and supporting furniture Educating children about the dangers of climbing...

Page 4: ...r electric shock 9 Entering of objects and liquids Never insert an object into the product through vents or openings High voltages are present in the product and inserting an object can cause electric shock and or short internal parts For the same reason do not spill water or liquid on the product 10 Servicing Refer all servicing to qualified service personnel Servicing is required when the appara...

Page 5: ...ry cloth Unplug this product from the wall outlet before cleaning Do not use liquid cleaners or aerosol cleaners Use a damp cloth for cleaning 20 Ventilation Do not block any ventilation openings Install in accordance with the manufacturer instructions The vents and other openings in the cabinet are designed for ventilation Do not cover or block these vents and openings since insufficient ventilat...

Page 6: ... minimum viewing level B Do not display the fixed image for extended periods of time C Turn the power off when not in actual use Important Information Regarding Use of Video Games Computers Captions or Other Fixed Image Displays To clean this unit wipe with a soft dry cloth If the surfaces are extremely dirty use a soft cloth dipped in a soap and water solution or a weak detergent solution Use eye...

Page 7: ...te it Second touch will fulfill its function Be sure button presses must be quickly done before the illumination disappears and it is suggested to touch the sensor center otherwise the operation may not fulfill successfully 5 1 2 INPUT MENU CH VOL 3 4 5 6 7 INPUT MENU CH VOL 1 2 3 11 4 5 6 7 8 9 10 USB SCART PC IN AUDIO VGA S VIDEO RS 232 AV OUT VIDEO L AUDI O R Y C P r r C P b b AUDI O HDMI 1 USB...

Page 8: ...Teletext 17 HDMI Press to switch to HDMI mode 18 AUTO STEREO Selects Stereo or Mono In VGA mode press to automatically adjust PC image settings 19 TV Press to switch to TV mode 20 VIDEO Press repeatedly to cycle between SCART SVIDEO inputs 21 FREEZE To freeze the current picture 22 MUTE Press to mute the sound Press again to restore 23 EXIT Exits the menu screen 24 PICTURE Selects picture mode 25 ...

Page 9: ... the and symbols in the battery compartment 2 Replace the cover 3 Selecting a location You should select a location for the TV Where direct light does not reflect on the screen That has indirect and soft lighting Where the TV has access to an antenna or cable TV connection Where the TV has access to a power outlet Note Watching TV in total darkness or with a reflection on the screen may cause eyes...

Page 10: ...is illustration is for reference only The AC plug may be different on different models Connections When connecting an external device to the TV make sure that the TV and the device are turned off Check the plugs on the ends of cables to make sure that they are the correct type before you try plugging them into jacks on the TV Make sure that all plugs are securely inserted into the jacks Loose conn...

Page 11: ...o select HDMI then press ENTER to confirm Note You can also press HDMI button for HDMI 3 Turn on the HDMI device and set it to the correct mode Refer to the instructions that came with the HDMI device If the external device has DVI output only use a DVI to HDMI adapter cable to connect to the HDMI terminal Connect the audio cable to the PC IN AUDIO jack on the TV rear Connecting a USB device TV Si...

Page 12: ...tton for VGA 3 Turn on your computer and adjust the display properties as required To play video from the computer Connect a VGA cable between the VGA jack on the computer and the VGA input jack on the unit Connect an Audio cable between the AUDIO output on the computer and AUDIO input jack on the unit TV REAR Component Audio cable Component video device video cable Component cables often have red...

Page 13: ...AR AV cable Connecting device with 21 pin Scart Connect the SCART Cable between the TV and external device through the 21 pin SCART socket To connect to external device with AV terminals you may use 21 pin Scart Converter to connect to SCART socket To connect device with 21 pin Scart 1 Turn on your TV then press INPUT button The Input menu opens 2 Press 5 or6 to select SCART then press ENTER to co...

Page 14: ...or the channel to change Note Button presses must be within three seconds of each other To go to the previous channel viewed press To browse among your favorite channels you setup press FAVORITE button repeatedly Adjusting the volume Press the VOL or VOL to increase or decrease the volume Press the MUTE button to temporarily turn off the sound To restore the sound press the MUTE button again To ad...

Page 15: ...DIO menu can be selected From the menu press 5 or 6 to select item press 3 or4 to adjust the selected item If a sub menu exists press ENTER or 4 to open it then use 5 6 3 4 to operate To confirm the selection press ENTER To return to previous menu press MENU To close the menu press EXIT Using the OSD on screen display menu Note Depending on the signal tuned you may see different menu options on yo...

Page 16: ...n to search programs manually To manual scan for channels 2 3 Press 6 or 5 to highlight Manual Scan then press ENTER 4 Press3 to scan towards lower frequency press4 to scan towards higher frequency If the program found is not the one you desire press 3 4 until you get the desired program then this program is stored in the current channel position 5 65 75MHz Exit Adjust Manual Scan Current Channel ...

Page 17: ... Edit Manual Scan Color System AUTO I CHANNEL Move DK BG L I Return OK Return Country Country 2 3 Press 6 or 5 to highlight Channel Edit then press ENTER 4 Press 6 or 5 to highlight FineTune then use 3 or4 to manually fine tune until the best possible picture and sound are achieved Or you can turn AFC function to ON to automatically fine tune the program In Channel Edit sub menu highlight AFC and ...

Page 18: ...ystem Auto Scan Channel Edit Manual Scan Color System AUTO CHANNEL Move Enter To sort programs 1 Press MENU then press 6 or 5 to display CHANNEL menu press ENTER to access Press 6 or 5 to highlight Channel Edit then press ENTER 2 Highlight Current Channel then press 3 or4 to select a current channel number which you want to swap 3 Highlight Target Channel then press 3 or4 to select a target channe...

Page 19: ...ANNEL Move Enter BG Return Country Others CHANNEL Current Channel Target Channel Channel Swap Skip Channel FineTune AFC Fav CH Channel Label 1 9 OFF OFF OFF Move OK Return OFF OFF ON 0 Setting Channel Label Label channels to make it easier to identify To Label channels 1 Use channel select buttons to select a channel you want to label Or go to Channel Edit sub menu make use of Current Channel menu...

Page 20: ...cts the aspect ratio of the picture You can select Auto Selects the correct aspect ratio automatically 4 3 Shows picture in 4 3 display mode 16 9 Shows a full screen picture in 16 9 mode Zoom1 Enlarges the picture vertically The top and bottom may be cropped Zoom2 Enlarges the picture both horizontally and vertically The edges may be cropped Panorama Stretches the picture at the edges but maintain...

Page 21: ...rate You can select 3 To close the menu press EXIT button Normal Music Movie News 0db 6db 6db 0 0 0 0 0 0 1K 2K 3K 8K 300 15K hz AUDIO Move Adjust Return Return User Equalizer Setting Sub Menu Adjusting the Sound Nicam OFF You can quickly select sound multiplex mode by using the AUTO STEREO button on the remote control This enables the selection of the reception mode when receiving a NICAM signal ...

Page 22: ...ur TV to wait before it automatically turns off To cancel sleep mode select OFF Note You can also press SLEEP to set the sleep timer OSD Skin Selects skin for OSD menu display Reset Setting Resets all settings of the current source to defaults Operate according to on screen instructions OSD Time Selects menu displaying time on the screen Press 6 or 5 to highlight an option press ENTER to access th...

Page 23: ...as are displayed at the bottom of the screen The 4 coloured buttons are used to access the items or corresponding pages Hold button Certain pages contain sub pages which are automatically displayed successively This button is used to stop or resume sub page acquisition Reveal button Press the button to reveal the concealed information such as games solutions Press the button again to hide the info...

Page 24: ...res or play compatible MP3 audio Switching to USB mode To switch to USB mode 1 Make sure that you have connected the USB device to the USB port on the side of your TV 2 Press INPUT button 3 Press 6 or 5 to select USB then press ENTER Or you can press USB button on the remote control to switch to USB mode directly Exit Adjust Return Notes Never remove the USB device or turn off the TV while using t...

Page 25: ...ou can select Slide Show Selects slide show speed You can select Slow Normal or Fast Slide Effect Selects a transition effect when moving to the next photo in the slide show You can select B to T Bottom to Top T to B Top to Bottom R to L Right to Left L to R Left to Right Snake Cross Diagonal RandomBox Waterfall or NoEffect Music Repeat Turns it on to repeat playing music when it reaches end Turns...

Page 26: ...uld be station trouble Adjust the antenna Move the TV away from noise sources such as cars neon signs or hair dryers Using a highly directional outdoor antenna may solve the problem Good picture no sound The sound may be muted Press MUTE again to cancel Audio noise Communication problems may occur if infrared communication equipment e g infrared cordless headphones is used near the TV Move the inf...

Page 27: ... be changed for the sake of improvement Note 25 Type LCD TV Panel 24 60 cm TFT LCD TV system PAL BG NTSC AV Power Requirement AC 220 240 V 50 60 Hz Power Consumption 60W Dimensions W x H x D with stand 574 428 188 mm Weight with stand 5 kg Terminals Antenna in 1 S Video in 1 COMPONENT in 1 PC in 1 HDMI in 1 SCART 1 Headphone 1 USB port 1 AV out 1 RS 232 1 Audio out 3W 2 ...

Page 28: ...tical surface you must remove the stand column If the stand is provided please read these instructions thoroughly before attempting this installation NOTE The appearance of this product in these illustrations may differ from your actual product and is for comparative purposes only 26 To install the stand Installing the stand Stand Locators Secure with three screws To remove the stand from the TV p...

Page 29: ...5944039030 Ver 1 0 ...

Reviews: