background image

-E32-

Language

Display

Audio

Parental

OSD
Audio
Subtitle
DVD Menu

English

Disc
Disc
Disc

Language

Display

Audio

Parental

OSD
Audio
Subtitle
DVD Menu

English

Disc
Disc
Disc

English

Español

Français

Deutsch

Portugues

Language

Display

Audio

Parental

TV Type

4:3 LB

4:3 LB

4:3 PS

16:9

Setting Language

1. Press [SETUP] in the stop mode.

The setup screen appears.
“Language” is highlighted.

2. Press [ENTER].

“Language” screen appears.

3. Press [

p

] or [

o

] to select the item (highlighted).

Example:

INITIAL SETTINGS

Once the initial settings have been completed, the unit can
always be operated under the same conditions.
The settings will be retained in the memory until they are changed,
even if the power is turned off.

Notes:

In this instruction manual, the language in on-screen
display is English.
If you change the language, please follow the selected
language in on-screen display.

You cannot switch audio sound track languages if there is
only one language recorded on the disc.

When you play back a DVD video disc, the unit automatically
displays the pre-selected subtitle language if it is included on
the disc.

For improvement, on-screen displays subject to change
without notice.

Setting Display

1. Press [SETUP] in the stop mode.

The setup screen appears.

2. Press [

a

] to select “Display”.

3. Press [ENTER].

“Display” screen appears.

4. Press [ENTER].

The submenu (“4:3 LB”, “4:3 PS” and “16:9”) appears.

5. Press [

p

] or [

o

] to select the appropriate setting for your TV

screen size.
Example: To select “4:3 PS”

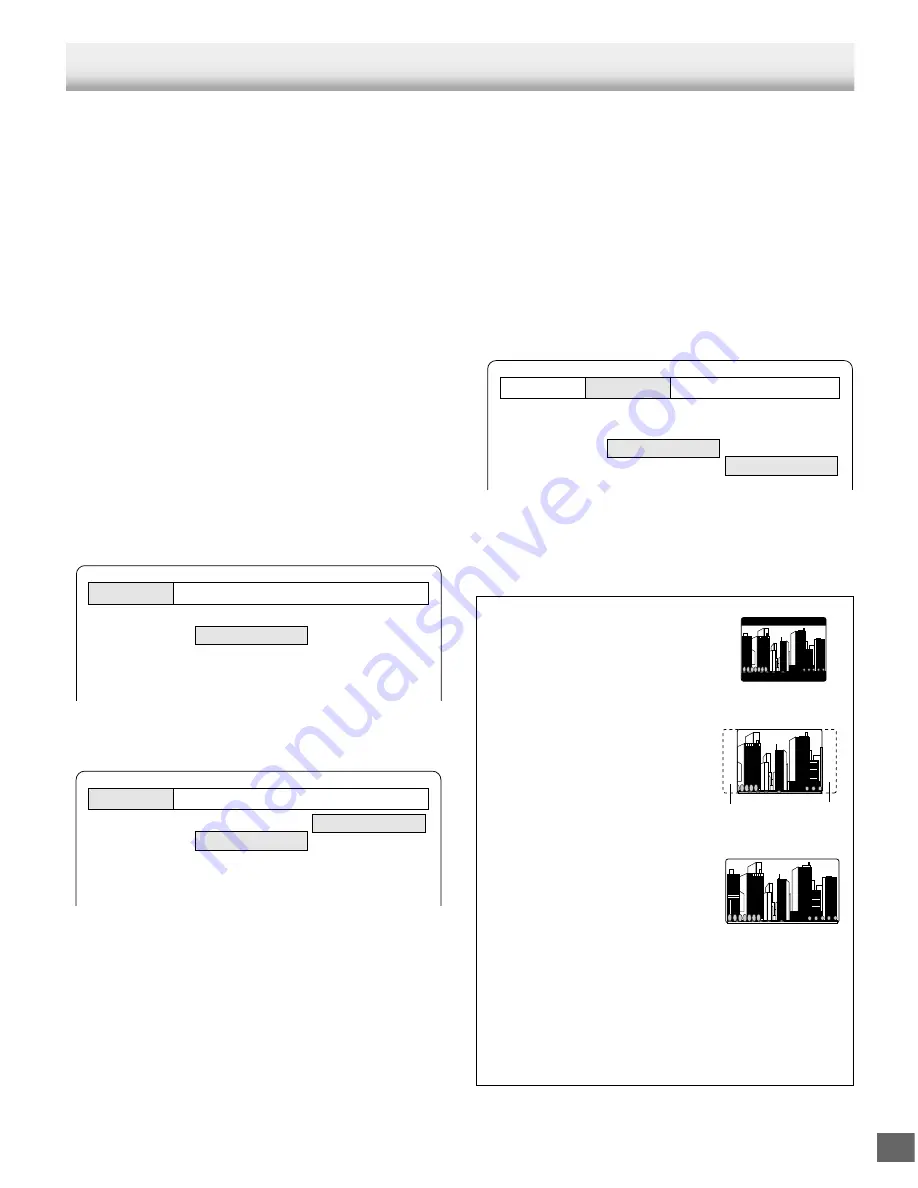
Cut off

Cut off

4:3 LB (Letterbox):
Select when a conventional TV set is
connected.
When the wide screen disc is played
back, the black bands appear at the
top and bottom of screen.

4:3 PS (Panscan):
Select when a conventional TV set is
connected.
When the wide screen disc is played
back, it displays pictures cropped to
fill to your TV screen. The left and
right edges are cut off.

16:9 :
Select when a wide screen TV set is
connected.
Played in “FULL” size. (Setting the
wide screen TV to “FULL” mode is
also necessary.)

Notes:

The screen size may differ depending on the DVD video
discs.

If you select 16:9 to get rid of the black bands on screen
when wide screen disc is played back, picture may be
slightly distorted.

In some discs, even if 4:3 PS is selected, the black bands
may remain on the screen.

4. Press [ENTER].

The submenu appears.
Example:

5. Press [

p

] or [

o

] to select the language (highlighted).

6. Press [ENTER].

The selected language remains.

7. Repeat steps 3 ~ 6 for other items.

Note:
If  “Others” is selected, enter the language code. (See
“Language Code List” on page E35.)

8. Press [

o

] to skip back to the setup screen (or press [SETUP]).

6. Press [ENTER].

(In this example, “TV Type 4:3 PS” remains.)

7. Press [

o

] to skip back to the setup screen (or press [SETUP]).

Summary of Contents for DWM-2500

Page 1: ...e Theater System 1AD6P1P1839 DWM 2500 Issue Number 1 DWM 2500 SANYO S HELP LINE Call the toll free number below if you have any difficulties operating this product 1 800 813 3435 Weekdays 7 30 AM 4 00 PM Central Time TM English ...

Page 2: ...ow Motion Playback DVD E20 Still Picture Pause E20 Frame by Frame Advance Playback DVD E20 Picture Zoom Pin Point Zoom DVD E21 Viewing from a Desired Camera Angle Multi Angle DVD E21 Angle Replay E21 Repeat Playback E22 Designated Range Repeat Playback A B Repeat E22 Random Playback CD E23 Programmed Playback CD E23 Selecting Subtitle Language DVD E24 Selecting Audio Soundtrack Language Multi Lang...

Page 3: ...EL WARNING UNAUTHORIZED RECORDING OF COPY RIGHTED MATERIAL MAY VIOLATE APPLICABLE COPYRIGHT LAWS THE MANUFACTURER ASSUMES NO RESPONSIBILITY FOR UNAUTHORIZED DUPLICA TION USE OR OTHER ACTS WHICH INFRINGE UPON THE RIGHTS OF COPYRIGHT OWNERS CAUTION RISK OF ELECTRIC SHOCK DO NOT OPEN ACCESSORIES RB TS760MT wireless remote control Front left speaker cable Length Approx 16 4 feet 5 meters Front right s...

Page 4: ...Connect the equipment into an outlet on a circuit different from that to which the receiver is connected Consult the dealer or an experienced radio TV technician for help Do not damage the power cord When not in use disconnect the power cord from the outlet Grasp the plug not the cord when disconnecting the unit If water should enter the unit electrical shock or a malfunction may result Use in an ...

Page 5: ... indicators ALL REP 1 A B 16 Program indicator PGM 17 Dolby Pro Logic indicator s PL 1 Dolby Digital indicator s D 2 DTS indicator DTS 3 Play indicator a 4 Last memory indicator L M 5 Pause indicator k 6 PM3 indicator MP3 7 WMA indicator WMA 8 Title and Track indicator T 9 Message or number indicators Title chapter track playing time or other information Manufactured under license from Dolby Labor...

Page 6: ... button MUTE Bass button BASS Sound preset button SOUND Function button FUNCTION Volume buttons VOLUME 6 Shift button SHIFT 7 Open Close button OPEN CLOSE 8 Return button RETURN See page E29 9 Clear Trim button CLEAR TRIM Note At Trimming mode press the button while holding the SHIFT button down See page E14 10 Test tone button TEST See page E14 11 Menu button MENU 12 Directional arrow buttons o a...

Page 7: ...elow find the code corresponding to your brand of TV 2 While holding down TV POWER enter the 2 digit code using the number buttons 0 9 then release TV POWER The remote control is now set to operate your TV TV brands Code ADMIRAL 05 10 13 EMERSON 17 FISHER 03 GE 07 GOLD STAR 01 HITACHI 02 JVC 15 MAGNAVOX 08 MATSUSHITA 12 18 MITSUBISHI 14 PANASONIC 12 18 QUASAR 12 18 RCA 06 SAMSUNG 16 SANYO 03 SHARP...

Page 8: ...t shorting to adjacent wires as shown below Label of Speaker Wire Color Tube Use Positive Polarity FRONT R Red Front right speaker FRONT L White Front left speaker CENTER Green Center speaker REAR R Gray Surround right speaker REAR L Blue Surround left speaker SUBWOOFER Violet Subwoofer Red Black Red Black Front right speaker Front left speaker Center speaker Surround right speaker Surround left s...

Page 9: ... all the same and can be used for Front left and right Center Surround left and right speakers The front center and surround speakers should be placed at approximately the same distance from the listening position Place the front left and right speakers either side of the TV Place the center speaker directly above the TV Place the surround speakers either sides of the listening position or slightl...

Page 10: ...annot connect it to an antenna terminal of TV Video cable supplied To VIDEO INPUT jack To MONITOR OUT VIDEO jack Yellow Partial back panel Need help Call 1 800 813 3435 Using MONITOR OUT S VIDEO jack Note Please follow the steps before turn on the power 1 If your TV has the S VIDEO INPUT jack connect the S video cable not supplied between the MONITOR OUT S VIDEO jack of the unit and the S VIDEO IN...

Page 11: ...ble not supplied between the TO TV OUT terminal of the VCR and the ANT IN terminal of the RF Modulator 3 Connect the 75 ohm coaxial cable not supplied between the TO TV terminal of the RF Modulator and the VHF UHF ANTENNA IN terminal of the TV 4 Connect the audio cables not supplied between the VIDEO AUDIO IN 1 or 2 jacks of the unit and the AUDIO OUT jacks of the VCR Use the red connectors for th...

Page 12: ...at the cable ground shall be connected to the grounding system of the building as close to the point of cable entry as practical Screws not supplied FM outdoor antenna not supplied AM loop antenna Antenna discharge unit not supplied FM indoor antenna lead wire 75 ohm coaxial cable not supplied CAUTION When installing an outdoor antenna follow the installation instructions in the attached IMPORTANT...

Page 13: ...he display changes as follows DVD CD VIDEO 1 VIDEO 2 FM TUNER AM TUNER When the source selection is changed disc playback automatically stops Adjusting the volume Rotate VOLUME or press VOLUME or on the remote control The volume level appears on the FL display VOL 0 VOL MAX To reduce the volume temporarily muting Press MUTE on the remote control MUTE blinks on the FL display To restore the previou...

Page 14: ...Subwoofer The surround mode is set to Q Surround 5 1 channel surround sound The surround mode is set to Q Surround 5 1 channel surround sound For 2 channel source it uses Virtual 5 1 channel surround sound When using a monaural source select this mode It uses Virtual 5 1 channel surround sound The surround mode is set to 2 1 channel Front left and right speakers and Subwoofer Notes DVD video discs...

Page 15: ...or until the test tone becomes a comfortable level 5 If the test tone level is not the same from each speaker press p or o to adjust it while the speaker is activated The level appears on the TV screen and FL display Front L 0 10 appears Center 10 10 appears Front R 0 10 appears Surround R 10 10 appears Surround L 10 10 appears If necessary repeat this step again 6 Press TEST to turn the test tone...

Page 16: ...y method claims of certain U S patents and other intellectual property rights owned by Macrovision Corporation and other rights owners Use of this copyright protection technology must be authorized by Macrovision Corporation and is intended for home and other limited viewing uses only unless otherwise authorized by Macrovision Corporation Reverse engineering or disassembly is prohibited Handling S...

Page 17: ...for TV Note You must set the remote control code for TV first See Page E6 1 Press TV POWER to turn on the power When using the remote control the Transmitter Window on the remote control must be pointed toward your TV 2 Press TV VIDEO to select the video input source 3 Set the TV volume minimum Notes Only remote controlled TVs can be operated using this remote control Refer to your TV instruction ...

Page 18: ...LAY for DVD only 1 Press L MEMO to stop playback Last Memo n appears briefly on the TV screen L M and STOP appear on the FL display 2 Remove the disc or turn off the power 3 Load the disc and press a or turn on the power Last Memo Play appears on the TV screen 4 Press 4 to select Yes 5 Press ENTER Playback resumes from the point where you stopped If desired press L MEMO again Notes Point on up to ...

Page 19: ... 5 b or a or the number buttons to select the desired menu 3 Press ENTER The selected menu playback starts Important Note may appear on the TV screen during operation This icon means that the function is not available on the disc now Chapter Track Skip Skipping forward Press e during playback to skip to the next chapter or track e appears briefly on the TV screen A chapter or track is skipped each...

Page 20: ... select Chapter No 24 press 2 then 4 Note If you make a mistake press CLEAR 3 Press a Playback starts from the selected chapter Time Search DVD 1 Press SEARCH MODE three times while holding SHIFT down during playback The time search screen appears on the TV screen 2 Press the number button s to enter the time Example 20 minutes 5 seconds Press 2 0 0 and 5 42 minutes 39 seconds Press 4 2 3 and 9 1 ...

Page 21: ...erse slow playback Press R SLOW repeatedly to select the reverse slow speed playback 1 v 2 v 3 v 4 4 steps Press a to return to normal playback Note The sound is muted during slow motion playback Still Picture Pause Press k during playback k appears on the FL display k appears briefly on the TV screen DVD Still picture mode CD Pause mode Press a to return to normal playback Note The sound is muted...

Page 22: ...ti Angle DVD 3 Press ZOOM while holding SHIFT down The screen is magnified more than 1 2 appears briefly on the TV screen If necessary press o a p or b repeatedly to move the screen as desired 4 To return to the original screen press ZOOM while holding SHIFT down Off appears briefly on the TV screen Note Pin Point Zoom may not work on some discs 3 5 Some DVD video discs may contain scenes which ha...

Page 23: ...B repeat playback mode may not work correctly with some discs Repeat Playback Press REPEAT during playback or programmed or random playback of the title or track you want to repeat Each time the button is pressed the repeat mode will be changed as follows DVD TV screen FL display Operation Chapter REP 1 Repeat of chapter being played Title ALL REP Repeat of title being played Off Normal playback m...

Page 24: ...ontents are retained in memory Note To play the program again press PROGRAM RANDOM twice to call up the Program Mode screen then press a Random Playback CD 1 Press PROGRAM RANDOM once in the stop mode Random appears on the TV screen RND blinks on the FL display 2 Press a to begin random playback RND remains lit on the FL display The unit will automatically select tracks at random Notes To stop ran...

Page 25: ...ed language is not selected even if the button is pressed the language is not available on the disc When the power is turned on or the disc is replaced select the subtitle language again If the subtitle language is not necessary press S T ON OFF to select Off Please refer to Setting Language on page E32 Selecting Audio Soundtrack Language Multi Language DVD This operation works only with discs on ...

Page 26: ...yback 2 Press ON SCREEN again Selecting Picture Mode Press PICTURE MODE to show the picture mode Each time the button is pressed the picture mode changes as follows Standard x Mild x Black and White x Standard 3 Press ON SCREEN to close the disc information Chapter remaining playing time Title elapsed playing time Title elapsed playing time Chapter remaining playing time Title number Chapter numbe...

Page 27: ...OPERATION In this instruction manual the language in on screen display is English If you change the language see page E32 please follow the selected language in on screen display Note If TVG Mode is not necessary select Off 7 Press ENTER TVG Mode Strict remains 8 Press p to select TVG CC Closed Caption 9 Press ENTER The submenu Off CUSS and On appears 10 Press p to select On Note If TVG CC Off is ...

Page 28: ...S CC2 Mute the swear word Display the modified text only On CC2 Mute the swear word Display all text with the modified text Setting TVGuardian Operation TV CC1 or C1 TVG Mode TVG CC TVG CC Ch Sound Closed Caption Off _______ CC2 Original sound Original text Moderate Off CC2 Mute the swear word No display CUSS CC2 Mute the swear word No display On CC2 Mute the swear word No display Strict Off CC2 M...

Page 29: ...ng frequency and 128kbps of constant bit rate WMA CD When creating a WMA disc be sure the copyright function is off WMA files must have the extension letters WMA or wma Standard sampling frequency and the bit rate WMA version 7 and 8 32kHz 48kbps 64kbps 44 1kHz 48kbps 192kbps 48kHz 128kbps 192kbps DRM files cannot be played back Microsoft Windows Media and Windows Logo are trademarks or registered...

Page 30: ...uring playback k appears briefly on the TV screen k appears on the FL display Note The sound is muted Press a to return to normal playback File Skip Skipping forward Press e during playback to skip to the next file e appears briefly on the TV screen Skipping backward Press f during playback to skip back to the beginning of the file currently play f appears briefly on the TV screen Press the button...

Page 31: ...sume the slide show If the picture appears upside down or sideways please do the following steps 1 Press k if necessary 2 Press ANGLE repeatedly while holding SHIFT down until it s right side up or Normal appears briefly on the TV screen 3 Press a or k to skip to the next picture and continue the slide show If you press e or f during the slide show it skips to the next picture or previous picture ...

Page 32: ...ip to the next picture and continue the slide show If you press e or f during the slide show it skips to the next file or previous file After the last file has displayed the file list appears Notes To stop the slide show press n The file list appears If the disc is loaded with the label side downward or if a badly scratched disc is loaded No Play appears on the TV screen If this occurs load the di...

Page 33: ...2 Press a to select Display 3 Press ENTER Display screen appears 4 Press ENTER The submenu 4 3 LB 4 3 PS and 16 9 appears 5 Press p or o to select the appropriate setting for your TV screen size Example To select 4 3 PS Cut off Cut off 4 3 LB Letterbox Select when a conventional TV set is connected When the wide screen disc is played back the black bands appear at the top and bottom of screen 4 3 ...

Page 34: ...0ms 15 feet Approx 457 5cm 15ms 14 Press ENTER Surr Delay and the selected delay time remain 15 Press o to skip back to the setup screen or press SETUP D1 The distance from the front speaker D2 The distance from the center speaker D3 The distance from the surround speaker Front left speaker Front right speaker Center speaker Surround left speaker Surround right speaker D1 D2 D3 D3 D1 Need help Cal...

Page 35: ...e content of movie programs The parental lock level is equivalent to the following MPAA Rating System Level 7 NC 17 No one 17 and under admitted Level 6 R Restricted Level 4 PG 13 Parents strongly cautioned Level 3 PG Parental guidance suggested Level 1 G General audiences Some DVD discs contain a restriction level which enables parents to prevent playback of discs by children This unit is equippe...

Page 36: ... 7579 ko Korean 7583 ks Kashmiri 7585 ku Kurdish 7589 ky Kirghiz 7665 la Latin 7678 ln Lingala 7679 lo Laothian 7684 lt Lithuanian 7686 lv Latvian Lettish 7771 mg Malagasy 7773 mi Maori 7775 mk Macedonian 7776 ml Malayalam 7778 mn Mongolian 7779 mo Moldavian 7782 mr Marathi 7783 ms Malay 7784 mt Maltese 7789 my Burmese 7865 na Nauru 7869 ne Nepali 7876 nl Dutch 7879 no Norwegian 7967 oc Occitan 79...

Page 37: ... presetting begins from the low end of the band When 24 FM or 12 AM stations have been preset or the high end of the band is reached automatic presetting stops PGM disappears and the station memorized on channel 1 will be heard 3 To preset stations on the other band follow steps above Note If APT is activated all previously programmed stations of the band will be cleared and new stations will be p...

Page 38: ...steps 522 1710 kHz 9 kHz steps FM 87 9 107 9 MHz 200 kHz steps 87 5 108 0 MHz 50 kHz steps 3 While PGM is blinking press PRESET or PRESET to select the channel to be preset The number buttons on the remote control can also be used In this example the channel is 9 4 While PGM is blinking press ENTER In this example 103 1 MHz FM station is preset on FM channel 9 5 Repeat steps above to add more pres...

Page 39: ...de out during the 1 minute period before the unit turns off There are 4 time periods available 30 60 90 and 120 minutes Press SLEEP repeatedly while holding SHIFT down to select the desired sleep time SLEEP and the selected time blink on the FL display After several seconds the original display returns and the brightness of the display reduces SLEEP blinks To check the remaining sleep time Press S...

Page 40: ...e disc Check the disc logo type color system and Regional code See page E15 Select the correct input function on the TV Connect the video cable into the jack Turn up the volume Select the correct function Connect the speaker wires firmly to the speaker terminals See page E7 Connect the speaker wires firmly to the speaker terminals See page E7 Load a playable disc Check the disc logo type color sys...

Page 41: ...B 0 7 Vp p 75 Ω PR 0 7 Vp p 75 Ω MONITOR OUT S VIDEO Y 1 0 Vp p 75 Ω C 0 286 Vp p 75 Ω MONITOR OUT VIDEO 1 0 Vp p 75 Ω DVD Video Player Section Type DVD Video player Signal format NTSC color Laser Semiconductor laser wavelength 650 nm 790 nm Signal to noise ratio More than 105 dB Wow and flutter Below measurable level Tuner Section FM Frequency range 87 9 MHz 107 9 MHz 200 kHz steps Usable sensiti...

Page 42: ...y to the cabinet or cosmetic parts broken or damaged video heads batteries or routine maintenance 3 This warranty does not apply to uncrating setup installation removal of the product for repair or reinstallation of the product after repair 4 This warranty does not apply to repairs or replacements necessitated by any cause beyond the control of SANYO including but not limited to any malfunction de...

Reviews: