background image

– 3 –

EN

1.


Read these instructions.

2.

  Keep these instructions.

3.

  Heed all warnings.

4.

  Follow all instructions.

5.

  Do not use this apparatus near water.

6.

  Clean only with dry cloth.

7.

  Do not block any ventilation openings. Install in

accordance with the manufacturer’s instructions.

8.

  Do not install near any heat sources such as 

radiators, heat registers, stoves, or other apparatus 
(including amplifiers) that produce heat.

9.

  Do not defeat the safety purpose of the polarized 

or grounding-type plug. A polarized plug has two 
blades with one wider than the other. A grounding 
type plug has two blades and a third grounding 
prong. The wide blade or the third prong are 
provided for your safety. If the provided plug does 
not fit into your outlet, consult an electrician for 
replacement of the obsolete outlet.

10.

  Protect the power cord from being walked on or 

pinched particularly at plugs, convenience 
receptacles, and the point where they exit from the 
apparatus.

11.

  Only use attachments / accessories specified by 

the manufacturer.

12.

  Use only with the cart, stand, tripod, 

bracket, or table specified by the 
manufacturer, or sold with the 
apparatus. When a cart is used, 
use caution when moving the 
cart / apparatus  combination  to 
avoid injury from tip-over.

13.

  Unplug this apparatus during lightning storms or

when unused for long periods of time.

14.

  Refer all servicing to qualified service personnel.

Servicing is required when the apparatus has 
been damaged in any way, such as power-supply 
cord or plug is damaged, liquid has been spilled 
or objects have fallen into the apparatus, the 
apparatus has been exposed to rain or moisture, 
does not operate normally, or has been dropped.

FCC WARNING

This equipment may generate or use radio frequency energy. Changes or modifications to this equipment may cause harmful 
interference unless the modifications are expressly approved in the manual. The user could lose the authority to operate this 
equipment if an unauthorized change or modification is made.

RADIO-TV INTERFERENCE

This equipment has been tested and found to comply with the limits for a Class B digital device, pursuant to Part 15 of the 
FCC Rules. These limits are designed to provide reasonable protection against harmful interference in a residential installation. 
This equipment generates, uses, and can radiate radio frequency energy and, if not installed and used in accordance with the 
instructions, may cause harmful interference to radio communications. However, there is no guarantee that interference will not 
occur in a particular installation. If this equipment does cause harmful interference to radio or television reception, which can be 
determined by turning the equipment off and on, the user is encouraged to try to correct the interference by one or more of the 
following measures:

1)

 Reorient or relocate the receiving antenna.

2)

 Increase the separation between the equipment and receiver.

3)

 Connect the equipment into an outlet on a circuit different from that to which the receiver is connected.

4)

 Consult the dealer or an experienced radio / TV technician for help.

Continued on next page.

The model and serial numbers of this unit may be found on the cabinet.
You should record and retain those numbers for future reference.

Serial No.:

Model No.:

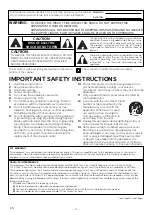
WARNING:


TO REDUCE THE RISK OF FIRE OR ELECTRIC SHOCK, DO NOT EXPOSE THIS
APPARATUS TO RAIN OR MOISTURE.
APPARATUS SHALL NOT BE EXPOSED TO DRIPPING OR SPLASHING AND NO OBJECTS
FILLED WITH LIQUIDS, SUCH AS VASES, SHALL BE PLACED ON THE APPARATUS.

CAUTION: 

TO REDUCE THE RISK OF ELECTRIC SHOCK, DO NOT 
REMOVE COVER (OR BACK). NO USER SERVICEABLE 
PARTS INSIDE. REFER SERVICING TO QUALIFIED 
SERVICE PERSONNEL.

CAUTION

RISK OF ELECTRIC 

SHOCK DO NOT OPEN

The exclamation point within an equilateral triangle 
is intended to alert the user to the presence of 
important operating and maintenance (servicing) 
instructions in the literature accompanying the 
appliance.

The lightning flash with arrowhead symbol, within an 
equilateral triangle, is intended to alert the user to the 
presence of uninsulated “dangerous voltage”


within 

the product’s enclosure that may be of sufficient 
magnitude to constitute a risk of electric shock to 
persons.

The important note and rating are located on the rear or 
bottom of the cabinet.

The symbol for CLASS ll (Double Insulation)

IMPORTANT SAFETY INSTRUCTIONS

Summary of Contents for DVP2902

Page 1: ...support at www philips com welcome User Manual For further assistance call the customer support service in your country To obtain assistance contact Philips Customer Care Center In the U S A Canada Puerto Rico or the U S Virgin Islands 1 866 515 1124 ...

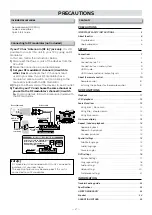
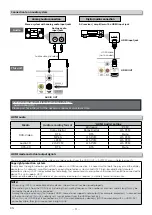
Page 2: ...cluded with this unit You need to purchase it at your local store The quality of picture may become poor if this unit is connected to an RF modulator If your TV has Antenna In RF in jack only it is still possible to connect this unit to your TV by using an RF modulator In this case follow the instructions below 1 Disconnect the Power cords of the devices from the AC outlet 2 Make the Connection as...

Page 3: ...the limits for a Class B digital device pursuant to Part 15 of the FCC Rules These limits are designed to provide reasonable protection against harmful interference in a residential installation This equipment generates uses and can radiate radio frequency energy and if not installed and used in accordance with the instructions may cause harmful interference to radio communications However there i...

Page 4: ...ion To avoid the hazards of electrical shock and fire Do not handle the AC power cord with wet hands Do not pull on the AC power cord when disconnecting it from an AC outlet Grasp it by the plug Do not put your fingers or objects into the unit Location and handling Do not install the unit in direct sunlight near strong magnetic fields or in a place subject to dust or strong vibration Avoid a place...

Page 5: ...e are no user serviceable parts inside Turn off the unit unplug the AC power plug and then call our support center mentioned on the front page Before calling please check model and serial number on the unit Cleaning the cabinet Wipe the front panel and other exterior surfaces of the unit with a soft cloth Never use a solvent thinner benzene or alcohol to clean the unit Do not spray insecticide liq...

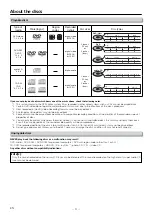
Page 6: ...e intentions of the disc s producers 3 Discs recorded in the VR Video Recording format cannot be played back 4 Scratched or stained discs may not be played back 5 Some discs cannot be played back because of incompatible recording conditions characteristics of the recorder or special properties of discs 6 You can play back discs which bear the marks above If you use non standardized discs this unit...

Page 7: ...er audio device 2 VIDEO OUT jack Connect a video cable here through the video Input jack on a television 3 HDMI OUT jack Connect a TV AV receiver amplifier or other device with an HDMI compatible port with an HDMI cable Note s Please purchase the necessary cables at your local store Refer to pages 8 9 AUDIO OUT L R VIDEO OUT HDMI OUT 2 1 3 ...

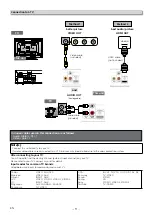
Page 8: ...ps VIDEO SOURCE Emerson VIDEO AUX Hitachi INPUT AUX JVC VIDEO VIDEO1 VIDEO2 VIDEO3 LG INPUT AUX Magnavox AUX CHANNEL SOURCE Panasonic TV VIDEO RCA INPUT TV VCR 00 90 91 92 93 Samsung TV VIDEO Sanyo VIDEO Sharp 00 Sony VIDEO1 VIDEO2 VIDEO3 Toshiba TV GAME Method 1 Method 2 better picture best audio picture TV VIDEO OUT HDMI OUT AUDIO OUT L R VIDEO OUT HDMI OUT AUDIO OUT L R VIDEO OUT HDMI OUT AUDIO...

Page 9: ...ght protection system To play back the digital video images of DVD video via an HDMI connection it is necessary that both the player and the display device or an AV receiver amplifier support a copyright protection system called HDCP high bandwidth digital content protection system HDCP is copy protection technology that comprises data encryption and authentication of the connected AV device This ...

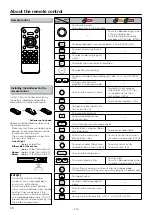
Page 10: ...ters or titles To skip tracks To switch between pages when thumbnail is displayed JPEG To turn the unit on or to turn the unit into the standby mode To completely turn off the unit you must unplug the AC power cord To stop playback To select subtitle language on a disc To call up the title menu on a disc To magnify part of a picture 1 5 2 2 5 DVD JPEG Installing the batteries for the remote contro...

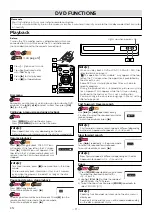
Page 11: ...e speed is 2 4 8 and 20 Note s Zooming function does not work while the disc menu is displayed Some part of the picture may not be zoomed depending on the disc or playback status Disc menu DVD Some discs contain menus which allow you to customize DVD playback Use K L 0 1 to select an item then press OK B on the unit 2 Zoom DVD JPEG 1 Press ZOOM repeatedly during playback to select the required zoo...

Page 12: ... differs depending on the contents The same number of digits that are stored on the disc must be entered Press cursor 0 or 1 to move the digit that you wish to change Press cursor o or p to change the number 1 3 Press OK 3 Press OK 3 Press OK 2 Enter the desired track file number e g CD 1 Available search mode Displayed list Track search CD File search File list thumbnail JPEG It is recommended th...

Page 13: ...Elapsed time of the current time D Currently selected language total languages E Current audio F Currently selected subtitle total subtitles G Currently selected angle total angles Track02 Track03 Track01 k Music CDDA 0 0 0 2 3 4 TRK 0 1 1 2 A B Track02 Track03 Track01 0 0 0 2 3 4 1 0 1 2 C A Current track number total tracks B Current repeat mode Track repeat TRACK Repeat all C Elapsed time of th...

Page 14: ...tial track mode Note s During random playback you cannot go back to the previous track Press G to search tracks or files randomly Random playback will start REP OFF Repeat off REP CHAPTER Current chapter repeat REP TITLE Current title repeat REP ALL Entire disc repeat REP OFF Repeat off REP 1 Current track repeat REP ALL Entire disc repeat REP OFF Repeat off REP 1 Current track repeat REP DIR Curr...

Page 15: ...nge the audio setting from the disc menu Refer to the manual accompanying the discs for details If your language is not shown after pressing AUDIO several times the disc may not have that language However some discs allow audio language setting on the disc menu Operation varies depending on the disc so refer to the manual accompanying the disc 1 English English audio 2 French French audio 3 Spanis...

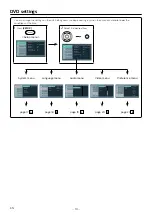
Page 16: ...o 1 Touch Play Voice Guide EasyLink 1 Touch Standby System Language Audio Video Preference English Auto English Audio Subtitle Menu Disc Menu Français Español System Language Audio Video Preference 8 Night Mode HDMI Audio 0 System Language Audio Video Preference 12 Set Contrast Set Brightness 0 Set Color Set Tint System Language Audio Video Preference 2 G 1 Kid Safe 3 PG 5 PGR 4 PG 13 6 R 7 NC 17 ...

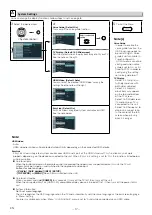
Page 17: ... You can select the desired HDMI Video among the settings See the note on the right ge TV Display HDMI Video 1Touch Play Voice Guide EasyLink 1 Touch Standby 480P Auto 720P 1080i 1080P EasyLink Default On EasyLink allows integrated system control over HDMI See the note below ge TV Display HDMI Video 1 Touch Play Voice Guide EasyLink 1 Touch Standby Off On Note HDMI video Auto HDMI video resolution...

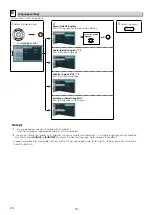
Page 18: ...nish Subtitle Default Off 1 2 Sets the subtitle language Audio Subtitle Menu Disc Menu e English French Spanish Off Disc Menu Default English 1 Sets the language in DVD menu Audio Subtitle Menu Disc Menu e French Spanish English Note s 1 Language options are not available with some discs Only the languages supported by the disc can be selected 2 Language setting for Audio and Subtitle are not avai...

Page 19: ...f the lowest sound level and the highest sound level ge nce 8 Night Mode HDMI Audio 0 Note s Audio Out Bitstream Connecting to a Dolby Digital decoder for Dolby Digital audio output The multi channel audio signals are output from HDMI OUT jack with Bitstream or LPCM PCM Connecting to another device an MD deck or DAT deck etc without a Dolby Digital decoder Convert the Dolby Digital into LPCM 2 cha...

Page 20: ...to the Desired Level Set Contrast Default 6 Adjusts the contrast ge nce 12 0 Set Contrast Set Brightness Set Color Set Tint Set Color Default 0 Adjusts the color saturation ge nce 12 0 Set Contrast Set Brightness Set Color Set Tint Set Tint Default 0 Adjusts the color tone ge nce 6 6 Set Contrast Set Brightness Set Color Set Tint Note s The horizontal white bars indicate the default setting The se...

Page 21: ...r new password Playback will stop if the ratings exceed the levels you set it will require you to enter a password before the disc will play back This function is available only when is displayed Default When you do not wish to initialize press SETUP to exit the menu at step 4 Password Sets the password for Parental Control and Default settings For the first time use This number will be used as th...

Page 22: ... while a Voice Guide message is being output In order to disable Voice Guide press SETUP on the remote control then select SYSTEM Voice Guide Off Disc cannot be played back Clean the disc Ensure the disc is inserted in correct position Insert a correct Type disc that plays back on this unit Check if the disc is defective by trying another disc Check if the parental settings exceeds the levels you ...

Page 23: ...nty This warranty does not apply a to damage caused by accident abuse misuse neglect misapplication or non supplied product b to damage caused by service performed by anyone other than company approved Authorized Service Location c to a product or a part that has been modified without written company permission or d if any serial number has been removed or defaced or e product accessories or consu...

Page 24: ...Cámara Lenta en el modo de Pausa Para Llamar el menú en un disco Para Visualizar la Miniatura cuando insertó un disco con Archivos JPEG y algún Archivo está resaltado JPEG Para Reproducir al Azar CD Para Abrir o Cerrar la bandeja del Disco Para Encender la unidad Para hacer una Pausa en la Reproducción Para Avanzar la Reproducción un Cuadro cada vez Para Iniciar o Reanudar la Reproducción Para Rep...

Page 25: ...esta garantía limitada Esta garantía no aplica a a daños causados por accidente abuso mal uso negligencia mala aplicación o por productos no provistos por la compañía b a daño provocado por servicio realizado por cualquier persona ó establecimiento de servicio no autorizado por la compañía c a productos o piezas que se hayan modificado sin la autorización por escrito de la compañía d si se ha reti...

Page 26: ... Herradura Huixquilucan Edo de México C P 52787 This product has been manufactured by and is sold under the responsibility of P F USA Inc and P F USA Inc is the warrantor in relation to this product The Philips trademark and the Philips Shield Emblem are registered trademarks of Koninklijke Philips N V used under license E6U20UL ...

Reviews: