background image

-E9-

AUDIO

INPUT

R

L

R-AUDIO-L

VIDEO

AUDIO
VIDEO

INPUT

1

Y

R

L

P

B

P

R

AUDIO OUT

VIDEO OUT

COMPONENT VIDEO OUT

OPT.

DIGITAL

OUT

VIDEO OUT 
SELECT

S

COMPONENT

S-VIDEO OUT

S-VIDEO IN 1

Y

R

VIDEO OUT 
SELECT

S

COMPONENT

S-VIDEO OUT

Y

R

L

P

B

P

R

AUDIO OUT

VIDEO OUT

COMPONENT VIDEO OUT

VIDEO OUT 
SELECT

S

COMPONENT

S-VIDEO OUT

COMPONENT VIDEO INPUT

Y

P

B

P

R

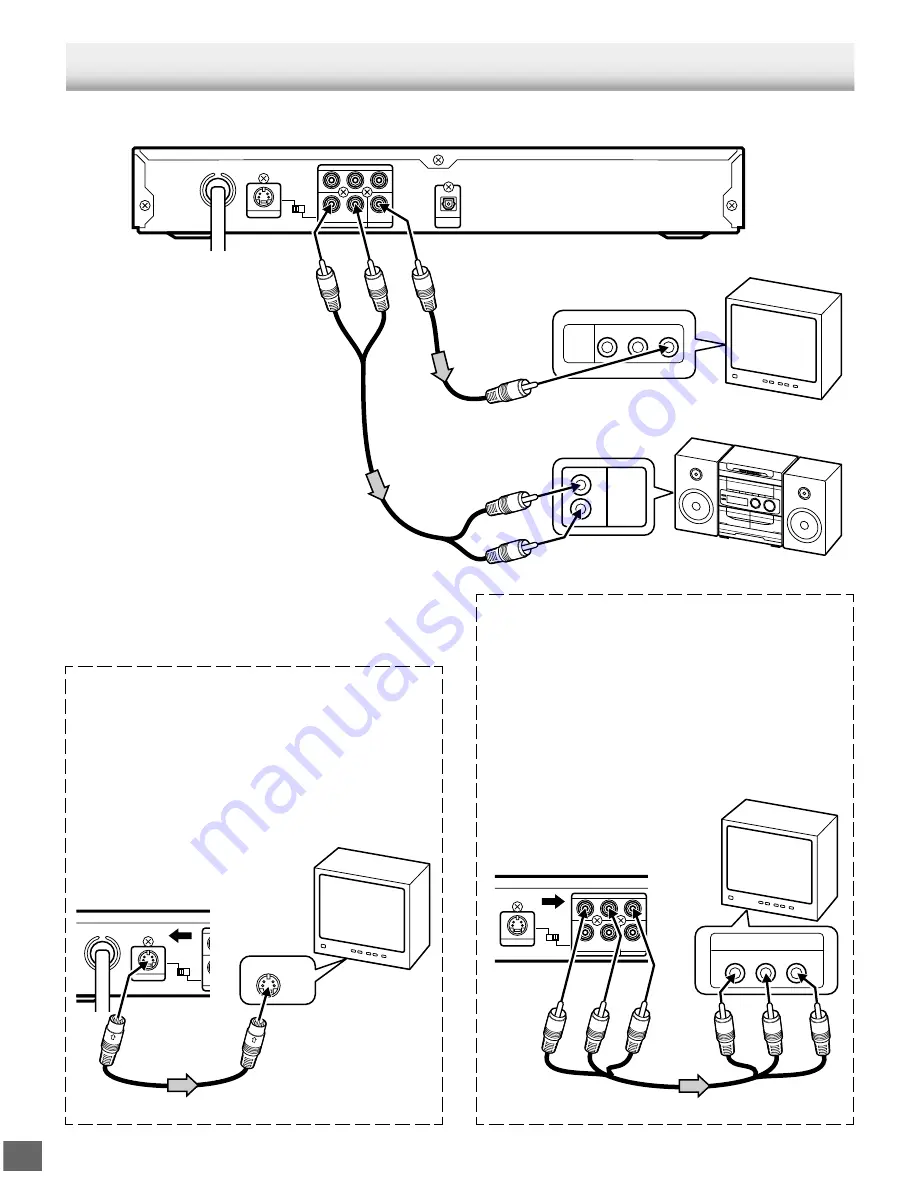
ADDITIONAL CONNECTION EXAMPLES

Connecting to an Audio System and TV (Example 3)

Connect the DVD video player to an Audio System and a TV.

Notes:

Please refer to the instruction manual of
your Audio System and TV.

When you connect the DVD video player
to other equipment, be sure to turn off the
power and disconnect all of the equipment
from the wall outlet until all the
connections have been made.

Do not connect the DVD video player to a
VCR directly. The playback picture will
be distorted because DVD video discs
are copy protected.

Using the S-VIDEO jack
Note:
Please follow the steps before turn on the power.
1. If your TV has the S-video input jack, connect the DVD video

player with the S-video cable (not supplied). (The VIDEO
OUT jack connection is not necessary.)
You can enjoy clearer picture playback.

2. Set the VIDEO OUT SELECT switch to the S position.
3. You also need to connect the left and right audio cables (not

supplied) to the AUDIO OUT jacks of DVD video player and
the Audio input jacks of the Audio System.

Using the COMPONENT VIDEO OUT jacks
Note:
Please follow the steps before turn on the power.
1. If your TV has the component video input jacks, connect the

DVD video player to these jacks. (The VIDEO OUT or S-
VIDEO OUT jack connection is not necessary.)
You can enjoy high quality picture playback.

2. Set the VIDEO OUT SELECT switch to the COMPONENT

position.

3. You also need to connect the left and right audio cables (not

supplied) to the AUDIO OUT jacks of DVD video player and
the Audio input jacks of the Audio System.

4. Set the DVD video player to

the INTERLACE position.
See page E13.

*Please consult your local audio/video dealer.

DVD video player

*Please consult your local audio/video dealer.

To S-video input jack

*S-video cable
(not supplied)

To S-VIDEO
OUT jack

TV

DVD video player

Audio System

*Video cable
(not supplied)

*Audio cable
(not supplied)

(Red) R

To video input (Yellow)

(White) L

(White) L

TV with Audio/Video input jacks

To VIDEO OUT jack
(Yellow)

To AUDIO OUT jacks

To AC 120V, 60Hz

(Red) R

*Component video cable (not supplied)

Green

Red

Blue

Green

Red

Blue

TV

To audio input jacks

Summary of Contents for DVD-SL25

Page 1: ...B SL25 z ON NEXT PREV FWD SLOW REV SLOW PAUSE STEP PLAY REV FWD CLEAR SEARCH MODE 1 2 3 C 4 5 6 7 8 9 0 4 b 5 a ENT SETUP MENU AUDIO RETURN PICTURE MODE ANGLE REPLAY ZOOM ANGLE LAST MEMO SURROUND ON SCREEN OPEN CLOSE REPEAT A B REPEAT SUBTITLE CHANGE SUBTITLE ON OFF TOP MENU PROGRAM RANDOM English ...

Page 2: ...AY for DVD only E14 Selecting a DVD Menu E15 Selecting a Top Menu DVD E15 Chapter Track Skip E15 Title Search DVD E16 Chapter Search DVD E16 Time Search DVD E16 Time Search CD E16 Track Search CD E16 Fast Playback E17 Slow Motion Playback DVD E17 Still Picture Pause E17 Frame by Frame Advance Playback DVD E17 Picture Zoom Pin Point Zoom DVD E18 Viewing from a Desired Camera Angle Multi Angle DVD E...

Page 3: ...HOCK DO NOT OPEN IMPORTANT INFORMATION To connect this unit to a TV TV must have a set of Audio Video composite input jacks RCA type You cannot use an antenna terminal to connect this unit Please Read This Manual Because DVD is a new technology we recommend that you read this manual carefully before connecting your DVD video player and operating it for the first time Keep the manual in a safe plac...

Page 4: ...nel FL Display 8 Message or number indicators Title chapter track playing time or other information 9 MP3 indicator MP3 10 WMA indicator WMA 11 Random play indicator RND 12 Program indicator PGM 1 Play indicator a 2 Pause indicator k 3 CD indicator CD 4 DVD indicator DVD 5 Last memory indicator LM 6 Virtual Surround Sound indicator 3D 7 Repeat mode indicators ALL REP 1 A B 1 S Video output jack S ...

Page 5: ...rn button RETURN See page E24 12 Directional arrow buttons 4 a 5 b 13 Forward slow button FWD SLOW 14 Pause Step button k PAUSE STEP 15 Skip Next button NEXT e 16 Play button a PLAY 17 Forward button FWD c 18 Clear button CLEAR 19 Search mode button SEARCH MODE 20 Number buttons 1 9 0 21 Reverse button REV d 22 Stop button n 23 Skip Previous button PREV f 24 Reverse slow button REV SLOW 25 Top men...

Page 6: ...oder or MPEG2 Decoder No Do you connect it to a Digital Amplifier No Do you connect it to an Amplifier with Dolby Pro Logic Decoder No See Connecting to an Audio System and TV Example 3 on page E9 See Connecting to a Conventional TV Example 1 on page E6 See Connecting to a TV with Progressive scan Capability Example 2 on page E8 See Connecting to a Conventional TV Example 1 on page E6 or Connectin...

Page 7: ...D video player with the S video cable not supplied The VIDEO OUT jack connection is not necessary You can enjoy clearer picture playback 2 Set the VIDEO OUT SELECT switch to the S position 3 You also need to connect the left and right audio cables not supplied to the AUDIO OUT jacks of DVD video player and the Audio input jacks of the TV Using the COMPONENT VIDEO OUT jacks Note Please follow the s...

Page 8: ...to the VHF UHF FROM ANT IN terminal of the VCR 2 Connect the 75 ohm coaxial cable not supplied between the TO TV OUT terminal of the VCR and the ANT IN terminal of the RF Modulator 3 Connect the 75 ohm coaxial cable not supplied between the TO TV terminal of the RF Modulator and the VHF UHF ANTENNA IN terminal of the TV 4 Connect the Audio Video cable supplied between the AUDIO OUT and VIDEO OUT j...

Page 9: ...o fields progressive scanning creates one frame in one field Conventional interlaced scanning constitutes one second with 30 frames 60 fields but progressive scanning constitutes it with 60 frames from scratch Progressive scanning can reproduce sharper picture with high resolution for still image or other picture containing long texts or horizontal lines This model has compliance with 525p progres...

Page 10: ...n enjoy clearer picture playback 2 Set the VIDEO OUT SELECT switch to the S position 3 You also need to connect the left and right audio cables not supplied to the AUDIO OUT jacks of DVD video player and the Audio input jacks of the Audio System Using the COMPONENT VIDEO OUT jacks Note Please follow the steps before turn on the power 1 If your TV has the component video input jacks connect the DVD...

Page 11: ...d To digital audio input Amplifier with Dolby Digital Decoder DTS Decoder or MPEG2 Decoder Please consult your local audio video dealer Front right speaker Center speaker Subwoofer Front left speaker Surround left speaker Surround right speaker To enjoy Dolby Digital sound Select Dolby Digital BitStream in Setting Digital Out on the INITIAL SETTINGS See page E29 To enjoy DTS sound Select DTS On in...

Page 12: ...high output from the amplifier which can cause damage to your speakers Please be careful in this regard Sudden changes in the surrounding temperature can cause dew to form on the optical pickup lens inside the unit Under this condition the unit may be unable to operate properly If this should occur remove the disc and allow the unit to adjust to the surrounding temperature FOR SAFE AND EFFICIENT O...

Page 13: ... is protected by method claims of certain U S patents and other intellectual property rights owned by Macrovision Corporation and other rights owners Use of this copyright protection technology must be authorized by Macrovision Corporation and is intended for home and other limited viewing uses only unless otherwise authorized by Macrovision Corporation Reverse engineering or disassembly is prohib...

Page 14: ... E28 TV Select the audio input source Audio System AV amplifier etc When the DVD video player is connected to the COMPONENT VIDEO OUT jacks of the TV see pages E6 E8 and E9 you must select the INTERLACE or PROGRESSIVE position Note Initial setting is INTERLACE 1 Turn on the power TV and DVD video player 2 In No Disc mode press and hold down a on the DVD video player until INTERLACE or PROGRESSIVE ...

Page 15: ...n you press a PLAY or a playback starts from the beginning of the disc CD Press n once during playback The unit stops completely To turn off the power press z ON OFF appears briefly on the FL display ContinuingPlaybackfromWhereYouStopped Watching LAST MEMO PLAY for DVD only 1 Press LAST MEMO to stop playback Last Memo n appears briefly on the TV screen LM and StOP appear on the FL display 2 Press ...

Page 16: ...The main menu screen will appear Note Press MENU again to resume playback 2 Press 4 5 b or a or the number buttons to select the desired menu 3 Press ENT The selected menu playback starts Selecting a Top Menu DVD Notes The operation may differ depending on the disc used Selecting a top menu may not be possible on some discs 1 Press TOP MENU The top menu will appear if the disc contains a top menu ...

Page 17: ...Press the number button s to enter the chapter number Example To select Chapter No 3 press 3 To select Chapter No 10 press 1 then 0 To select Chapter No 24 press 2 then 4 Note If you make a mistake press CLEAR 3 Press a PLAY Playback starts from the selected chapter Time Search DVD 1 Press SEARCH MODE three times during playback The time search screen appears on the TV screen 2 Press the number bu...

Page 18: ...yback Note The sound is muted during fast playback in DVD Slow Motion Playback DVD Forward slow playback Press FWD SLOW repeatedly to select the forward slow speed playback 1 v 2 v 3 v 4 4 steps Press a PLAY to return to normal playback Reverse slow playback Press REV SLOW repeatedly to select the reverse slow speed playback 1 v 2 v 3 v 4 4 steps Press a PLAY to return to normal playback Note The ...

Page 19: ...en is magnified 1 appears briefly on the TV screen If necessary press o a p or b repeatedly to move the screen as desired 3 5 Some DVD video discs may contain scenes which have been shot simultaneously from a number of different camera angles The jacket or case of discs that are recorded with angles will be marked Example Note The recorded angles differ depending on the disc used 1 Play the disc t...

Page 20: ...Off Normal playback mode During Programmed Playback TV screen FL display Operation Program 1 REP 1 Repeat the programmed track being played Program All ALL REP Repeat all programmed tracks Off Original programmed playback mode Important Note may appear on the TV screen during operation This icon means that the function is not available on the disc now Point A Point B During Random Playback TV scre...

Page 21: ...teps 2 and 3 as above to select another track 5 Press a PLAY to start playback PGM appears on the FL display When all programmed selections have played the unit stops automatically The program contents are retained in memory Note To play the program again press PROGRAM RANDOM twice to call up the Program Mode screen then press a PLAY Random Playback CD 1 Press PROGRAM RANDOM once in the stop mode ...

Page 22: ...may overlap each other on the TV screen In this case turn the subtitle off When the desired language is not selected even if the button is pressed the language is not available on the disc When the power is turned on or the disc is replaced select the subtitle language again If the subtitle language is not necessary press SUBTITLE ON OFF to select Off Please refer to Setting Language on page E27 S...

Page 23: ... the TV screen during operation This icon means that the function is not available on the disc now 3 Press ON SCREEN to close the disc information Chapter remaining playing time Title elapsed playing time Title elapsed playing time Chapter remaining playing time Title number Chapter number Subtitle language Camera angle A kind of audio Audio language Example for Audio CD 1 Press ON SCREEN 3 Press ...

Page 24: ... can recognize up to 256 files or folders per disc The CD with 257 files or folders and over is not available to this unit MP3 WMA CDs may not be played in the recorded order 1 Please use the MP3 or WMA software with the function that can record data alphabetically or numerically 2 Please refrain from making many sub folders by preference However some CD R RWs cannot be played back depending on th...

Page 25: ... TV screen The letter s color in the highlighted box turns green MP3 or WMA appears on the FL display Example the second directory Stopping Playback Press n during playback n appears briefly on the TV screen and playback stops completely Pause Press k PAUSE STEP during playback k appears briefly on the TV screen k appears on the FL display Note The sound is muted Press a PLAY to return to normal p...

Page 26: ... to start the slide show from the selected picture If you press k PAUSE STEP during the slide show the slide show stops temporary k appears briefly Press a PLAY or NEXT e again to resume the slide show If the picture appears upside down or sideways do the following steps 1 Press k PAUSE STEP if necessary 2 Press ANGLE repeatedly until it s right side up or Normal appears briefly on the TV screen 3...

Page 27: ...TV screen 3 Press a PLAY or k PAUSE STEP to skip to the next picture and continue the slide show If you press NEXT e or PREV f during the slide show it skips to the next file or previous file After the last file has displayed the file list appears Notes To stop the slide show press n The file list appears If the disc is loaded with the label side downward or if a badly scratched disc is loaded No ...

Page 28: ...anguage recorded on the disc When you play back a DVD video disc the unit automatically displays the pre selected subtitle language if it is included on the disc If Others is selected enter the language code See LANGUAGE CODE LIST on page E31 For improvement on screen displays subject to change without notice Setting Language 1 Press SETUP in the stop mode The setup screen appears Language is high...

Page 29: ...the wide screen disc is played back it displays pictures cropped to fill to your TV screen The left and right edges are cut off 16 9 Select when a wide screen TV set is connected Played in FULL size Setting the wide screen TV to FULL mode is also necessary Notes The screen size may differ depending on the DVD video discs If you select 16 9 to get rid of the black bands on screen when wide screen d...

Page 30: ...kHz sampling select 96kHz LPCM If not select 48kHz LPCM Notes When 48kHz LPCM is set there are 48kHz LPCM audio signals from the AUDIO OUT jacks not 96kHz LPCM audio signals When playing back the DVD video disc which recorded with 96kHz LPCM there is no digital output But playing back the DVD video disc with no copyright protection the sound is original recorded sound Dolby Digital If your amplifi...

Page 31: ...lent to the following MPAA Rating System Level 7 NC 17 No one 17 and under admitted Level 6 R Restricted Level 4 PG 13 Parents strongly cautioned Level 3 PG Parental guidance suggested Level 1 G General audiences Some DVD discs contain a restriction level which enables parents to prevent playback of discs by children This unit is equipped with a password designed to prevent children changing the l...

Page 32: ...ian 7578 kn Kannada 7579 ko Korean 7583 ks Kashmiri 7585 ku Kurdish 7589 ky Kirghiz 7665 la Latin 7678 ln Lingala 7679 lo Laothian 7684 lt Lithuanian 7686 lv Latvian Lettish 7771 mg Malagasy 7773 mi Maori 7775 mk Macedonian 7776 ml Malayalam 7778 mn Mongolian 7779 mo Moldavian 7782 mr Marathi 7783 ms Malay 7784 mt Maltese 7789 my Burmese 7865 na Nauru 7869 ne Nepali 7876 nl Dutch 7879 no Norwegian...

Page 33: ...r data The disc tray may be locked The display is set to Dark CORRECTIVE ACTION Insert the power plug into the AC wall outlet Load a disc Load a playable disc Check the disc logo type color system and regional code See page E12 Select the correct input function on the TV Connect the video cable into the jack Connect the video cable into the jack Select INTERLACE mode See page E13 Turn on the TV Co...

Page 34: ...Y 1 0 Vp p 75 Ω C 0 286 Vp p 75 Ω COMPONENT VIDEO OUT Y 1 0 Vp p 75 Ω PB 0 7 Vp p 75 Ω PR 0 7 Vp p 75 Ω AUDIO OUT R 2 V rms L 2 V rms VIDEO OUT 1 0 Vp p 75 Ω DIGITAL OUT Optical Power requirements AC 120 V 60 Hz Power consumption 11 Watts Dimensions W x H x D Approx 14 2 x 2 2 x 9 8 360 x 55 x 250 mm Weight Approx 4 3 lbs 1 95 kg SYMPTOM The operation or display is not normal The remote control do...

Page 35: ...ervice Depot when you make a claim under this Warranty You the original retail purchaser are responsible for any costs of TRANSPORTING the product to and from SANYO Canada Inc or an authorized Sanyo Service Depot You also are responsible for the cost of any MAINTENANCE necessary in respect of the product WARRANTY BECOMES VOID This warranty becomes void if the product s serial numbers are altered o...

Page 36: ... E35 SANYO Canada Inc Printed in China ...

Reviews: