background image

Connections 

(continued)

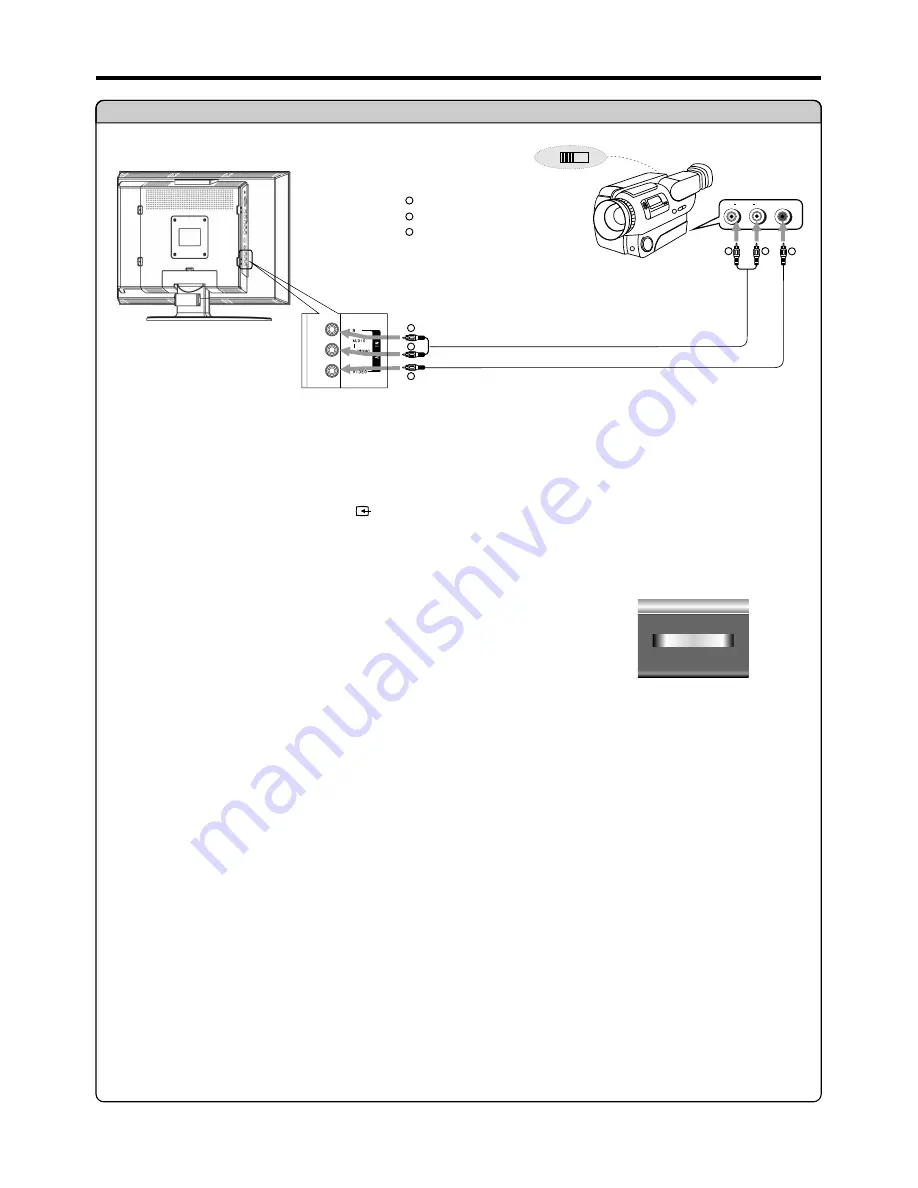
Connect a Camcorder

Note:

Connect the Audio/Video cables between the Audio (L/R)/Video jacks on the unit and camcorder.

How to connect:

1. Turn on your LCD TV, press 

SOURCE     

 button repeatedly to select 

Video

.

2. Turn on your camcorder and set it to output mode. (For details, refer to your camcorder owner's manual.)

3. Insert the tape into the camcorder and press Play button.

To playback Camcorder

The operations of the camcorder may be different and is dependent on your 

model. Please read the owner's manual of your camcorder to confirm 

operation.

11

Input Source

Source-switch

Video

Yellow (VIDEO)
White (AUDIO L)
Red (AUDIO R )

W

W

YY

RR

Video

cable

Audio

cable

YY

WW

RR

YY

W

W

RR

R

L

VIDEO

AUDIO

OUT

IN

Summary of Contents for AVL-209

Page 1: ...lease read the manual completely Please keep this manual for future reference Call our HELPLINE 1 800 263 2244 for further assistance SANYO Canada Inc www sanyo ca HD high definition LCD TV Instruction Manual AVL 209 HD Cable or Satellite receiver required ...

Page 2: ...fication of Controls 7 Connections 10 Turning the Unit On and Off 14 Memorizing the Channels 15 Basic Operations 17 Setting Picture 18 Adjusting Image in D Sub mode 19 Setting Sound 20 Other Functions 21 Viewing Closed Captions 22 Parental Controls 23 Troubleshooting 28 29 Care and Maintenance ...

Page 3: ... to environmental considerations For disposal or recycling information please contact your local authorities or the Electronic Industries Alliance www eia org FCC STATEMENT FCC Notice LCD TV A CLASS B digital device This equipment has been tested and found to comply with the limits for a Class B digital device pursuant to part 15 of the FCC Rules These limits are designed to provide reasonable pro...

Page 4: ...cordance with the manufacturer instructions The vents and other openings in the cabinet are designed for ventilation Do not cover or block these vents and openings since insufficient ventilation can cause overheating and or shorten the life of the product Do not place the product on a bed sofa rug or other similar surface since they can block ventilation openings This product is not designed for b...

Page 5: ...as the original parts Use of unauthorized parts can result in fire electric shock and or other danger 17 Overloading Do not overload wall outlets extension cords or convenience receptacles on other equipment as this can result in a risk of fire or electric shock 18 Entering of objects and liquids Never insert an object into the product through vents or openings High voltage flows in the product an...

Page 6: ...des and requirements for the grounding electrode An outside antenna system should not be located in the vicinity of overhead power lines or other electric light or power circuits or where it can collide with such power lines or circuits When installing an outside antenna system extreme care should be taken to keep from touching such power lines or circuits as contact with them might be fatal 22 Po...

Page 7: ...e Control Use the remote control by pointing it towards the remote sensor window of the set Objects between the remote control and sensor window may prevent Cautions regarding use of remote control Do not expose the remote control to shock In addition do not expose the remote control to liquids and do not place in an area with high humidity The remote control may not work properly if the remote se...

Page 8: ...ter RF switch or combiner that might be required Cable TV converter descrambler not supplied Two set signal splitter not supplied Cable TV Line RF switch not supplied OUT IN ANTENNAS The antenna requirements for good color television reception are more important than those for black white television reception For this reason a good quality outdoor antenna is strongly recommended The following is a...

Page 9: ... these two buttons to directly change the TV channel In OSD MENU press these buttons to choose the OSD items 4 VOL Press the VOL or VOL button to directly increase or decrease the sound volume level In OSD MENU press these buttons to adjust the value or setting of each item 5 POWER Press this button to turn the unit ON from STANDBY mode Press it again to turn the set back to STANDBY 7 Power Indica...

Page 10: ...t output jacks of a DVD player or Set Top Box 3 Antenna input Allows you to connect cable or outdoor antenna 4 S Video input Receive a S Video signal from external source such as VCR or DVD player 5 AV inputs Video Audio L R Receive video audio signals from external sources such as VCR or DVD player Connect to the D Sub audio output jacks on your PC 8 ...

Page 11: ... access the MENU main page or exit menu operation To display channel status or signal information Picture mode select Audio mode select To set sleep timer To quickly jump between current channel and last selected channel To switch channels In MENU operation use CH to select menu item To adjust volume In MENU operation use ENTER or VOL to adjust selected item To confirm your operation ...

Page 12: ...s Before Connecting Carefully check the terminals for position and type before making any connections The illustration of the external equipment may be different depending on your model Loose connectors can result in image or color problems Make sure that all connectors are securely inserted into their terminals Refer to the operating manual of the external device as well When connecting an extern...

Page 13: ...it to output mode For details refer to your camcorder owner s manual 3 Insert the tape into the camcorder and press Play button To playback Camcorder The operations of the camcorder may be different and is dependent on your model Please read the owner s manual of your camcorder to confirm operation 11 Input Source Source switch Video Yellow VIDEO White AUDIO L Red AUDIO R W W Y Y R R Video cable A...

Page 14: ...our DVD player or HD receiver 3 Insert a disc and press PLAY button or select a channel on the HD receiver To play DVD HDTV Receiver How to connect a DVD Player or HDTV Cable Satellite receiver using Component Video Connections Input Source Source switch YPbPr AUDIO COMPONENT S VIDEO AV OUT R L VIDEO AUDIO Rear of the DVD player or HD receiver L R AUDIO Pb Pr Y R R G G B B Red AUDIO R P C Green Y ...

Page 15: ...solution and settings on your computer to the required settings for this model 1280 x 768 resolution with 60 Hz vertical scanning frequency or refresh rate To Watch the PC screen Connect a D Sub cable between the D Sub jack on the PC and the D Sub input jack on the unit Connect an Audio cable between the AUDIO output on the PC and AUDIO input jack on the unit 13 Input Source Source switch D Sub ...

Page 16: ...OL to access the selected submenu page 1 2 Note Displaying Status Information W To clearly introduce the menu operations this operation manual provides a description based on operation with the remote control hen performing confirmation in MENU operation you may press either ENTER or VOL button Press the DSP button on the remote the unit will display current status information such as channel numb...

Page 17: ... Auto Search you can press Menu to exit 1 2 15 Cable Channel Auto Searching Move Select Menu to exit On Off Cable Source Channel Skip Fine Tune AFC Frequency 55 25 MHz Channel Auto Searching Move Select Menu to exit On Off Source Channel Skip Fine Tune AFC Frequency 55 25 MHz Press CH to select Source item 4 Auto Searching CH No 11 Repeat steps 1 3 in Selecting the Signal Source to access Channel ...

Page 18: ...d by using the CH buttons unless you use number buttons to input channel number directly 1 Repeat steps 1 3 in Selecting the Signal Source to access Channel page Cable Channel Auto Searching Move Select Menu to exit On Off Source Channel Skip Fine Tune AFC Frequency 55 25 MHz Press CH repeatedly to select Fine Tune item 2 3 Cable Channel Auto Searching Move Select Menu to exit On Off Source Channe...

Page 19: ... channel number one by one then the unit goes to the selected channel When you use the number buttons you can directly select channels that were erased Note Using the Return button Press this button to switch between the current channel and the previous channel Adjusting the Volume Using the volume buttons VOL and VOL Press the VOL or VOL to increase or decrease the volume Using the MUTE button At...

Page 20: ...ode User Each preset mode has its own picture settings Bright Select for a bright picture Soft Select for a finely detailed picture Normal Select for a normal picture Adjusted settings are stored in User mode When viewing regular not HDTV TV channels or sources via video S Video there will be a slight widening of the image in order to fill the 16 9 screen Press ENTER or VOL to access the Picture s...

Page 21: ...r Phase item 2 3 Adjust the clock frequency of the set s internal clock signal If shimmering or rainbow like noise is apparent in the image try adjusting the clock frequency setting You may find that images blur depending on the clock phase of your PC s Processor If you experience blurring you can obtain a clearer image by adjusting the phase setting Note Your computer settings should be 1280 x 76...

Page 22: ...c Select for a music program News Select for a speech or conversation program Adjusted settings are stored inUsermode Mono Bass Treble Balance MTS 14 16 43 Sound Move Select Menu to exit Press MENU to display the menu main page 1 Press CH repeatedly to select Sound page 2 Press ENTER or VOL to access the submenu 3 Press VOL to adjust the value of the item 5 Press CH to select Bass Treble or Balanc...

Page 23: ...ss page Display 1 Press ENTER or VOL to load default values 3 Press CH to select repeatedly Factory Reset item 2 Repeat steps 1 3 in Adjusting Menu Transparency to access page Display Bright English Display Language Transparency Back Light Move Select Menu to exit Yes Factory Reset Sleep Time Off Setting Sleep Timer Press the SLP button repeatedly to set a sleep time to automatically turn off the ...

Page 24: ...taries of TV dramas and news programs while allowing a clear view of the picture The TEXT mode displays various information over the picture such as TV program schedule weather forecast etc that is independent of the TV programs Setting Closed Caption 1 3 4 5 2 Setting CC When Mute If you set this item to On the unit displays closed caption when you mute the sound 22 Press MENU to display the menu...

Page 25: ... NC 17 X GENERAL AUDIENCES All ages admitted PARENTAL GUIDANCE SUGGESTED Some material may not be suitable for children PARENTAL STRONGLY CAUTIONED Some material may be inappropriate for children under 13 RESTRICTED Under 17 requires accompanying parent or adult guardian NO ONE 17 AND UNDER ADMITTED X Rating is an older rating that is unified with NC 17 but may be encoded in the data of older movi...

Page 26: ...ation Content Rating can be set D L S V Suggestive Dialog Foul Language Sexual Content Violence FV Fantasy Violence Example 1 Example 2 When TV Y7 in the age based rating is set to BLOCK this will automatically block the higher ratings TV G TV PG TV 14 and TV MA When TV 14 in the age based rating is set to BLOCK this will automatically block the higher ratings TV MA In addition if you block L sub ...

Page 27: ...lect Menu to exit Menu to exit Change Password Parental Lock Re input the new password and press ENTER or VOL to confirm 4 New Password Re Enter Password Change Password Move Select Menu to exit Turn On or Off Parental Lock Control Function From the Parental Controls menu press CH repeatedly to select Parental Lock item 1 2 Press VOL to select On or Off On Off Yes None NA E E Clear All TV Rating M...

Page 28: ...her setting for example TV PG 26 2 2 On Off Yes None NA E E Clear All TV Rating CA FR Rating CA EN Rating Parental Controls Move Select Menu to exit Change Password Parental Movie Rating Movie Rating NA G PG R NC 17 X Movie Rating Move Select Menu to exit PG 13 Press CH to select a movie rating to be set Repeat steps 1 5 in Accessing the Parental Controls Menu Press CH to select TV Rating item On ...

Page 29: ... ANS Exempt Exempt programming General Programming intended for audience of all ages Contains no violence or the violence content is minimal or is depicted appropriately 8 General Not recommended for young children Programming intended for a broad audience but contains light or occasional violence Adult supervision recommended Programming may not be suitable for children under the age of 13 Contai...

Page 30: ...ck the antenna connection This may be caused by electrical interference e g hairdryer nearby neon lights etc Turn off the equipment Check whether the batteries are working Replace if necessary Clean the remote control sensor lens on the unit Do not use the remote control under strong or fluorescent lighting The batteries should be inserted with polarity aligned Snowy picture and noise Horizontal d...

Page 31: ...normal programs in the form of a stationary fixed image This type of irreversible LCD panel deterioration can be limited by observing the following steps A Reduce the brightness contrast setting to a minimum viewing level B Do not display the fixed image for extended periods of time C Turn the power off when not in actual use Cleaning and Maintenance To clean this unit wipe with a soft dry cloth I...

Page 32: ...D x 17 1 H inch Weight 19 8 lb Screen 20 Computer settings 1280 x 768 with 60 Hz refresh rate TV system channel coverage SYSTEM VHF UHF CATV NTSC M 2 13 14 69 1 125 TV system NTSC M Speaker 8W 8W x 2 Accessories Operating manual X 1 Note Design and specification are subject to change without notice ...

Page 33: ...original retail purchaser are responsible for any costs of TRANSPORTING the product to and from SANYO Canada Inc or an authorized Sanyo Service Depot You also are responsible for the cost of any MAINTENANCE necessary in respect of the product In home service is only available to the units whose screen size is 25 inches or over and limited to the locations within a 30 km radius of any authorized Sa...

Page 34: ...PRINTED ON RECYCLED PAPER 604 L20Y197 00 Ver 1 0 ...

Reviews: