background image

SANTOS : User and maintenance manual 


ITEM  

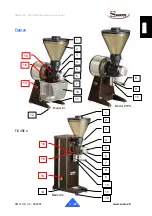
Description 

Bean hopper cover 

2 Bean 

hopper 

Bean hopper shutter 

4 Adjusting 

dial 

Adjuster button attachment 

Grinding wheel gap adjuster button 

Dial fastening screw 

Bag grip cord 

Bag grip strap 

10 

Grind outlet tube 

11 Base 
12 Non-slip 

feet 

13 On-off 

switch 

14 

Thermal overload switch, with reset 

15 Grinding 

unit 

16 

Grinding unit clamp nut 

17 Grinding 

wheels 

18 

Mobile grind wheel carrier plate 

19  

Fixed grind wheel carrier plate 


98101 US 3.0 - 09 2007  


19 

/ 20 

www.santos.fr


Summary of Contents for 1

Page 1: ...ANCE MANUAL IMPORTANT documents included in this manual to be kept CE COMPLIANCE DECLARATION WARRANTY CERTIFICATE Model 4 Model 1 Model PS Coffee grinders Fruit juicers Mixers Blenders Drinks dispensers Planetary mixers Cheese graters Ice crushers Mincers Vegetable slicers Dough mixer Moulins à café Presse fruits Mixers Blenders Distributeurs de boissons Batteurs mélangeurs Pétrin Râpes à fromage ...

Page 2: ...EN THE GRINDING WHEELS 7 FAULT FINDING 9 The machine will not start 9 The machine stops because the motor has overheated 9 The machine stops because of an overload 9 MACHINE TECHNICAL SPECIFICATIONS 10 Wiring diagram 110 120V 50 60Hz Model 1 1PS 11 Wiring diagram 220 240V 50Hz Model 1 1PS 12 Wiring diagram 220 240V 60Hz Model 1 1PS 13 Wiring diagram 100 120V 50 60Hz Model 4 14 Wiring diagram 220 2...

Page 3: ...THE PROVISIONS OF THE FOLLOWING EUROPEAN DIRECTIVES No 73 23 dated 19 02 73 Low voltage directive No 89 336 CEM directive No 2002 95 CE RoHS directive No 2002 96 CE WEEE directive The machine complies with the provisions of the following harmonised European standards EN ISO 12100 1 and 2 2004 Machine safety devices General design principles NF EN 60204 2006 Machine safety devices Machine electrica...

Page 4: ...ION The electric power supply for the machine is available in 3 single phase voltages 110 120 V 50 60 Hz 220 240 V 50 Hz 220 240 V 60 Hz Line protection the machine should be connected to a standard 2 pole earth electric socket The system should be fitted with an RCD and a fuse rated at 16A The appliance must be earthed CARE Before connecting the machine check that the mains electrical voltage is ...

Page 5: ...should be eliminated or recycled according to the regulations in force YOUR COFFEE GRINDER 1 1PS and 4 The coffee grinder is designed especially for hotels restaurants community catering for the drawer version and for coffee roasters The robust frame of the appliance is made of cast aluminum and painted metal The transparent hopper is made of transparent polycarbonate transparent and contains 1 kg...

Page 6: ...wdriver with insulated handle to touch the 2 connectors on the capacitor 13 The appearance of an electric arc shows that the capacitor has discharged Spare parts This machine requires no specific maintenance The bearings are lubricated for life If work is required to replace worn parts such as the grindstones or the electric or other components refer to the parts list see exploded view at the end ...

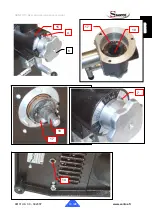
Page 7: ...ing gap to its minimum setting TAKE CARE Before tightening the fastening nuts 16 on the grinding unit 15 check that the dial 4 of the grinding wheel adjuster button 6 is set to COARSE This precaution is essential to prevent any risk of the grinding wheels being brought too close to each other which could cause damage to the grinding unit ADJUSTING THE MINIMUM GAP BETWEEN THE GRINDING WHEELS This s...

Page 8: ...ntenance manual 6 Run the machine empty to check that the grinding wheels rotate without touching each other on the finest setting If this is not the case repeat the above procedure 98101 US 3 0 09 2007 8 20 www santos fr ...

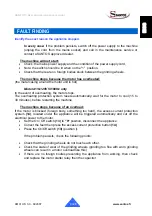
Page 9: ...sets automatically wait for the motor to cool 15 to 30 minutes before restarting the machine The machine stops because of an overload If the motor is blocked foreign body something too hard the excess current protection system 14 located under the appliance will be triggered automatically and cut off the electrical power to the motor Set the On Off switch 13 to 0 position disconnect the appliance ...

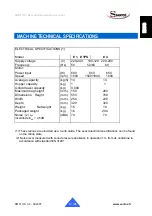
Page 10: ...rawer capacity kg 0 800 Maximum bag height mm 150 280 Dimensions Height mm 550 700 Width mm 250 220 Depth mm 320 320 Weight Net weight kg 15 19 Packaged weight kg 16 20 4 Noise 2 LpA incertitude K pA 2 5dB dBA 74 74 1 These ratings are provided as a rough guide The exact electrical specifications can be found on the rating plate 2 Noise level measured with sound pressure appliance in operation 1 m...

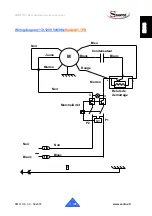
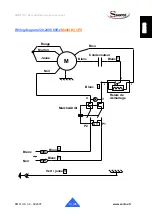
Page 11: ...nual Wiring diagram 110 120V 50 60Hz Model 1 1PS 4 3 2 Relais de démarrage Bleu Marche Arrêt Blanc Blanc Noir Marron Condensateur Noir 4 P1 3 P2 U M Jaune Blanc Rouge Marron Noir Noir Blanc 0 98101 US 3 0 09 2007 11 20 www santos fr ...

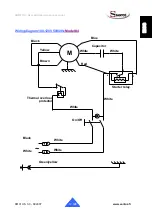
Page 12: ...and maintenance manual Wiring diagram 220 240V 50Hz Model 1 1PS Noir 4 3 2 Condensateur Blanc Blanc Marche Arrêt U 4 P1 3 P2 Blanc Blanc Blanc M Marron Relais de démarrage 0 98101 US 3 0 09 2007 12 20 www santos fr ...

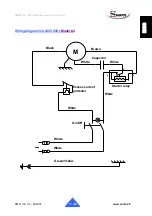
Page 13: ...iring diagram 220 240V 60Hz Model 1 1PS 4 3 2 1 1 Blanc Relais de démarrage Bleu Marche Arrêt Blanc Blanc 1 Blanc Condensateur 4 P1 3 P2 U M Jaune Marron Noir Blanc Rouge 1 Blanc Noir Vert jaune 9 98101 US 3 0 09 2007 13 20 www santos fr ...

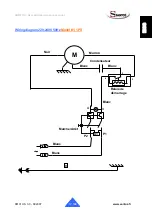
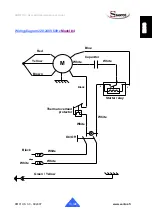
Page 14: ... Wiring diagram 100 120V 50 60Hz Model 4 4 3 2 Starter relay Blue On Off White White White White Green yellow Black White White Capacitor M Yellow White Red Brown Black Thermal overload protector 98101 US 3 0 09 2007 14 20 www santos fr ...

Page 15: ...intenance manual Wiring diagram 220 240V 50Hz Model 4 Black 4 3 2 Capacitor White White M Brown Starter relay On Off White White White Green Yellow Excess current protector White 98101 US 3 0 09 2007 15 20 www santos fr ...

Page 16: ...l Wiring diagram 220 240V 60Hz Model 4 On Off White White Green Yellow Black White Thermal overload protector White 4 3 2 White Starter relay Blue White Capacitor Yellow White Black Brown M Red 98101 US 3 0 09 2007 16 20 www santos fr ...

Page 17: ...SANTOS User and maintenance manual 98101 US 3 0 09 2007 17 20 www santos fr Figures FIGURE A 1 2 3 4 5 6 7 11 12 13 15 14 Model 1PS Model 1 4 5 6 7 8 9 16 15 Model 4 14 13 12 11 10 3 2 1 9 10 8 16 ...

Page 18: ...SANTOS User and maintenance manual 98101 US 3 0 09 2007 18 20 www santos fr 4 6 15 7 19 18 17 17 14 ...

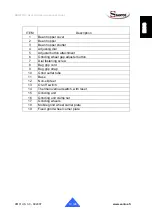
Page 19: ...ding wheel gap adjuster button 7 Dial fastening screw 8 Bag grip cord 9 Bag grip strap 10 Grind outlet tube 11 Base 12 Non slip feet 13 On off switch 14 Thermal overload switch with reset 15 Grinding unit 16 Grinding unit clamp nut 17 Grinding wheels 18 Mobile grind wheel carrier plate 19 Fixed grind wheel carrier plate 98101 US 3 0 09 2007 19 20 www santos fr ...

Page 20: ...companied by a copy of this warranty certificate on which the serial number of the appliance is shown All appliances have an identification plate bearing a serial number identical to that on this warranty certificate In the event of serious damage which is deemed only to be repairable in our workshops and after agreement from our services all appliances under warranty are to be dispatched by the c...

Reviews: