Bedienungsanleitung / User manual VTC-249IRP/W
_________________________________________________________________________________
- 25 -
4. Adjustments
Lens adjustment:
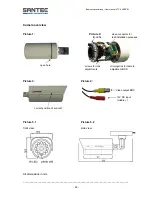
(picture 2)
Lens control (focal length and focus) is done by the two setting rings.
Carefully loosen the two safety screws a bit so that you are able to turn the setting rings. In
order to achieve the ideal angle of view, turn the zoom ring until you get from a wide angle
area to a zoom area or vice versa. Then use the second ring to adjust the sharpness.
Finally seize the two safety screws again carefully.
OSD adjustment:
The camera adjustments are done by an OSD (on-screen-display) menu. On the camera
board you will find a mini-joystick (picture 2). Press onto this joystick and a menu pops up in
the video picture. You can now move the joystick left/right/up/down in order to get to the
desired menu item. For confirming your choice, press onto the joystick.
See chapter “Camera adjustments via OSD menu” for further details.
Additional video connection:
(picture 2)
This additional video connector can be used with the included adapter, e.g. if you want to
install a monitor during the installation phase in case the regular video cable has already
been laid.
After all adjustments are made, carefully close the housing again. Make sure not to damage
the rubber gasket. It should be kept smooth by treating it with acid-free fat, e.g. Vaseline.
Improper handling of the appliance will invalidate the warranty.
Sun-roof mounting:
(picture 3)
After the camera adjustments are made and the camera is put into the correct position, the
housing is closed and fixed again. Now the sun-roof is put onto the camera housing. The
sun-roof should be flush with the backside of the camera. It is not necessary to use screws to
fix the sun-roof.
Safety precautions for IR-LEDs:
(picture 2)
Always keep a distance of > 1 m to prevent damages to your health. Never look directly into
the IR-LEDs to avoid eye damages.

