background image

23

ENGLISH

Playback procedure

1

Press 

TV/DVD

 to select DVD mode.

2

Place the disc in the 

disc slot with the label 

side facing forward. (If 

the disc has a label.) 

Hold the disc without 

touching either of its 

surfaces, align it with 

the guides, and place it 

in position.

3

On the screen, “ ” changes to “Reading” and 

then playback will commence.

A menu screen may appear on the TV screen, 

if the disc has a menu feature. In this case, 

press 

 or 

ENTER

 to operate a menu 

feature.

Reading

4

Press 

STOP

 to end playback.

The unit memorizes the stopped point, 

depending on the disc. “ ” appears on the 

screen. Press 

PLAY

 to resume playback (from 

the scene point).

If you press 

STOP

 again (“   ” appears on the 

screen) or unload the disc, the unit will clear the 

stopped point.

5

Press  

(EJECT)

.

Remove the disc and then press 

POWER

.

The unit turns off.

When you eject the disc, you may hear 

mechanism noise, but it is not malfunction.

NOTE:

If a non-compatible disc is loaded, “Incorrect Disc”, 

“Region Code Error” or “Parental Error” will appear 

on the TV screen according to the type of loaded 

disc. If these appear, check your disc again (see 

pages 8 and 30).

Some discs may take a minute or so to start 

playback.

If an 8 cm disc is placed into the disc slot and 

picture playback or menu display does not begin 

automatically, press 

PLAY

.

A “Prohibition” symbol “ ” may appear at the upper 

right of the screen. This symbol means either the 

feature you tried is not available on the disc, or the 

unit cannot access the feature at this time. This 

does not indicate a problem with the unit.

If you place a single-faced disc label backwards (i.e. 

the wrong way) “Reading” will appear in the display 

and then “Incorrect Disc” will be displayed.

Some playback operations of DVDs may be 

intentionally fixed by software producers. Since 

this unit plays DVDs according to the disc content 

recorded, some playback features may not be 

available. Also refer to the instructions supplied with 

the DVDs.

Preparation

The following pages describe the setup/

operation in DVD mode.

Preparation

Before DVD/CD operation, please make the following 

preparations.

1

Insert the AC cord plug into a standard 120V 

60Hz polarized AC outlet. 

If the AC cord plug is plugged in for the first 

time, wait for about 5 seconds before pressing 

POWER

.

NOTE:

When connecting to other equipment, unplug 

the unit from the AC outlet.

2

Press

 POWER

 on the unit or on the remote 

control to turn on the unit. The POWER indicator 

will change to green.

Each time you turn the unit ON, the TV/DVD 

starts from the TV mode.

When using an amplifier, switch on the amplifier. 

3

Press 

TV/DVD

 to select DVD mode.

The DVD startup screen will appear on the screen.

NOTE:

If the unit does not operate properly: 

Static electricity, etc., may affect the player’s 

operation. Disconnect the AC power cord once, 

then connect it again.

About inserting disc: 

If the unit is slanted or moved while insertiag disc, 

the disc may get damage.

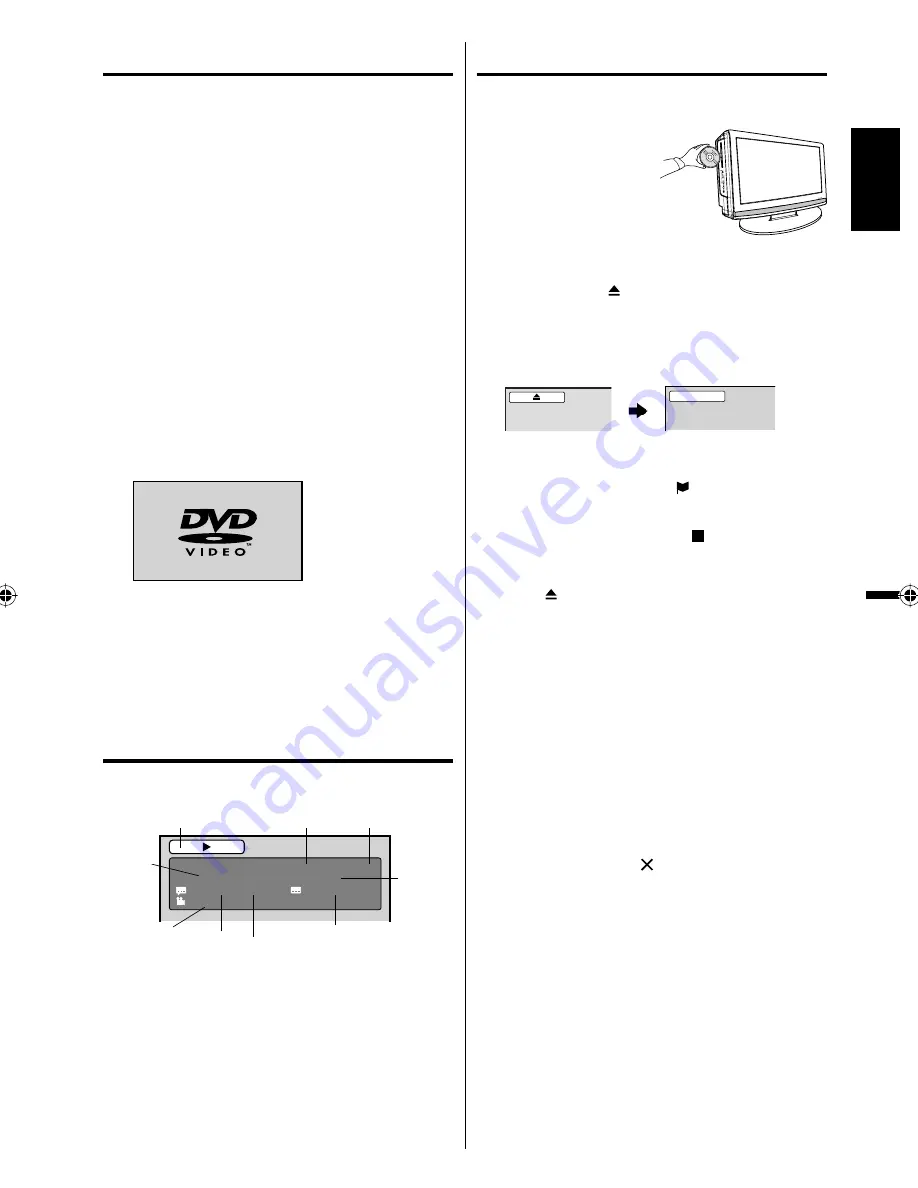
Status display of disc

Press 

DISPLAY

. The status display of the disc will 

appear on the screen.

DVD

    00:15:25   01:41:39

Title 1/3

 Chapter 2/24

1/1 Eng Dolby Digital

1/2 Eng

1/1

DISC OPERATION

ELAPSED TIME

TOTAL TIME

CHAPTER 

NO.

SUBTITLE LANGUAGE

A KIND OF AUDIO

AUDIO LANGUAGE

ANGLE NO.

TITLE NO.

To make the status display screen disappear, press 

DISPLAY

 again.

52C0121A_eng.indd   23

52C0121A_eng.indd   23

12/26/08   11:27:09 AM

12/26/08   11:27:09 AM

Summary of Contents for HDLCDVD195

Page 1: ...levision mode If not using Cable TV set this menu option to the Air position Lorsque l appareil sort de l usine l option Signal Type est en mode Cable c blodistribution Si vous n utilisez pas la c blo...

Page 2: ...TO RAIN OR MOISTURE TO PREVENT THE SPREAD OF FIRE KEEP CANDLES OR OPEN FLAMES AWAY FROM THIS PRODUCT AT TIMES CAUTION TO PREVENT ELECTRIC SHOCK DO NOT USE THIS POLARIZED PLUG WITH AN EX TENSION CORD R...

Page 3: ...harges Section 810 of the National Electrical Code ANSI NFPA 70 provides information with respect to proper grounding of the mast and supporting structure grounding of the lead in wire to an antenna d...

Page 4: ...is may cause skin inflammation If the liquid gets in your mouth immediately gargle and consult with your doctor Also if the liquid gets in your eyes or touches your skin consult with your doctor after...

Page 5: ...ost images This type of damage is NOT COVERED BY YOUR WARRANTY Never leave your LCD Panel on for long periods of time while it is displaying the following formats or images Fixed Images such as stock...

Page 6: ...ection Press it in direction of arrow until click How to remove the stand When you transport this product remove the stand and put into an attached container box For wall mounting the base must be dis...

Page 7: ...ction of your desired scenes using Title Chapter Time Track You can play back from the desired scene Recalling Up to 3 Scenes You can program up to 3 scenes in memory and recall the marked scenes Fram...

Page 8: ...20 Closed Caption 21 CC advanced 21 Setting the picture size 21 DVD operation Preparation 23 Status display of disc 23 Playback procedure 23 Special playback 24 MP3 WMA JPEG and Audio CD playback 24 P...

Page 9: ...egion number 1 or ALL of DVD video discs can be used on this unit Title When two or more movies are recorded on a disc the disc is divided into two or more sections Each section is called a TITLE Chap...

Page 10: ...ing during the menu screen operations POWER button INPUT ENTER button VOLUME buttons CHANNEL 1 PLAY button MENU button Remote sensor POWER indicator EJECT button Left side CHANNEL 3 STOP button DISC s...

Page 11: ...n the menu TOP MENU Select title SEARCH Fast Forward Review playback PLAY Playback SKIP Skip chapter to forward or reverse direction SUBTITLE Set subtitle STOP Stop SLOW Forward Reverse slow motion PA...

Page 12: ...not be operated for an extended period of time Power source TO USE AC POWER Connect the AC cord plug into this unit s AC IN jack Connect the AC cord into an AC outlet 1 2 NOTE Please make sure to ins...

Page 13: ...o the antenna jack If your combination VHF UHF antenna has a 300 ohm twin lead wire the use of the 300 75 ohm matching transformer may be necessary Connect the UHF 300 ohm twin lead wire to the Combin...

Page 14: ...uire the use of a Converter Descrambler box you may wish to use a signal Splitter and an A B Switch box available from the Cable TV company or an electronics supply store Follow the connections shown...

Page 15: ...lection 0 9 buttons to select the channel If you press only channel number channel selection will be delayed for a few seconds TO SELECT ANALOG CHANNELS 1 9 Press 1 9 as needed Example to select chann...

Page 16: ...sound will be silenced and Mute will appear on the screen The sound can be switched back on by pressing this button again or the VOL or SLEEP To set the TV to turn off after a preset amount of time pr...

Page 17: ...roughness of the picture Audio Bass Treble Balance You can adjust the sound quality to your preference MTS Stereo Mono SAP The multi channel TV sound MTS feature provides high fidelity stereo sound M...

Page 18: ...nce for several minutes please be patient NOTE Memorizing channels is best accomplished during evening PRIMETIME hours as more stations are broadcasting digital signals Memorizing channels can only be...

Page 19: ...u will appear 3 Press or to select a channel you want to label then press Ch Label Label Clear Adjust Ch Label Channel Number 15 1 Select 4 Press or repeatedly until the character you want appears in...

Page 20: ...ars old and above TV MA 17 years old and above Genre ALL All D Dialogue L Language S Sex V Violence FV Fantasy Violence Movie Rating G PG PG 13 R NC 17 X ENTER Set Movie Rating Select G All ages PG Pa...

Page 21: ...1 Select Setup then press or ENTER 2 Press or to select Closed Caption then press or ENTER The Closed Caption menu will appear 3 Press or to set CC Setting to On On Captions will be displayed on the s...

Page 22: ...1 Cinema Wide1 2 Cinema Wide2 0 4 Select 0 Natural 4 Full 3 Cinema Wide3 NOTE Selectable picture sizes may vary depending on the input source or broadcast signal Picture Size menu also can be displaye...

Page 23: ...If you place a single faced disc label backwards i e the wrong way Reading will appear in the display and then Incorrect Disc will be displayed Some playback operations of DVDs may be intentionally f...

Page 24: ...WMA JPEG encoding software not supplied The Apple HFS System cannot be played MP3 WMA JPEG CD information Limitations on MP3 WMA JPEG CD playback MP3 WMA JPEG CD is the disc that is standardized by I...

Page 25: ...ions You can use Program playback Repeat Track or All and Random functions for MP3 WMA JPEG and Audio CD Playback see pages 25 and 26 JPEG playback 1 In the file browser press to select the desired JP...

Page 26: ...The track repeat function is canceled when SKIP or is pressed In case of Audio CD the function of A B Repeat also can be used See A B Repeat playback on page 27 Random playback CD 1 In the file brows...

Page 27: ...he TV DVD stores the points that you want to watch again You can resume playback from that scene Marking the scenes 1 Press MARKER during playback 2 Select the blank Marker using or then press ENTER a...

Page 28: ...VD Title selection Two or more titles are recorded on some discs If the title menu is recorded on the disc you can select the desired title 1 Press TOP MENU during playback Title menu appears on the s...

Page 29: ...deo Suitable for playback of video content pictures JPEG Interval 4 You can continuously playback all JPEG files automatically Off Plays back one file at a time 5 10 15 Seconds Displays images in the...

Page 30: ...the setting cannot be changed unless you enter the correct password Setting the new password 1 Press SETUP TV MENU in the stop mode or No Disc Press or to select option then press or ENTER 2 Press or...

Page 31: ...ar 3030 Bengali Bangla 1224 Hebrew 1933 Nepali 2415 Telugu 3015 Bhutani 1436 Hindi 1819 Norwegian 2425 Thai 3018 Bihari 1218 Hungarian 1831 Oriya 2528 Tibetan 1225 Breton 1228 Icelandic 1929 Panjabi 2...

Page 32: ...onent for the location of video and audio inputs and outputs To connect the LCD TV DVD to a VCR Connections to other equipment To connect to a DVD player with Component Video Input You can enjoy a hig...

Page 33: ...Subwoofer Surround Speaker Left Surround Speaker Right TV DVD NOTE When you are viewing digital broadcast this unit will not work in conjunction with DTS audio or MPEG audio There will be no sound out...

Page 34: ...edia computer and to the AUDIO connector of the PC AUDIO IN jack of the TV DVD Press INPUT SELECT on the remote control to select PC mode Switch on the computer The TV DVD can operate as the computer...

Page 35: ...ARIATION A slight picture size variation is normal when you adjust the CONTRAST or BRIGHTNESS settings Most types of television interference can be remedied by adjusting the height and position of the...

Page 36: ...e control adjustments Check antenna or Cable TV connections reorient antenna Check for sources of possible interference 15 18 17 13 14 35 Picture wobbles or drifts Station or Cable TV experiencing pro...

Page 37: ...is selected Check the Parental setup 30 Audio soundtrack and or subtitle language is not changed when you play back a DVD Multilingual language is not recorded on the DVD disc 28 No subtitle Some dis...

Page 38: ...1 100 135 100 135 01 5A Inputs S Video Y Input 1 0 V p p 75 ohms C Input 0 3 V p p 75 ohms Video RCA 1 V p p 75 ohms Audio RCA 8 dBm 50K ohms Component video Y 1 V p p 75 ohms Pb Pr 0 7 V p p 75 ohms...

Reviews: