background image

INSTRUCTION FOR USING THE SPA OUTDOORPOOL

55

PROGRAMMING INSTRUCTIONS

56

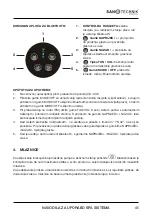
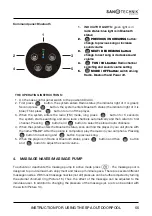
THE PANEL BUTTONS:

THE OPERATING INSTRUCTIONS:

1.

First press           button, the system enters Radio status (the indicator light of it is green); 
Second press             button, the system enters Bluetooth status (the indicator light of it is 
blue); Third press

  button to turn off the player.

2.

When the system enters the radio (FM) mode, long press          button for 3 seconds, 
the system starts searching and store radio channels automatically and then return to first 
channel. Pressing            button and           button to select the stored radio channels.

3.

When the system enters the Bluetooth status, scan and find the player in your cell phone with 
the name “

YS-02

”. After the pairing is completed, play the music in your cell phone. Pressing 

                button to next song and            button to previous song.
4.

When the player is in Radio or Bluetooth status, press            button and then             button 
and            button to adjust the sound volume. 

1

2

3

4

5

1.

INDICATOR LIGHTS: 

green light is in

radio status; blue light is in Bluetooth
status;

2.

PREVIOUS / INCREASING 

button:

change to previous song or increase 
sound volume

3.

NEXT / DECREASING button:

change to next song or decrease sound 
volume

4.

TUN / VOL button: 

Radio channel

searching and sound volume setting

5.

MODE / OFF button: 

switch among 

Radio, Bluetooth and Power off.

PROGRAMMING INSTRUCTIONS

56

THE PANEL BUTTONS:

THE OPERATING INSTRUCTIONS:

1.

First press

button, the system enters Radio status (the indicator light of it is green); 

Second press             button, the system enters Bluetooth status (the indicator light of it is 
blue); Third press

  button to turn off the player.

2.

When the system enters the radio (FM) mode, long press          button for 3 seconds, 
the system starts searching and store radio channels automatically and then return to first 
channel. Pressing            button and           button to select the stored radio channels.

3.

When the system enters the Bluetooth status, scan and find the player in your cell phone with 
the name “

YS-02

”. After the pairing is completed, play the music in your cell phone. Pressing        

button to next song and

button to previous song.

4.

When the player is in Radio or Bluetooth status, press

button and then

button 

and

button to adjust the sound volume. 

1

2

3

4

5

1.

INDICATOR LIGHTS: 

green light is in 

radio status; blue light is in Bluetooth 
status;

2.

        PREVIOUS / INCREASING 

button: 

change to previous song or increase 
sound volume

3.

        NEXT / DECREASING button: 

change to next song or decrease sound 
volume

4.

         TUN / VOL button: 

Radio channel 

searching and sound volume setting

5.

        MODE / OFF button: 

switch among 

Radio, Bluetooth and Power off.

2.

1.

5.

3.

4.

THE OPERATING INSTRUCTIONS:

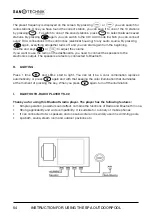
Kommand panel: Bluetooth

4. MASSAGE NAVES/MASSAGE PUMP

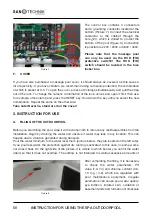
To activate or deactivate the massage pump in active mode press          . The massage pool is 
designed to provide maximum enjoyment and take up minimal space. There are several different 
massage nozzles. With most massage nozzles (not all!) pressure can be further adjusted by turning 
the external chromed ring (Picture 15). Thus, the effect of the massage can be adjusted to the 
individual user. In addition to changing the pressure of the massage jet, a jet can be added with 
the switch (Picture 14).


On the base control panel switch to the position CD/AUX

Summary of Contents for SANOSPA XXL1908

Page 1: ...SPA11 SPA12 SPA13 SPA14 SPA15 XXL1908 XXL1909 XXL1912 XXL1913 BEDIENUNGSANLEITUNG SPA OUTDOORPOOL GER NAVODILA ZA UPORABO SPA SISTEMA SLO NAVODILA ZA UPORABO SPA SISTEMA HR INSTRUCTION FOR USING THE S...

Page 2: ......

Page 3: ...BEDIENUNGSANLEITUNG OUTDOORPOOL SPA08 SPA09 SPA10 SPA11 SPA12 SPA13 SPA14 SPA15 GER...

Page 4: ...MUNGEN 6 D TRANSPORTWEGE 6 E ELEKTRISCHERANSCHLUSS 7 F ABDECKUNG 9 3 BEDIENUNGSANLEITUNG 9 A BEF LLEN DES WHIRLPOOLS 9 B ERSTINBETRIEBNAHME AKTIV PASSIV MODUS 10 C EINSTELLEN DER UHRZEIT 11 D FILTERZE...

Page 5: ...des Pools verzichtet werden Wer jedoch trotzdem nicht auf die Nutzung verzichten m chte sollte die Wassertemperatur auf max 38 C einstellen Vor der Nutzung des Pools sollte die Wassertemperatur mit ei...

Page 6: ...age liegender Oberfl che aufgestellt werden Es sollte ein Standort sein an dem man min eine Elektroanschluss und im besten Fall einen Wasseranschluss und einen Abfluss hat Wenn m glich sollte man an a...

Page 7: ...inem ortsans ssigen Elektriker Um eine Ordnungsgem e Verbindung herzustellen nutzen Sie bitte die daf r vorgesehenen Anschl sse auf der Platine innerhalb der Controllerbox siehe Seite 9 Alle Leitungen...

Page 8: ...chsichtigen Schutz von den Anschl ssen Abbildung 6 Entfernen Sie nun die Transparente Abdeckung von den Anschl ssen in dem Sie sie einfach abziehen Bild 6 Der Steuerkasten enth lt 4 Anschl sse und ein...

Page 9: ...n und zu halten w hrend dessen Sie die neue Zahl ausw hlen Wiederholen Sie diesen Vorgang auf der anderen Seite Bitte beachten Zu keinem Zeitpunkt auf der Abdeckung stehen sitzen oder liegen 3 BEDIENU...

Page 10: ...terlegten Schriften funktionieren nur im Passiv Modus B ERSTINBETRIEBNAHME AKTIV PASSIV MODUS Sobald der Whirlpool a m Stormnetz angeschlossen i st l euchtet das B edienteil und das L CD Display zeigt...

Page 11: ...ON OFF Set pre heating time Massage pump 1 ON OFF Setting switch Massage pump 2 ON OFF 24 hours circulation cleaning ON OFF Massage pump 3 ON OFF Heater ON OFF Temperature setting 3 1 2 TUNE TUNE MHz...

Page 12: ...nfirm Hour setting CD DVD ON OFF or Switch ON OFF Set circulation cleaning time LED Light ON OFF Set pre heating time Massage pump 1 ON OFF Setting switch Massage pump 2 ON OFF 24 hours circulation cl...

Page 13: ...unktionen Radio und Bluetooth Hohe Kompatibilit t f r eine Vielzahl von Mobiltelefonen Man kann den Radio mit zwei Lautsprechern und einem Subwoofer verbinden Es kann in verschiedenen Bereichen wie Sc...

Page 14: ...enzsuche und Lautst rkeeinstellung 5 MODE OFF Umschalten zwischen Radio und Bluetooth und Ausschalten Steuerung 1 Schalten Sie auf dem Hauptbedienelement in die Position CD AUX 2 Dr cken Sie zuerst Ta...

Page 15: ...wichtig das Wasser vor der ersten Benutzung des Massagebeckens zu chlorieren Verwenden Sie nur schnell l sliches Chlorgranulat und keine Chlortabletten oder fl ssiges Chlor Stellen Sie am Ende des Pro...

Page 16: ...m oder ein weiches Tuch Verwenden Sie niemals Scheuermittel oder raue Gegenst nde um den Pool zu reinigen da sonst das Acryl den Glanz verliert oder sogar Schaden nimmt In diesem Fall erlischt die Gar...

Page 17: ...NAVODILA ZA UPORABO MASA NEGA SISTEMA SPA08 SPA09 SPA10 SPA11 SPA12 SPA13 SPA14 SPA15 SLO...

Page 18: ...I NEGA KABLA 20 D TRANSPORTNE POTI 20 E PRIKLOP NA ELEKTRI NO OMRE JE 20 F POKROV 22 3 NAVODILA ZA UPORABO 22 A POLNJENJE MASA NEGA BAZENA 22 B PRVA UPORABA AKTIVNI PASIVNI NA IN 23 C NASTAVITEV ASA 2...

Page 19: ...saj lahko temperatura prikazana na kontrolniku odstopa od dejanske Konzumacija alkohola drog ali mo nih medikamentov lahko povzro i nezavest in posledi no utopitev e imate prekomerno telesno te o te...

Page 20: ...lj iroke E PRIKLOP DOVOD ELEKTRI NEGA KABLA Priporo amo da za priklop na elektri no omre je najamete elektrikarja priklop na hi no omre je kot tudi priklop elektronike na samem masa nem bazenu Masa ni...

Page 21: ...da snamete panel slika 3 Pri tem bodite pazljivi na kable zvo nikov in razsvetljave v kolikor ti spadajo k va emu modelu da jih ne iztrgate iz ohi ja Slika 1 Slika 2 Slika 3 Slika 4 Elektri ni priklj...

Page 22: ...ujte e morda voda pu a na kak nem neprimernem mestu do tega lahko pride zaradi vibracij nastalih pri transportu Vodo nato ite minimalno do oznake za nivo vode slika spodaj nahaja se na levi strani V k...

Page 23: ...g 1 Control panel Minute setting System ON OFF Setting confirm Hour setting 3 1 2 SET MINUTE HOUR CYCLE PREHEAT F C c Fig 1 Control panel Minute setting System ON OFF Setting confirm Hour setting CD D...

Page 24: ...2 3 c c MINUTE HOUR LOCKED CYCLE PREHEAT F C SET Fig 1 Control panel Minute setting System ON OFF Setting confirm Hour setting CD DVD ON OFF or Switch ON OFF Set circulation cleaning time LED Light O...

Page 25: ...za 10 minut Pritisnite Sedaj lahko nastavite as trajanja gretja s tipkama ali Maximalen as predgretja zna a 19 ur in 50 minut Ponovno pritisnite Sedaj lahko s pritiskom na nastavite temperaturo vode m...

Page 26: ...kom na e elite preklopiti na eno od shranjenih postaj pritisnite s tem boste lahko izbirali med shranjenimi postajami S ponovnim pritiskom na preklopite na CD AUX na in v katerem lahko priklopite prek...

Page 27: ...jate predvajanje 5 Ko je predvajalnik v na inu radio ali Bluetooth z gumboma NAPREJ in NAZAJ spreminjate jakost zvoka 1 2 3 4 5 1 KONTROLNA LU zelena lu je v radijskem stanju modra lu je v stanju Blue...

Page 28: ...aznitev odstranite tudi priklju ke na rpalkah in gretju Izperite tudi filter 5 VZDR EVANJE VODE Pri polnjenju masa nega bazena preverite trdoto va e vode V kolikor va a voda vsebuje veliko vodnega kam...

Page 29: ...ahko po kodujete akril Notranjost izgubi sijaj pojavijo se lahko druge po kodbe in garancija ni ve veljavna 8 NAPAKE Napaka Napaka se prika e kot Odprava napake Nobena od rpalk in ogrevanje ne deluje...

Page 30: ...NAVODILA ZA UPORABO SPA SISTEMA 30...

Page 31: ...NAVODILA ZA UPORABO KL8300 SISTEMA SPA 08 SPA09 SPA10 SPA11 SPA12 SPA13 SPA14 SPA15 CRO...

Page 32: ...PRIMJERENO MJESTO ZA MONTA U 34 D UPUTE ZA TRANSPORT 34 E SPAJANJE NA STRUJU 34 F POKROV 36 3 UPUTSTVA ZA UPOTREBU 36 A PUNJENJE MASA NOG BAZENA 36 B PRVA UPOTREBA AKTIVNI PASIVNI NA IN 37 C NAMJE TA...

Page 33: ...je temperatura prikazana na kontrolnoj plo i odstupa od stvarne Konzumacija alkadhola droga ili jakih medikamentata mo e uzrokovat nesvjesticu i utapanje Ukoliko imate preveliku tjelesnun te inu prob...

Page 34: ...epenice prjelazi vas mogu smetati kod postavljanja masa nog bazena na eljeno mjesto zato predhodno provjerite da su transportne rute jednostavne dovoljno iroke E SPAJANJE NA STRUJU Prepuru ujemo da za...

Page 35: ...jeme budite oprezni na kablove zvu nika i rasvjete Ako jesu na va em modelu da se ne izvade iz ku i ta Slika 1 Slika 2 Slika 3 Slika 4 Elektri ni priklju ak masa nog bazena Otvorite pokrov na suprotno...

Page 36: ...ve male estice iz bazena Zapo nite dodavanjem vode i provjerite je li mo da voda curi na nekom neprikladnom mjestu To se mo e dogoditi zbog vibracija nastilih tijekom transporta Napunite vodu najmanje...

Page 37: ...SET MINUTE HOUR CYCLE PREHEAT F C c Fig 1 Control panel Minute setting System ON OFF Setting confirm Hour setting CD DVD ON OFF or Switch ON OFF Set circulation cleaning time LED Light ON OFF Set pre...

Page 38: ...N OFF Setting switch Massage pump 2 ON OFF 24 hours circulation cleaning ON OFF Massage pump 3 ON OFF Heater ON OFF Temperature setting 3 1 2 TUNE TUNE MHz CH MEM 1 2 3 c c MINUTE HOUR LOCKED CYCLE PR...

Page 39: ...sa svakim pritiskom pove ava za 10 minuta Pritisnite Sada jednostavno namjestite vrijeme trajanja grijanja s tipkama ili Maximalan vrijeme predgrijanja iznosi 19 sati i 50 minuta Ponovno pritisnite Sa...

Page 40: ...te lako izabrat izme u poranjenih postaja S ponovnim pritiskom na spojite se na CD AUX model na kojem imate dvije tipke za pohranjivanje glasno e S ponovnim pritiskom na se sve skupa isklju i i opet...

Page 41: ...a eg ure aja lako s gumbima NAPRIJED i NAZAD mjenjate glazbu 5 Kad je ure aj u na inu radio ili Bluetooth s gumbima NAPRIJED i NAZAD mjenjate ja inu zvuka 1 2 3 4 5 4 MLAZNICE Za uklju ivanje ili iskl...

Page 42: ...njenje bazena otpojite pumpu 5 ODR AVANJE VODE Prilikom punjenja masa nog bazena provjerite tvrdo u svoje vode Ako va a voda sadr i puno kamenca dodajte joj omek iva vode koji titi bazen i tehniku baz...

Page 43: ...ivnih sredstva za i enje jer e te o tetit akril Unutra njost gubi sjaj te gubite garanciju 8 GRE KE Gre ka Gre ka se poka e kad Otklanjanje gre ke Nijedna pumpa ne radi Na zaslonu se poka e E01 senzor...

Page 44: ...NAVODILA ZA UPORABO SPA SISTEMA 44...

Page 45: ...INSTRUCTION FOR USING THE SPA OUTDOORPOOL 45 INSTRUCTION FOR USING THE OUTDOORPOOL SPA 08 SPA09 SPA10 SPA11 SPA12 SPA13 SPA14 SPA15 ENG...

Page 46: ...D TRANSPORTATION 48 E ELECTRICAL CABLE CONNECTION SUPPLY 48 F COVER 50 3 INSTRUCTION FOR USE 50 A FILLING OF THE OUTDOORPOOL 50 B FIRST USE ACTIVE PASSIVE MANNER 50 C SETTING THE TIME 52 D FILTERING...

Page 47: ...r as the temperature displayed on the controller may deviate from the actual temperature Consumption of alcohol drugs or strong medicines can cause unconsciousness and consequent drowning If you are o...

Page 48: ...free and wide enough E ELECTRICAL CABLE CONNECTION SUPPLY We recommend that you hire an electrician to connect to the electric network connection to the home network as well as to connect the electro...

Page 49: ...ure 3 Be careful with speaker cables and lighting if they belong to your model to avoid tearing them out of the chassis Electrical connection of the massage pool Open the cover on the side of the scre...

Page 50: ...r minimum to the water level mark picture below they are located on the left side If you pour less water the protection against dry running is activated In this case no pump works nor does it heat On...

Page 51: ...N OFF Temperature setting Surf Water pump 1 ON OFF Fig 1 Sketch map of big massage bathtub NAVODILA ZA UPORABO MASA NEGA SISTEMA 21 B PRVA UPORABA AKTIVNI PASIVNI NA IN Takoj ko je masa ni bazen prikl...

Page 52: ...manner The lock will start work by pressing Button in the status of Waitting Mode or no pressing operation lasting above 30 minute In the status of Locked press the button twice the lock will be unlo...

Page 53: ...program to be active once a day or is active continuously For the daily pre heating setting in passive mode press then press or to set the initial heating time The minimum heating time is 5 minutes a...

Page 54: ...able for a variety of mobile phones It can connected to two speakers and one subwoofer and is widely used in swimming pools spa bath sauna steam room and outdoor pavilions etc PROGRAMMING INSTRUCTIONS...

Page 55: ...ess button and then button and button to adjust the sound volume 1 2 3 4 5 1 INDICATOR LIGHTS green light is in radio status blue light is in Bluetooth status 2 PREVIOUS INCREASING button change to pr...

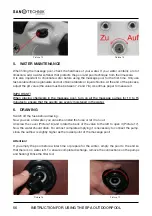
Page 56: ...ischarge remove the connections on the pumps and heating Rinse the filter too Picture 14 Picture 15 Picture 16 Picture 17 5 WATER MAINTENANCE When filling the massage pool check the hardness of your w...

Page 57: ...damage acrylic The interior loses its brilliance other injuries can occur and the warranty is no longer valid 8 ERRORS Error Error is shown as Troubleshooting None of the pumps and heating does not wo...

Page 58: ......

Page 59: ......

Page 60: ...E info sanotechnik si SC SANOTECHNIK COM RUMANIEN S R L ROMANIA Tancabesti DN 1 KM 26 5 Com Snagov jud llfov T 40 21 350 13 43 F 40 21 350 13 44 E office sanotechnik ro SANOTECHNIK HUNG RIA KFT HUNGA...

Reviews: