*
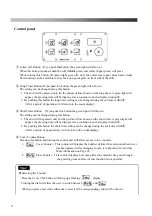
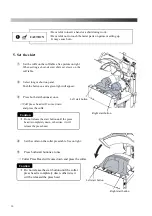
If long timer is selected during press, long timer
lamp button will light. If short timer is selected
during press, short timer lamp button will light.
*
Press the reset button to release the press position.
⑥
Collar and cuff press head will be released
automatically after the timer complete.
⑦
Remove the shirt from the press, then place the
next shirt and setup again.
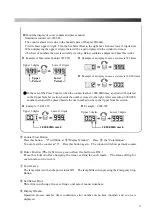
When you want to reset the counter indicator,
Please push the "Counter Clear" Button of a console panel. "0" will blink at "Display Window".
Press the "Enter Button".
You can reset the counter at "0". Press this button again.
6. After operation is over
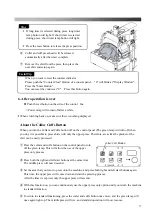
Push the red button on the side of the control
box.
→
Power lamp will turned off after a while.
*
When switching back on, make sure there is nothing displayed.
About the Collar Cuffs Button
When you turn the Collar and Cuffs button off on the control panel (The green lamp will turn off when
you do,) it is possible to press shirts with only the upper press. Therefore, areas like the placket of the
shirt can be easily processed.
①
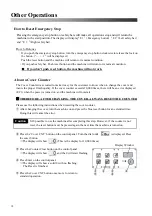
Press the collar and cuffs button on the control panel to turn
off the green lamp. This will allow the use of the upper
press only process.
②
Press both the right and left start buttons at the same time.
The middle press will now descend.
③
Set the area that you want to press onto the machine, and press both right and left start buttons again.
This time, the upper press will come down and start the pressing process.
After the timer is expired, only the upper press will ascend.
④
With this function on, you can continuously use the upper press only option until you return the machine
to standard function.
⑤
To return to standard functioning, press the collar and cuffs button once more, and the green lamp will
once again light up. The middle press will rise, and standard operation will now resume.
Tips
Useful Tip
Collar
・
Cuff
Button
17
Summary of Contents for LP-660E-V2
Page 2: ......
Page 38: ...36...
Page 39: ...Spare Parts List Index 1 Front Diagram 2 Rear Diagram 3 Steam Piping 4 Cover Diagram 37...
Page 40: ...1 Front Diagram REV 1 38...
Page 44: ...3 Steam Piping REV 1 42...
Page 46: ...4 Cover Diagram REV 1 44...
Page 50: ......
Page 51: ......
Page 52: ......
Page 53: ......


