background image

6

Power the radio

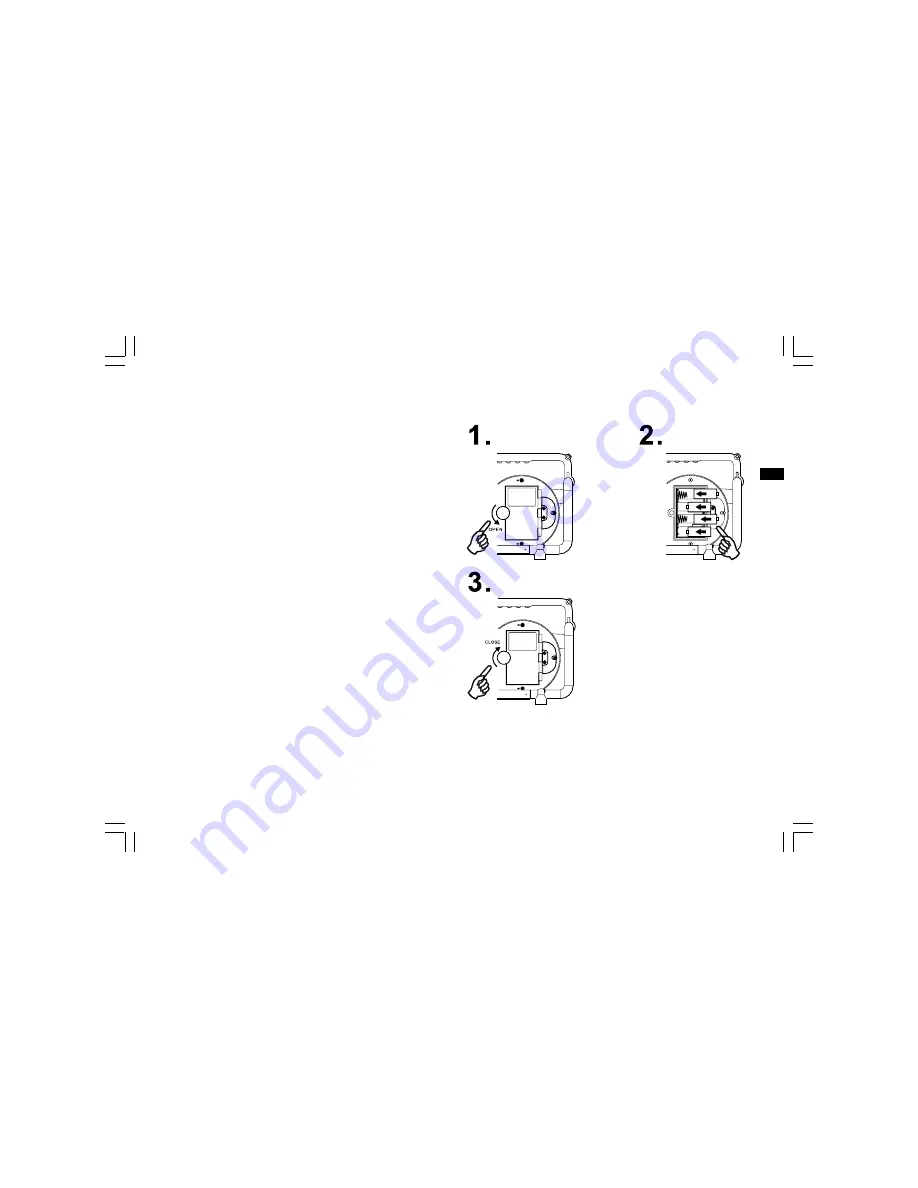
1. Installing the batteries, first turn battery cover fixture anti-clockwise
    to loosen and pull down the battery cover.
    Note:
    Before you insert the batteries, if you use non-rechargeable
    batteries, make sure NiMH/Alkaline switch to Alkaline position.

2. Insert 4 x C size (UM-2) batteries into the compartment. Ensure the
    battery is inserted in accordance with the diagram shown.

Close the battery cover and fasten the fixture by turning clockwise.
If the radio is not to be used for any extended period of time, it is
recommended that the battery is removed from the radio.

Reduced power, distortion and a “stuttering sound” or low battery LED
indicator in red color is on are all signs that the batteries need replacing
or recharged (see below charge the batteries).

3. AC Operation
Before plug the AC power cord into the AC socket, be sure the voltage
is correct. If you have batteries in the radio and connect AC power cord
into the AC socket, the batteries will automatically be disconnected.

AC power cord storage is designed to store the cord when the radio is
not in use.

GB

Summary of Contents for DAB+BOX

Page 1: ...FM RDS DAB Digital Radio DAB BOX 3A81UC1000000 Operating instruction GB...

Page 2: ...g a Station Secondary Service DAB 9 Display Modes DAB 10 Finding New Stations Manual Tuning DAB 11 Autoselect DAB 12 Dynamic Range Control DRC settings DAB 13 Prune stations 14 Operating Your Radio FM...

Page 3: ...om the apparatus 11 Only use the attachments specified by the manufacturer 12 Use only with the cart stand tripod bracket or table specified by the manufacture or sold with the apparatus When a cart i...

Page 4: ...4 5 6 7 8 9 10 11 Volume control knob Tuning control Select knob FM DAB antenna LCD display Charge LED indicator Power On Off button Band button Auto Tune button Info button Preset stations Speaker C...

Page 5: ...4 12 13 14 Aux In socket Battery compartment Power cord storage Controls GB...

Page 6: ...5 15 Alkaline NiMH NiCad rechargeable battery switch Controls...

Page 7: ...urning clockwise If the radio is not to be used for any extended period of time it is recommended that the battery is removed from the radio Reduced power distortion and a stuttering sound or low batt...

Page 8: ...cket located on the rear of your radio Plug the adaptor into a standard mains outlet The display will show Welcome to DAB for a few seconds and then the display will show Clock not set During this tim...

Page 9: ...he last used station will be selected 4 During Autotune as new stations are detected the station counter on the right hand side of the display will increase and station will be added to the list The t...

Page 10: ...ting Note If after selecting a station the display shows not available it may be necessary to relocate your radio to a position giving better reception Secondary service DAB 1 Certain radio stations h...

Page 11: ...vel required for satisfactory reception displays type of station being listened to e g Pop Classic News etc displays name of multiplex to which current station belongs displays current channel and fre...

Page 12: ...the right hand side of the display will increase and stations will be added to the list Manual Tuning DAB Manual tuning allows you to tune directly to the various DAB band III channels 1 Press and hol...

Page 13: ...Autoselect press and hold the Tuning control Select knob until the display shows Auto selection ON 2 Rotate the Tuning control until the station you required is visible on the display After a few seco...

Page 14: ...ol knob to find DRC value Press and release the Tuning control knob to enter adjustment mode 3 Rotate the Tuning control knob to select required DRC setting default is off DRC off DRC is switched off...

Page 15: ...hich have not been received for a very long time are shown in the station list with a question mark The prune stations function will delete the marked DAB stations from your station list 1 Press and h...

Page 16: ...waveband 3 Press and release the Auto Tune button your radio will search upwards and stop automatically when it finds a station of sufficient strength 4 When the waveband end is reached your radio wi...

Page 17: ...Rotate the Tuning control rightward or leftward to tune to a station The frequency will change in steps of 50 kHz When the waveband end is reached the radio will recommence tuning from the opposite wa...

Page 18: ...ous modes displays scrolling text messages such as artist track name phone in number etc displays type of station being listened to e g Pop Classic News etc displays the frequency of the station being...

Page 19: ...to confirm the setting Preset stations in DAB and FM modes There are 5 memory presets for each DAB FM wavebands 1 Press the Power On Off button to switch on your radio 2 Tune to the required station a...

Page 20: ...set in DAB and FM modes 1 Press the Power On Off button to turn on the radio 2 Select the required waveband 3 Momentarily press the required Preset button the preset number and station will appear in...

Page 21: ...ontrol to select System then press and release the Tuning control The display will show Factory Reset Press and release the Tuning control to enter the setting then press and release the Tuning contro...

Page 22: ...otate the Tuning control to select System 2 Press and release the Tuning control to enter the setting Rotate the Tuning control to find SW version then press and release the Tuning control to view the...

Page 23: ...approx 10 seconds Using AC power to power the radio when radio is switched on LCD display will be always illuminated Aux In socket The Aux In socket is to connect audio source like MP3 player or CD wa...

Reviews: