S&S Cycle 124 Twin Cam Style Assembly And Installation Instructions Manual Download Page 13

H. Fuel system installation and tuning

NOTES - S&S Engine assemblies are available with either
carbureted or fuel injected systems.

Assembled Engines  are shipped with the
carburetor or fuel injection system installed.  Refer to
the included instructions for operation and tuning .

Unassembled Engines are shipped with the fuel
system packaged separately. Refer to the included
instructions for installation and tuning .

1.  Install fuel system.

1.

Engine asemblies supplied with Super “G”
carburetors, refer to included instruction Sheet
#51-1012.

2.  Engine assemblies supplied with Super “D”

carburetors,refer to included Special
Application Racing Carburetor Supplement for
additional information.

3. Engine assemblies supplied with fuel injection,

refer to included Induction System instruction
Sheet 

2.  Re-install and connect fuel tank.

1.  Refer to appropriate service manual. Inspect

fuel lines and clamps - replace as necessary.

2.  Check fuel line connections and routing. Avoid

hot surfaces. Make certain that the protective
cover has been placed over fuel line, and that
it is clear from sharp edges and abrasive
surfaces.

3.  Fill the fuel tank with a sufficient quantity of

gasoline for the initial start-up proceedure. 

4.  Double check that all fuel line connections

have been made correctly and there is no gas
leakage at any point in the system.

I.  Oil Tank, Fittings, and Oil Lines 

1. Oil 

Tank 

Preparation

1.  Remove and flush oil tank thoroughly before

installing oil lines. Flush oil cooler also, if so
equipped.

2.  Re install oil tank per appropriate OEM manual

3.

Install S&S Oil Tank Fittings 

a.

Remove the OEM fittings from the existing
oil tank. (transmission mounted oil tanks
only)

b.

Install S&S supplied fittings using LOCTITE
PIPE SEALANT 565. Tighten to 120-144
in.-lbs.

CAUTION - If engine is run with foreign material in the
oil tank, engine damage will occur. Engine damage
caused by foreign material in the oil tank

is not

covered under the S&S warranty

NOTES:

When installing threaded fittings, be careful not to cross-

thread fittings or damage threads. Damage caused by
incorrect hardware installation will not be covered under
warranty.

To prevent galling, apply  pipe sealant, or Teflon tape to

threads of all steel fittings prior to installation in crankcase. 

If  Teflon tape is used, loose tape must not enter

crankcase or oil passages. Do not apply tape to first 2-3
threads that screw into hole. If fittings are removed or
replaced be sure no tape shreds remain in holes. Tape
shred could block oil passages causing restriction of oil flow.

CAUTION -  Restricted oil flow may result in extensive
engine damage not covered under warranty.

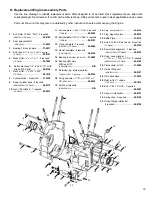
2.  Oil conduit block and oil hose installation 

See Picture I1

13

Conduit Block

Grade 5 bolt and washer

O-rings

Oil tank fittings

Picture I 1

Summary of Contents for 124 Twin Cam Style

Page 1: ...ctions S S Cycle Inc 14025 County Highway G Box 215 Viola Wisconsin 54664 Phone 608 627 2080 Fax 608 627 1488 Technical Service Phone 608 627 TECH 8324 Technical Service Email sstech sscycle com Website www sscycle com For all S S Twin Cam style Engine Assemblies with Twin Cam style or optional Evolution style engine mounting All S S Twin Cam style Engine Assemblies are Type A style non counterbal...

Page 2: ... a well ventilated area where fumes can dissipate WARRANTY All S S parts are guaranteed to the original purchaser to be free of manufacturing defects in materials and workmanship for a period of twelve 12 months from the date of purchase Merchandise that fails to conform to these conditions will be repaired or replaced at S S s option if the parts are returned to S S by the purchaser within the 12...

Page 3: ...d include oil pump oil pressure switch cam support plate cam cover tappets tappet covers and oil filter bracket Installation can be performed by any Harley Davidson repair shop equipped to do complete engine overhauls No special tools other than those used in normal engine building operations are required NOTES Installation of a fuel injected engine in a motorcycle that was originally equipped wit...

Page 4: ...Davidson Service Manual These materials should be cross referenced as necessary IMPORTANT Before proceeding verify that serial numbers on crankcases match numbers on packing carton and certificate of origin Contact S S immediately if numbers do not match NOTE Valid certificate of origin is required for any transfer or sale of longblock assemblies Certificate of origin is required to title and lice...

Page 5: ...ting polishing glass bead blasting or other modification will not be covered under warranty Powder Coating Subjecting heat treated alloys such as those used in S S crankcases to excessive heat can drastically alter their strength and their critical properties The degree of change depends upon the temperatures reached and the duration of exposure When powder coating or otherwise processing alloy pa...

Page 6: ... additional clearancing and shimming may occasionally be required When this style of case is solid mounted instead of rubber mounted additional care must be taken in installing the case Main areas of concern are between cases and frame motor mounts Checking clearance around and between case mounting bosses and frame is necessary to insure that crankcase rests squarely on motor mount pad and no str...

Page 7: ...ywheels in crankcase 1 Thoroughly clean parts according to instructions previously mentioned Apply coat of assembly lube to bearing surfaces 2 Place flywheel assembly onto a suitable holding fixture with sprocket shaft pointing up See Picture E3 3 Install case and Timken bearing onto shaft with appropriate tool See Picture E4 NOTE Do not use a press to install sprocket shaft bearings as this can p...

Page 8: ...motor oil over bearing end of connecting rod assembly and into flywheel cavity Rotate flywheels several times to distribute oil over connecting rod bearings Assembly should turn freely and without binding CAUTION Do not carry crankcase by the studs It stresses the crankcase and studs in ways they are not designed to handle Also it is easy to drop and damage the case when it is carried by the studs...

Page 9: ...9 Use tool to guide bearing rollers onto inner race Picture E9 Picture E12 Picture E10 Picture E13 Picture E11 Figure 1 Picture E7 1 2 3 4 5 6 7 8 9 Picture E8 ...

Page 10: ... b Lubricate wristpin wristpin bushing and wristpin bore in piston with assembly lube Raise the previously installed support ring in the lower groove to allow the wrist pin to slide in under it Install wristpin through piston and connecting rod secure with new retaining clips two per piston c The moly faced ring is installed in the top piston ring groove chamfer side up d The plain cast ring is in...

Page 11: ...re 6 S S Reed Valve installation The S S Reed Valve Assembly 31 2071 included with the crankcase is an effective way to control internal air pressures inside the crankcase reducing oil carry over blow by and oil leakage It is a one way valve that allows for the smooth passage of air through and out of the engine breathing system Installation of the S S Reed valve is optional It is not required for...

Page 12: ...es are handled automatically by the S S IST ignition 2 Once the IST ignition has been installed per the included instruction sheet 51 1155 no other adjustments are necessary NOTES If the S S IST ignition is not used S S recommends using electronic ignition with adjustable advance curve in S S Twin Cam Style engines Adjustable curve permits slowing rate of advance to control or eliminate pinging un...

Page 13: ...here is no gas leakage at any point in the system I Oil Tank Fittings and Oil Lines 1 Oil Tank Preparation 1 Remove and flush oil tank thoroughly before installing oil lines Flush oil cooler also if so equipped 2 Re install oil tank per appropriate OEM manual 3 Install S S Oil Tank Fittings a Remove the OEM fittings from the existing oil tank transmission mounted oil tanks only b Install S S suppl...

Page 14: ...CAUTION Improper installation of oil lines or fittings may result in parts damage not covered under warranty 3 Oil recommendations NOTES S S Cycle suggests that the engine be broken in using a regular petroleum based oil It allows the required wear patterns to form on mating parts for proper break in Experience has shown that synthetic oils will not allow new parts to wear enough in the break in p...

Page 15: ... failure of exhaust pipes or mounting hardware K Initial Start Up And Engine Break In NOTE engines are designed for high performance and as such are not as tolerant of inadequate break in as stock or lower performance engines Correct break in will assure longer engine life and will prevent unnecessary engine damage Engine damage caused by improper break in is not covered under the S S warranty 1 I...

Page 16: ...ve speed trailer towing or sidecar operation 5 After 1000 miles verify Ignition and fuel system settings and adjustments Change the engine oil The break in process is complete L Tuning Guidelines Ignition timing and carburetor jetting are responsibilities of the customer If not thoroughly familiar with these procedures contact a professional mechanic 1 Exhaust Systems Muffled exhaust systems If yo...

Page 17: ...e in case tight 001 003 less than 0025 Connecting Rods Specification Service Wear Limit Crankpin bearing 001 0012 002 Running clearance Piston pin fitment in rod 0005 001 002 Connecting rod side play 015 035 040 Torque Values Specification S S Suggestion Rocker box hardware 1 4 120 in lbs Loctite 243 Rocker box hardware 5 16 18 ft lbs Loctite 243 Tappet guide fasteners 120 in lbs Loctite 243 Pushr...

Page 18: ...miles and every 2 500 miles thereafter Spark Plugs Champion RA8HC or equiv Inspect every 5 000 miles Replace every 10 000 miles or as needed Ignition Timing 28 deg total advance max Inspect every 5 000 miles Engine Mounts Inspect every 500 miles and every 5 000 miles thereafter External Fasteners except cyl head bolts Re torque at 500 miles and every 5 000 miles thereafter 1 S S recommends that pe...

Page 19: ...ring internal spiraloc HD 35114 02 2 required 50 8160 18 Oring oil pump 11 16 I D x 15 16 O D x 1 8 CS HD 11293 50 8039 19 Switch oil pressure HD 26561 99 N A 20 Plug sump HD 765 50 8330 21 Plug magnetic drain 50 8335 22 Baffle Plate 31 0119 23 Screw 10 24 3 8 pan head 2 required 10 Pack 50 0139 24 Dowel case alignment 2 required HD 16574 99 10 pack 50 8109 25 Oring case alignment 9 16 I D x 11 16...

Page 20: ...Because every industry has a leader ...

Reviews: