


10
2. Inspect pistons, especially areas around
machined surfaces such as ring grooves and
wristpin holes. De-burr as necessary, taking
care to remove particles that could become
dislodged inside engine.
3. Measure ring end gaps and adjust as
necessary. See Pictures E13 and E14
a. Compression ring end-gaps should be
between .017” to .025”.
b. Oil ring rail end-gaps should be between
.015” to .035”.
4. Thoroughly clean cylinders, pistons, rings,
wristpins, and wristpin retainers in solvent,
then hot, soapy water. Take special care to
flush oil passages. Dry all with compressed air,
lightly coat all bare steel surfaces with
assembly lube, and place on clean, dry
surface.
5. S&S recommends installing all cylinder base
gaskets dry. Be sure holes in gaskets align
with cylinder base dowels and oil holes.
NOTE - cover cylinder studs with rubber hose to protect
piston and rings until cylinders are installed.
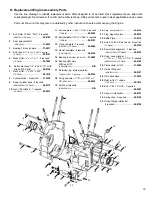
6.
Install rings on pistons.
NOTE - The high wrist pin location on 124” pistons requires
an additional support for the oil rings at the gap on each
side of the wrist pin. This stiff ring should be installed first.
a.
Install oil ring lower support in bottom
piston ring groove,with the dimple facing
down, and located in piston pin gap.
b. Lubricate wristpin, wristpin bushing, and
wristpin bore in piston with assembly lube.
Raise the previously installed support ring
in the lower groove to allow the wrist pin to
slide in under it. Install wristpin through
piston and connecting rod, secure with
new retaining clips, two per piston.
c. The moly-faced ring is installed in the top
piston ring groove, chamfer-side up.
d. The plain cast ring is installed in the
second piston ring groove, dot up.
e. Install the oil ring expander in the lower
ring groove (on top of the previosly
installed support ring), then install one oil
ring rail on either side of the expander.
f. Stagger all ring end-gaps
NOTE - S&S recommends the use of clip installer, part
number HD 42317, available from Kent-Moore, through
Harley-Davidson, or similar tool, for clip installation.
See Picture E15.
7. Install cylinder head alignment dowels in
cylinder.
8.
Apply very light film of motor oil to piston skirts
and cylinder bores and install rear cylinder.
Install rear cylinder head, referring to following
section as necessary.
NOTE - On Twin Cam style Engine, if engine builder
chooses to install front cylinder before installing rear head,
rear cylinder should be temporarily secured with head bolt
and washers. If cylinder is not secured, piston can lift
cylinder and disturb base gasket if flywheels rotated.
9.
Repeat piston installation for front cylinder and
cylinder head.
Picture E15
Picture E14