background image

3

ENGLISH

4 Use

4.1 Connecting to a PC

Connect the microphone to your PC using the 
USB cable supplied. Insert the cable in the 
microphone's USB-B port at the bottom of the 
microphone and connect the USB-A to your 
PC. The first time that you connect the 
microphone to your PC, you will notice that it is 
registered automatically and that a driver is 
installed automatically. The system may not 
automatically select the microphone for use 
e.g. if you have a built-in microphone on your 
PC. If so, you need to select 'USB Pnp Sound 
Devices' as the default device under audio 
recording devices via the control panel / audio 
devices, and possibly also do the same under 
audio playback devices, if you want to hear the 
PC's sound via the minijack output on the 
microphone itself (see section 4.2).

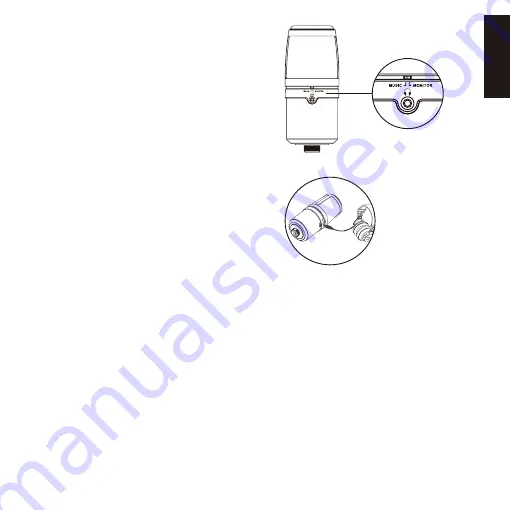
4.2 Connecting analogue headphones

It is possible to replicate the microphone's 
sound in 100% real-time. Doing so avoids the 
delay that typically occurs when the signal is 
digitally processed in the computer.  
Connect the Minijack plug from an analogue 
headphone to the jack on the back of the 
microphone. 
On the small switch contact above the 
connector, you can choose whether you want 
to hear the sound in real-time from the 
microphone or whether you want to hear the 
sound emitted otherwise from your PC. When 
the contact is set to 'MONITOR', sound is heard 
in real-time from the microphone, and when 
the contact is set to 'MUSIC', your PC's normal 
sound is heard (provided that 'USB PnP Sound 
Device' has been chosen as the playback 
device on your PC; see section 4.1).

5 Volume control and Mute function

A volume control knob can be found on the 
front of the microphone. 
This also has a mute function, which can be 
used to turn off the microphone if (for 
example) you are having a private 
conversation that you do not want others to 
hear during a Skype call. Pressing the volume 
button down will cause the light in the LED 
above the button to switch to RED, indicating 
that the microphone has been muted. Pressing 
on the volume button again will switch on the 
microphone again, and the LED will turn BLUE.

Summary of Contents for Studio Pro 126-03

Page 1: ...sandberg it manuals 126 03 Follow these instructions for easy installation and operation of your new Sandberg product U ivatelskou p ru ku v e tin naleznete na adrese www sandberg it manuals 126 03 Na...

Page 2: ...Sandberg Studio Pro Microphone USB Item no 126 03 Rev 20 09 17 ENGLISH DANSK FRAN AIS DEUTSCH SUOMI...

Page 3: ...atures a port and volume control for direct headset connection for real time monitoring of the microphone s signal without delay or its mode can be changed to make it function as an extra USB audio ou...

Page 4: ...en the signal is digitally processed in the computer Connect the Minijack plug from an analogue headphone to the jack on the back of the microphone On the small switch contact above the connector you...

Page 5: ...of voices when there are sudden changes to air flows in speech or singing This can be dampened significantly if you use a pop filter which consists of a metal mesh screen that you fit together with t...

Page 6: ...river installation P mikrofonen er der stik og lydstyrkekontrol til direke tilslutning af headset der kan give dig realtime monitering af mikrofonens signal uden delay eller via omskifter kan bruges s...

Page 7: ...g r man den forsinkelse som typisk kan opst n r signalet behandles digitalt i computeren Tilslut Minijack stikket fra en analog hovedtelefon i stikket p mikrofonens bagside P den lille omskifter konta...

Page 8: ...der er pludslige ndringer i luftstr mmene under tale eller sang Dette kan d mpes betydeligt ved brug af et s kaldt pop filter der best r af et metalnet som du monterer med den medf lgende flex arm p...

Page 9: ...t m sti ilman ajurien asennusta Sis lt suoran kuulokeliit nn n ja nenvoimakkuuden s d n mikrofonin signaalin reaaliaikaiseen seurantaan ilman viivett Sen tila voidaan my s vaihtaa toimimaan lis USB ni...

Page 10: ...yleens ilmenee kun signaalia k sitell n digitaalisesti tietokoneessa Liit analogisten kuulokkeiden miniliitin mikrofonin takana olevaan liittimeen Pienell liittimen yl puolella olevalla kytkimell voit...

Page 11: ...pop ni kun puheen tai laulun synnytt m ilmavirtaus muuttuu killisesti N it ni voidaan vaimentaa huomattavasti pop filtterin avulla Se on metalliverkkosuojus joka asennetaan mikrofonisi taipuisaan vart...

Page 12: ...on Verf gt ber einen Anschluss und Lautst rkeregler mit direkter Headset Verbindung zur Verfolgung des Mikrofonsignals in Echtzeit und ohne Verz gerung M glichkeit der nderung des Modus als zus tzlich...

Page 13: ...diowiedergabeger te zu treffen sofern Sie den PC Sound ber den Minibuchsenausgang am Mikrofon h ren m chten siehe Abschnitt 4 2 4 2 Anschluss analoger Kopfh rer Es ist m glich den Sound des Mikrofons...

Page 14: ...st rkeregler erneut gedr ckt schaltet sich das Mikrofon wieder ein und die LED Anzeige wird BLAU 6 Noch bessere Audioaufzeichnungen mit dem Sandberg Studio Pro Mikrofon Vielleicht sind Ihnen die plopp...

Page 15: ...te Comporte un contr le du volume et un port pour une connexion directe du micro casque qui permet un contr le permanent et sans d calage du signal du microphone Le mode peut tre chang de mani re fonc...

Page 16: ...e sous les dispositifs de lecture audio si vous voulez entendre le son du PC via la sortie mini jack sur le micro lui m me voir section 4 2 4 2 Connexion de casques analogiques Il est possible de repr...

Page 17: ...le volume r activera le micro et la diode passera au BLEU 6 Profitez d enregistrements audio de meilleure qualit avec votre micro pro Studio de Sandberg Il est possible que vous sachiez d j ce que son...

Reviews: