SBFILTERS.COM
2
GENERAL INFORMATION AND WARNINGS
If you are driving in heavy snowfall or extreme rain conditions, you should always check for accumulated snow and water on the air filter
following your OE recommendations for driving in these conditions.
The following is recommended after operating the vehicle up to 100 miles in heavy snowfall or extreme rain: At the earliest opportunity,
open the hood and check the air box and filter. If any snow has accumulated, make sure to remove the snow from the filter, box, and
inlet. It is okay if the filter is a little wet. Wet filters will normally dry out on their own. If the filter is dripping wet, it should be replaced
with another filter that is not wet. Do not reuse the dripping wet filter until it has naturally dried.
Operation in snow and rain
Air Box Plug Testing
• After your installation is complete engage parking brake and start your engine. Listen for abnormal noises. If an air leak is detected,
re-inspect hoses and connections as they may need to be repositioned and tightened.
• S&B FILTERS recommends that you keep your OE intake system in the event it is required in the future.
• In order to maintain your warranty, all connections and components must be checked periodically for alignment and for proper tension
on all connections. Failure to do so may void your warranty.
• Use only S&B FILTERS cleaning and oil products to service your filter. Using any other brand oil and/or cleaners on your S&B air filter
may void your warranty.
Performance Testing
Stock intake boxes are a significant contributor to poor air flow which is why S&B designs custom air boxes with secondary and/
or enlarged openings. With that said, S&B recognizes the benefits of cooler air, so we have included a plug to seal off the opening if
so desired. For optimal performance, we recommend that the intake be used without the end cap except in conditions of extreme
heatwave.
Periodically check the following:
The California Air Resource Board (CARB) requires that an E.O. Identification label be applied to the vehicle in order to pass a
smog check inspection when a Performance Intake Kit has been installed. You must place the E.O. Label provided on or near the
intake kit after installation so that a smog check technician can easily verify the E.O. Number. Check the status of the exemption
process by looking up a specific part number at
www.sbfilters.com
. The CARB Exemption number and/or status is listed under
the Product Details section for each part number. If the status shows as “Pending,” CARB has yet to issue an exemption but the
product has been submitted. Products that have not been issued an E.O. number are street legal in most states, but may not be
used on emission controlled vehicles in the state of California and are for off road use only. If you purchased your kit from S&B
Filters directly, we will automatically mail you your Exemption Sticker when it is issued to us. If you purchased your kit from an
authorized S&B Filters Dealer, log onto our web site and register to receive your Exemption Sticker.
If your vehicle has a Vehicle Emission Control Information decal affixed to the factory airbox,
a new replacement label must be obtained and installed in a readily visible position in the
engine compartment in order to remain CARB compliant. Failure to do so will prevent the
vehicle from passing a smog check. Replacement labels can be ordered from your local
dealership. Regulations state that the VECI label shall not be affixed to any equipment which
is easily detached from the vehicle. Label placement, under the hood on a painted surface is
recommended.
Emissions Standard
• Intake tube and filter connections, and intake box fasteners, making sure they are tight.
• All electrical connections and wire harnesses moved during the installation of the intake and make sure they are secure and away
from any hot or moving components.
• Check for any signs of abrasion or wear and tear on the intake tube, box, filter, and electrical harnesses moved or near the intake
and repair/replace as necessary.
Summary of Contents for 75-5115
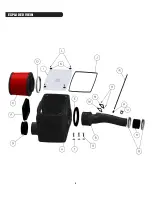
Page 4: ...3 EXPLODED VIEW...


