background image

8

200-2966

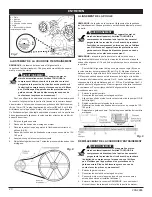
MAINTENANCE

5.  Shift the motor back to the point where the correct deflection exists  
 

(see “Drive Belt Tension Adjustment”).

6.  Retighten the motor mounting bolts to 130-180 in.-lbs.
7.  Check to ensure that the tension remained correct.
8.  Reinstall the belt guard. All moving parts must be guarded.

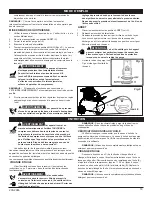
TO REPLACE OR CLEAN CHECK VALVE

WARNING:

RISK OF INJURY. This unit starts  


  automatically. ALWAYS shut off the compressor, remove  

  the plug from the outlet, and bleed all pressure from the   

  system before servicing the compressor, and when the    


compressor is not in use. Do not use the unit with the    


shrouds or belt guard removed. Serious injury could occur  


from contact with moving parts.

1.  Turn air compressor off,               

To pump

head

C

A

B E

D


remove the power cord from  


the outlet or lock out the   


power supply and relieve all  


the air pressure from the tank  


(refer to “Shutdown” in    


Operating Instructions).    


Make sure the compressor has  


cooled down before servicing.

2.  Using the appropriately sized  
 

wrench, loosen the compression  


nut (A) on the check valve (B).  


Gently move the transfer  tube  


(C) out of the way. 

3.  Remove the bleeder tube (D)  
 

from the elbow (E ) located on  


the side of the check valve by  


gently pulling it off the barbed end.                          


4.  Making note of the orientation for reassembly,  
 

unscrew the check valve from the tank  


(counterclockwise) using a 7/8” open end  


 wrench. 
5.  Using a pencil or screwdriver, carefully push the  
 

valve disc up and down. If the valve disc does  


not move freely up and down, the check valve  


needs to be cleaned or replaced.

6.   Clean the check valve with warm soapy water  
 

and make sure to dry thoroughly before  


reinstalling. If the disc valve still does not move     


freely up and down, it will  need to be replaced. 

7.  Apply thread sealant to the check valve threads and reinstall into the  
 

tank by turning clockwise. Make sure it is the same orientation as   


when it was removed. 

8.  Replace the bleeder tube by pushing it back onto the barbed fitting of  
 

the elbow.

9.  Replace the transfer tube and tighten compression nut.

CLEANING THE AIR FILTERS


A dirty air filter will      

A

B

A = Cover(s)

B = Filter element(s)

reduce the compressor’s 
performance and life. To 
avoid any internal 
contamination of the 
pump, the filters should be 
cleaned frequently, and 
replaced on a regular 
basis. Felt filters should be 
cleaned in warm, soapy 
water, rinsed, and allowed 
to air dry before reinstallation. Paper filters should be replaced when dirty. 
Do not allow the filters to become filled with dirt or paint. If the filter 
becomes filled with paint, it should be replaced. Direct exposure to dirty 
conditions or painting areas will void your warranty.

CHECKING THE RELIEF VALVE


Pull the tank safety valve daily to ensure that it is operating properly 

and to clear the valve of any possible obstructions.

TESTING FOR LEAKS


Check that all connections are tight. A small leak in any of the 

hoses, transfer tubes, or pipe connections will substantially reduce the 
performance of your air compressor. If you suspect a leak, spray a small 
amount of soapy water around the area of the suspected leak with a spray 
bottle. If bubbles appear, repair or replace the faulty component. Do not 
over tighten any connections.

STORAGE


Before storing the compressor for a prolonged period, use an air 

blow gun to clean all dust and debris from the compressor. Disconnect the 
power cord and coil it up. Pull the tank safety valve to release all pressure 
from the tank. Drain all moisture from the tank. Clean the filter elements 
and filter housings; replace the elements if necessary. Drain the oil from 
the pump crankcase and replace it with new oil. Cover the entire unit to 
protect it from moisture and dust.

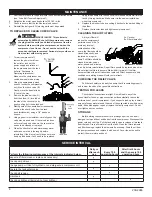
SERVICE INTERVAL

Perform the following maintenance at the intervals indicated below.

Daily or 

after each 

use

Every 100 

operating hours

After first 8 hours 

and then every 100 

operating hours

Inspect air filters (clean or replace as necessary)

Check pump oil level

Change pump oil 

(Use full synthetic, non-detergent air compressor oil.)

Operate the tank safety valve

Check belt tension

Drain tank

Check and tighten all bolts 

(do not over tighten)

Summary of Contents for P1682066.MN

Page 1: ... 7 120 240 15 7 5 1 105 7 23 bar 135 9 30 bar WARNING Read and understand all safety precautions in this manual before operating Failure to comply with instructions in this manual could result in personal injury property damage and or voiding of your warranty The manufacturer WILL NOT be liable for any damage because of failure to follow these instructions AVERTISSEMENT Lire et s assurer de bien c...

Page 2: ...ing correct voltage and adequate fuse protection RISK OF INJURY This unit starts automatically ALWAYS shut off the compressor remove the plug from the outlet and bleed all pressure from the system before servicing the compressor and when the compressor is not in use Do not use the unit with the shrouds or belt guard removed Serious injury could occur from contact with moving parts Stay alert and w...

Page 3: ...OTE ELECTRICAL WIRING Refer to the air compressor s serial label for the unit s voltage and amperage requirements Ensure that all wiring is done by a licensed electrician in accordance with the National Electrical code WARNING CALIFORNIA PROPOSITION 65 WARNING This product contains chemicals known to the State of California to cause cancer birth defects and or reproductive harm CAUTION Drain the m...

Page 4: ...table compressors in a heated building when not in use This will reduce problems with lubrication motor starting and freezing of water condensation d The compressor must be level to ensure proper lubrication of the pump and good drainage of the moisture in the tank 5 Connect an air hose not included to the manifold outlet Fig 2 ASSEMBLY ASSEMBLING THE COMPRESSOR COMPRESSOR CONTROLS Pressure Switch...

Page 5: ... area where the air is needed If use of an extension cord cannot be avoided the cord should be no longer than 50 feet and be a minimum wire size of 12 gauge AWG Do not use a 16 or 14 gauge extension cord Use only a 3 wire extension cord that has a 3 blade grounding plug and a 3 slot receptacle that will accept the plug on the product Make sure your extension cord is in good condition An undersized...

Page 6: ...ing Keep children away from the compressor at all times NOTE If the unit does not operate properly SHUT DOWN IMMEDIATELY and contact a qualified service center 6 If a pressure regulator is present on your compressor adjust it to the working pressure of the tool WARNING When adjusting from a higher to a lower pressure turn the knob counterclockwise past the desired setting then turn clockwise to re...

Page 7: ... compressor remove the plug from the outlet and bleed all pressure from the system before servicing the compressor and when the compressor is not in use Do not use the unit with the shrouds or belt guard removed Serious injury could occur from contact with moving parts NOTE Once the motor pulley has been moved from its factory set location the grooves of the flywheel and pulley must be aligned to ...

Page 8: ...he elbow 9 Replace the transfer tube and tighten compression nut CLEANING THE AIR FILTERS A dirty air filter will A B A Cover s B Filter element s reduce the compressor s performance and life To avoid any internal contamination of the pump the filters should be cleaned frequently and replaced on a regular basis Felt filters should be cleaned in warm soapy water rinsed and allowed to air dry before...

Page 9: ...d flywheel Check alignment Low oil level in pump crankcase Keep oil at proper level at all times Excess carbon on valves or top of piston Contact a qualified service center Oil in discharge air Worn piston rings or cylinder Contact a qualified service center Restricted air intake Clean or replace the air filter element s Oil level too high Reduce to proper level Overheating Poor ventilation Reloca...

Page 10: ...orsión hasta 2 3 3 4 N m Torque to 25 50 lb ft Serrez de 25 À 50 lbs ft Torsión hasta 33 9 67 8 N m Torque to 50 75 lb ft Serrez de 50 À 75 lbs ft Torsión hasta 67 8 101 7 N m Torque to 130 180 lb in Serrez de 130 À 180 lbs in Torsión hasta 14 7 20 3 N m Note Tighten compression nut handtight plus 1 full turn Note Serrez l écrou de compactage solide plus 1 plein tour Nota Apriete la tuerca de la c...

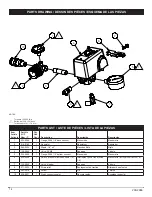
Page 11: ...t 39 Conjunto de tanque incluye los artículos 23 30 y 39 23 095 0081 2 Wheel pneumatic 10 Roue Rueda or 23a Fig 1 095 0089 2 Wheel plastic 9 Roue Rueca 24 033 0001 2 Hubcap 1 2 Chapeau de moyeu Tapacubo 25 094 0029 2 Pad Tampon Almohadilla or 094 0031 1 Pad Tampon Almohadilla 26 512 0035 1 Bushing 1 1 2 NPSM x 1 4 NPT Bague Buje 27 072 0006 1 Petcock Robinet de purge Llave de desagüe 28 512 0039 1...

Page 12: ... 36 37 3 1 17a 1x PUMP 040 0469 Specifications Weight Approx 31 Lbs Oil Capacity 11 35 oz 336 ml Lubrication Use full synthetic non detergent air compressor oil Max RPM 1240 Torque to 5 lb ft Serrez de 5 lbs ft Torsión hasta 6 8 N m Torque to 8 lb ft Serrez de 8 lbs ft Torsión hasta 10 8 N m Torque to 9 12 lb ft Serrez de 9 À 12 lbs ft Torsión hasta 12 2 16 3 N m Torque to 14 16 lb ft Serrez de 14...

Page 13: ...sket crankcase Joint carter Empaquetadura cárter 19 060 0195 1 Washer breather Rondelle Arandela 20 056 0078 1 Oil fill plug Bouchon Tapón 21 032 0072 1 Oil sight glass w o ring Verre de vue de niveau d huile Cristal de la vista del nivel de aceite 22 062 0066 1 Oil drain plug Bouchon Tapón 23 049 0061 1 Crankcase Carter Cárter 24 051 0103 1 Bearing ball 204 Roulement Cojinete 25 053 0107 1 Cranks...

Page 14: ...ro 6 034 0226 1 Switch pressure includes items 7 9 Interrupteur inclut les articles 7 9 Manómetro incluye los artículos 7 9 7 136 0090 1 Valve bleeder Soupape Válvula 8 071 0033 1 Strain relief Soulagement de traction Aliviador de esfuerzo 9 061 0216 1 Screw Vis Tornillo 10 036 0031 1 Quick connect coupler Raccord rapide Acoplador especial 1 10 2 3 6 9 8 5 7 4 1 1 1 1 Torque to 125 150 lb in Serre...

Page 15: ... Omettre de bien mettre à la terre ce produit pourrait entraîner de sérieuses blessures ou un décès par électrocution S assurer que le circuit électrique sur lequel le compresseur est branché offre une mise à la terre et une tension appropriées ainsi qu une protection par fusible adéquate RISQUE DE BLESSURE Cet appareil se met en marche automatiquement TOUJOURS éteindre le compresseur le débranche...

Page 16: ...rnal de réservoir ou après chaque utilisation RISQUE RESPIRATOIRE L air obtenu directement du compresseur ne devrait jamais être utilisé pour la consommation humaine Le jet d air peut contenir du monoxyde de carbone des vapeurs toxiques ou des particules solides provenant du réservoir Respirer ces contaminants peut provoquer des blessures graves ou même la mort Afin d utiliser l air produit par ce...

Page 17: ...on d air dans la pompe et le tube de transfert B A D C E Fig 1 quand la pression dans le réservoir atteint la pression de fermeture Au fur et à mesure que l air comprimé est utilisé et que le niveau de pression dans le réservoir baisse jusqu à la pression d ouverture le manostat remet le moteur en marche automatiquement sans avertissement et la pompe reprend la compression d air Le sortie d air vo...

Page 18: ...calibre est petit plus la rallonge doit être grosse INSTRUCTIONS DE MISE À LA TERRE Ce produit doit être mis à la terre En cas de court circuit électrique la mise à la terre réduit les risques de décharges électriques en fournissant un fil par lequel le courant électrique peut s échapper H Fig 4 SPÉCIFICATIONS DE L ALIMENTATION ÉLECTRIQUE Ce produit est équipé d un câble d alimentation muni d un f...

Page 19: ...happent peuvent projeter des particules risquant de causer des blessures aux yeux Portez des lunettes de protection lorsque vous ouvrez le robinet de purge 4 Ouvrez le robinet de purge voir F pour vidanger l humidité du réservoir AVERTISSEMENT Cet appareil se met en marche automatiquement Arrêttez TOUJOURS le compresseur débranchez le de la prise de courant et purgez toute la pression du circuit a...

Page 20: ...it avant de procéder à l entretien du compresseur ou lorsque vous ne l utilisez pas N utilisez pas l appareil sans les protections ou le garde courroie Risque de blessures graves en cas de contact avec les pièces en mouvement REMARQUE lorsque la poulie du moteur a été enlevée de son emplacement déterminé à l usine les rainures du rotor et de la poulie doivent être alignées à 1 16 po afin d empêche...

Page 21: ...as celui ci devra être remplacé 7 Appliquer du scellant pour filetage sur les filetages du clapet de non retour et le réinstaller sur le réservoir en tournant dans le sens horaire S assurer d utiliser la même orientation que lorsque celui ci a été retiré 8 Replacer le tube de vidange en le poussant à l intérieur du raccord acéré du coude 9 Replacer le tuyau de transfert et resserrer les écrous de ...

Page 22: ... pas trop Fuites des soupapes Communiquer avec centre de service qualifié Admission d air colmatée Nettoyez ou remplacez le ou les élément s du filtre à air Joints éclatés Communiquer avec centre de service qualifié Usure des segments de piston ou du cylindre Communiquer avec centre de service qualifié Cognement de la pompe Poulie du moteur ou volant motoeur desserré Resserrez la poulie et le vola...

Page 23: ...ir lesiones graves o muerte por electrocución Asegúrese de que el circuito eléctrico al que se conecte este compresor tenga una adecuada toma a tierra un voltaje correcto y una protección con fusibles satisfactoria RIESGO DE LESIONES Esta unidad se enciende automáticamente SIEMPRE apague el compresor desconéctelo y purgue toda la presión del sistema antes de reparar el compresor y también cuando e...

Page 24: ...l depósito RIESGO PARA LA RESPIRACIÓN El aire obtenido directamente del compresor no se debe utilizar nunca como suministro para consumo humano El flujo de aire puede contener monóxido de carbono vapores tóxicos o partículas sólidas del depósito Respirar este aire puede causar lesiones graves o la muerte Si se desea utilizar el aire producido por el compresor para respirar deben instalarse filtros...

Page 25: ...La bomba vea B comprime el aire y lo descarga hacia el tanque El tanque vea C almacena el aire comprimido El interruptor de presión vea D apaga el motor y alivia la presión del aire en la bomba y el tubo de transferencia cuando la presión del aire en el tanque alcanza el límite establecido en fábrica Al ir usándose el aire comprimido y bajar el nivel de presión en el tanque hasta llegar al nivel p...

Page 26: ...ngitud mayor que 9 1 m 50 pies y un hilo con calibre mínimo de 12 AWG No use prolongadores de calibre 14 ni 16 Use solamente un cable de 3 hilos que tenga un enchufe de 3 terminales planos y un receptáculo de 3 ranuras que permita conectar el producto Asegúrese de que su cable prolongador esté en buenas condiciones Un cable demasiado pequeño provocará una caída en el voltaje de la línea causando u...

Page 27: ... activado por presión en la posición AUTO vea B La bomba comenzará a llenar el depósito con aire Cuando la presión apagará el motor eléctrico Al usarse la presión de aire y disminuir el nivel de presión en el depósito el interruptor de presión volverá a arrancar el motor y el bomba comenzará a llenar neuvamente el depósito ADVERTENCIA La bomba genera altas temperaturas Para evitar quemaduras y otr...

Page 28: ... 7 AJUSTE DE LA TENSIÓN DE LA CORREA DE TRANSMISIÓN NOTA El ajuste de la tensión de la correa de transmisión y la alineación de la polea se realizan al mismo tiempo Se explican por separado para mayor claridad ADVERTENCIA Esta unidad arranca automáticamente SIEMPRE apague el compresor quite el enchufe de la toma de corriente y purgue toda la presión del sistema antes de realizar operaciones de man...

Page 29: ...e toda la presión del sistema antes de realizar operaciones de antenimiento en el compresor y cuando el compresor no esté en uso No utilice la unidad sin las cubiertas o sin el protector de la correa ya que podría sufrir lesiones por contacto con las piezas móviles 1 Apague el compresor de aire desenchúfelo de la pared o cierre totalmente el suministro eléctrico y purgue todo el aire del depósito ...

Page 30: ...mpresor Desconecte el cable eléctrico enrollándolo Tire de la válvula de seguridad para purgar todo el aire del depósito Elimine toda la humedad del depósito Limpie los elementos y el alojamiento del filtro reemplácelos si fuera necesario Drene el aceite del cárter de la bomba y reemplácelo con aceite nuevo Cubra toda la unidad para protegerla de la humedad y del polvo MANTENIMIENTO INTERVALOS DE ...

Page 31: ...presor Polea del motor o volante del compresor suelto Vuelva a ajustar la polea y el volante Verifique la alineación Bajo nivel de aceite en el cárter de la bomba Mantenga en todo momento el nivel de aceite adecuado Demasiado carbón en las válvulas o en la parte superior del pistón Póngase en contacto con centro de servicio cualificado Aceite en el aire de descarga Anillos de pistón o cilindros de...

Page 32: ...à cet effet Conservez votre reçu et ce manuel pour référence ultérieure Quand vous avez besoin des services de l usine s il vous plaît contactez au centre d entretien autorisé le plus proche ou composez simplement le SERVICE CLIENTÈ Au Canada Appel gratuit 1 888 895 4549 Télécopieur 1 507 723 5013 Las piezas de repuesto y el servicio están disponibles del Centro de Servicio autorizado más cercano ...

Reviews: