background image


English - 3


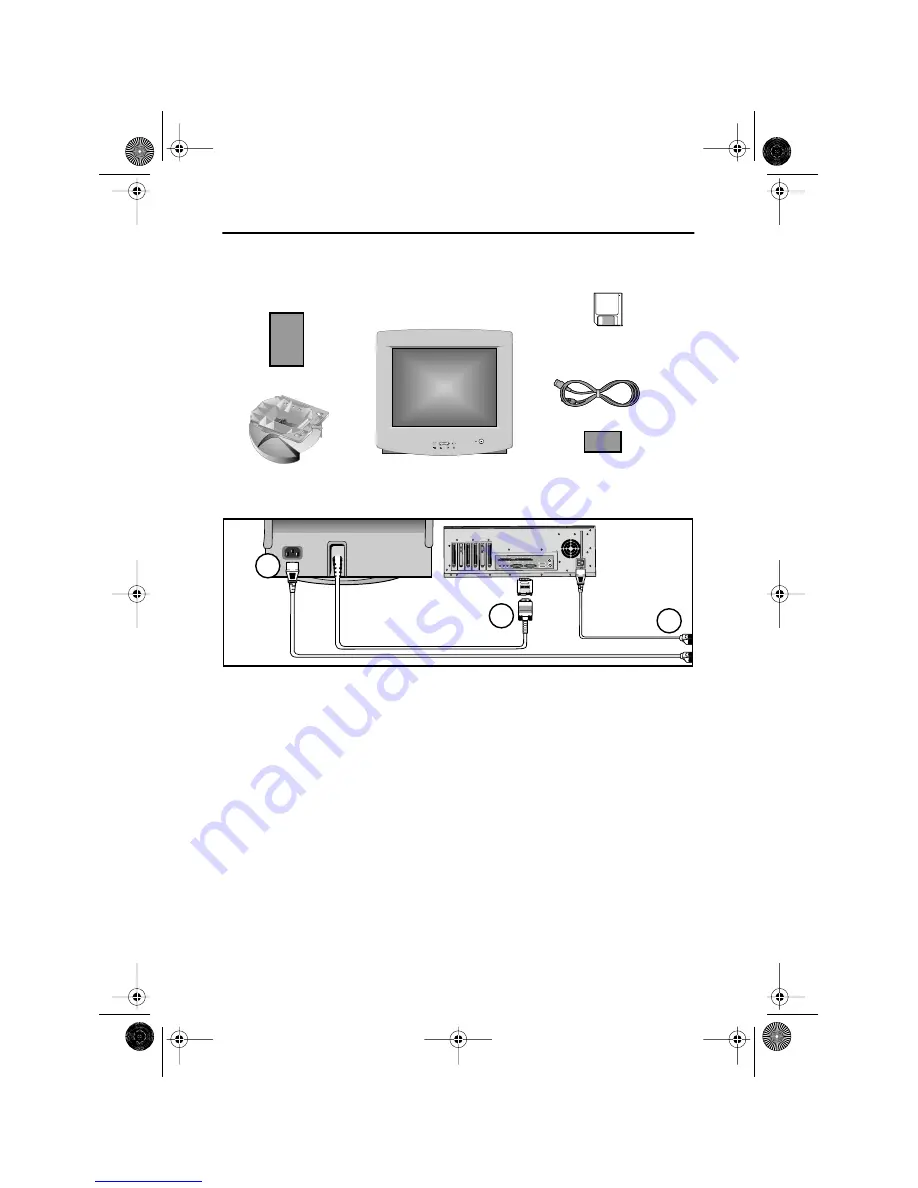
Please make sure the following items are included with your monitor. If any items are 
missing, contact your dealer.


Connecting Your Monitor


1


Turn off your computer and unplug 
the power cord.


2


Signal cable 


Connect the end of the signal cable to 
your computer’s video port (Video 
board, video card, or graphics card). 
If you are using a Macintosh 
computer, connect the cable to a 
Macintosh adapter, and set the pins 
on your adapter (Adapter not 
included). A PC-compatible computer 
does not need an adapter.


3


Power port


Connect the power cord for your 
monitor to the power port on the back 
of the monitor.      


4


Power cords


Plug the power cord for the monitor 
and the power cord for your computer 
into a nearby outlet.


5


Turn on your computer and monitor. 
If your monitor displays an image, 
installation is complete.


6


Install monitor driver


  Insert the provided diskette into the 

A drive.


  Double click the “install.exe” file.

Manual

Stand

Monitor

Power Cord

Warranty card

(Not available in all locations)

Driver Installation Diskette

(Not available in all locations)

EXIT

EXIT

MENU

MENU

MENU

3

2

4

 (Adapter not included) 


Your New Monitor


3p-4p.fm  Page 3  Friday, December 1, 2000  11:05 AM


Summary of Contents for 56V

Page 1: ...USER S MANUAL 38cm 15 Color Monitor 56E 56V 56E56V Cover auto fm Page 1 Wednesday November 8 2000 4 38 PM...

Page 2: ...ogo is registered trademark of Samsung Electronics Co Ltd Microsoft Windows and Windows NT are registered trademarks of Microsoft Corporation VESA DPMS and DDC are registered trademarks of Video Elect...

Page 3: ...l Position 6 Vertical Position 6 Horizontal Size 6 Vertical Size 6 Pincushion 7 Geometry 7 Trapezoid 7 Parallelogram 7 Pinbalance 7 V Linearity 7 Language 8 Advanced 8 V Moir 8 Video Input Level 8 Col...

Page 4: ...in a location with low humidity and a minimum of dust 8 Do not expose the monitor to rain or use it near water in kitchens near swimming pools etc If the monitor accidentally gets wet unplug it and c...

Page 5: ...not need an adapter 3 Power port Connect the power cord for your monitor to the power port on the back of the monitor 4 Power cords Plug the power cord for the monitor and the power cord for your com...

Page 6: ...unction open a sub menu or move between menus when using the on screen menu system 4 Power button The power button turns the monitor on and off The power indicator light glows green during normal oper...

Page 7: ...on icons 3 To select a function or open a sub menu push the button The screen will display the options for adjustment If there is a sub menu use the or button to highlight the feature you want to adju...

Page 8: ...on Horizontal screen position Moves screen left Moves screen right Vertical Position Vertical screen position Moves screen down Moves screen up Horizontal Size Horizontal screen size Decreases size In...

Page 9: ...of screen Widens top of screen Parallelogram Skews screen image left Skews screen image right Pinbalance Curves vertical lines to left Curves vertical lines to right V Linearity Compresses image at t...

Page 10: ...uages Korean Svenska and Russian are applied only to the product for Europe Advanced V Moir Corrects for on screen moir pattern and clear Vertical Moir Video Input Level Selects the video signal level...

Page 11: ...tor display settings Factory timing User timing OSD Lock Unlock Allows you to secure the current control settings so that they cannot be inadvertently changed You can unlock the OSD controls at any ti...

Page 12: ...ange appears n The input signal frequency is over or under the synchronization range of the monitor see Specifications on page 12 The screen image is too light or too dark n Adjust the brightness or c...

Page 13: ...ty installed on your computer to set up this feature NOTE This monitor is EPA Energy Star compliant and ENERGY 2000 compliant when used with a computer equipped with VESA DPMS functionality Display Mo...

Page 14: ...24 Dots 768 Lines Active Display Horizontal Vertical 10 5 0 16 inch 267 0 4 mm 7 9 0 16 inch 200 0 4 mm Input Signal Terminated Analog 0 7 Vpp positive at 75 ohms Separate Sync TTL level positive or n...

Page 15: ...ontal size 6 L Language 8 M Menu button 4 Monitor function control 6 7 8 9 O Operation 6 7 8 9 On Screen Display 5 OSD Lock Unlock 9 P Parallelogram 7 Pinbalance 7 Pincushion 7 Power button 4 Power co...

Page 16: ...theproduct Declaration of conformity for products Marked with FCC Logo ThisdevicecomplieswithPart15oftheFCCRules Operationissubjecttothefollowingtwoconditions 1 thisdevicemaynotcauseharmfulinterferenc...

Page 17: ...ax 81 3 5641 9861 SAMTRON SWEDEN SAMSUNG ELECTRONICS SVENSKA AB BOX 713 S 194 27 UPPLANDS VASBY Tel 468 590 966 00 Fax 468 590 966 50 SAMTRON MEXICO SAMSUNG ELECTRONICS MEXICO S A DE C V Mina No 200 E...

Reviews: