background image

Installation

English

26


Installation

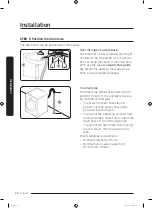
STEP 6 

Power on

Plug the power cord into an AC 220-240 V / 50 Hz approved electrical outlet protected by 
a fuse or circuit breaker. Then, press 

Power

 to turn on the washing machine.

Environment

Please dispose of the packaging materials for this product in an “environmentally friendly” 
manner. For further detail, please contact your local area authority.

Untitled-2   26

2019-07-18   PM 12:22:06

Summary of Contents for WW11R64 Series

Page 1: ...Washing Machine User manual WW11R64 Untitled 2 1 2019 07 18 PM 12 22 01...

Page 2: ...ings 13 Installation 14 What s included 14 Installation requirements 16 Step by step installation 18 Environment 26 Before you start 27 Initial settings 27 Laundry guidelines 27 Detergent drawer guide...

Page 3: ...nglish 3 Contents Troubleshooting 49 Checkpoints 49 Information codes 53 Specifications 56 Fabric care chart 56 Protecting the environment 57 Specification sheet 58 Untitled 2 3 2019 07 18 PM 12 22 01...

Page 4: ...d situations that may occur It is your responsibility to use common sense caution and care when installing maintaining and operating your washing machine Because the following operating instructions c...

Page 5: ...e is not to be used by persons including children with reduced physical sensory or mental capabilities or lack of experience and knowledge unless they have been given supervision or instruction concer...

Page 6: ...his appliance must not be supplied through an external switching device such as a timer or connected to a circuit that is regularly switched on and off by the utility 9 This appliance is intended to b...

Page 7: ...ged and this may result in electric shock or fire Keep all packaging materials out of the reach of children as these may be dangerous If a child places a bag over its head it may suffocate When the ap...

Page 8: ...ioned in such a way that the power plug is easily accessible Failure to do so may result in electric shock or fire due to electric leakage Install your appliance on a solid level floor that can suppor...

Page 9: ...he washing machine while an operation is in progress This may result in injury Do not touch the power plug with wet hands This may result in electric shock Do not turn the appliance off by unplugging...

Page 10: ...cautions CAUTION When the washing machine is contaminated by a foreign substance such as detergent dirt food waste etc unplug the power plug and clean the washing machine using a damp soft cloth Fail...

Page 11: ...ity can be attributed to Samsung for malfunctions or damages resulting from such misuse Do not stand on the appliance or place objects such as laundry lighted candles lighted cigarettes dishes chemica...

Page 12: ...may be caught by the detergent input device The liquid detergent guide applicable models only is not used for powder detergent Remove the guide when using powder detergent Do not place any objects suc...

Page 13: ...e clothing items to be washed are empty Hard sharp objects such as coins safety pins nails screws or stones can cause extensive damage to the appliance Do not wash clothing with large buckles buttons...

Page 14: ...the parts are included in the product package If you have a problem with the washing machine or the parts contact a local Samsung customer centre or the retailer 10 06 01 02 04 05 03 07 09 08 01 Rele...

Page 15: ...t caps Hose guide Cold water hose Hot water hose applicable models only Liquid detergent container applicable models only NOTE Bolt caps The provided number 3 to 6 of bolt caps depends on the model Un...

Page 16: ...mproperly connected grounding conductors may cause electric shock Water supply A proper water pressure for this washing machine is between 50 kPa and 800 kPa Water pressure less than 50 kPa may cause...

Page 17: ...rature Do not install the washing machine in areas where water may freeze as the washing machine always retains some water in its water valves pumps and or hoses Frozen water left in the connection pa...

Page 18: ...ay from a heat source STEP 2 Remove the shipping bolts Unpack the product package and remove all shipping bolts NOTE Number of shipping bolts may differ depending on the model WARNING Packaging materi...

Page 19: ...plied spanner loosen all the shipping bolts by turning them counterclockwise NOTE You must keep the shipping bolts for future use B 3 Insert the bolt caps B to the holes marked with circle in the figu...

Page 20: ...ete tighten the nuts using the spanner STEP 4 Connect the water hose The provided water hose may differ depending on the model Please follow the instruction according to the provided water hose Connec...

Page 21: ...Samsung service centre in case of a leak from the water hose or contact a plumbing technician in case of a leak from the water tap Otherwise this may cause electric shock CAUTION Do not stretch the wa...

Page 22: ...e connect the water hose to the adaptor Then release part D The hose fits into the adaptor with a clicking sound 7 To complete connecting the water hose see 2 and 3 on the Connecting to a threaded wat...

Page 23: ...onnect the other end of the hot water hose to the hot water tap Aqua stop hose applicable models only A The aqua stop hose alerts users of a risk of water leaks It senses the water flow and turns red...

Page 24: ...able drainage In a drain pipe The drain pipe should be between 60 cm and 90 cm high It is advisable to use a 65 cm high vertical pipe To ensure the drain hose stays in position use the plastic hose gu...

Page 25: ...ch mush be above the sink siphon so that the end of the hose is at least 24 in 60 cm above the ground 24 in 60 cm CAUTION Do not put the drain hose in places of stagnant water or ponding The water may...

Page 26: ...lectrical outlet protected by a fuse or circuit breaker Then press Power to turn on the washing machine Environment Please dispose of the packaging materials for this product in an environmentally fri...

Page 27: ...3 minutes 4 When the cycle is complete 0 appears on the display and the washing machine will turn off automatically The washing machine is now ready for use Laundry guidelines STEP 1 Sort Sort the la...

Page 28: ...wash the laundry net by itself without other laundry This may cause abnormal vibrations that could move the washing machine and result in injury STEP 4 Prewash if necessary Select the Pre Wash option...

Page 29: ...r authority Do not use detergent that tends to harden or solidity This detergent may remain after the rinse cycle blocking the drain outlet Powdered detergent should be thoroughly dissolved in a small...

Page 30: ...Before you start 2 Put the laundry in the drum on top of the capsule CAUTION For cycles using cold water or cycles that complete in less than one hour the capsule may not dissolve completely Untitled...

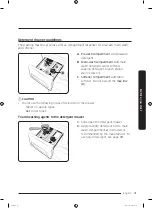
Page 31: ...etergent bleach and or stain removers C Softener compartment Add fabric softener Do not exceed the max line D CAUTION Do not use the following types of detergent in the drawer Tablet or capsule types...

Page 32: ...ic softener to the softener compartment Do not exceed the max line A 4 If you want to prewash apply prewash detergent to the prewash compartment as instructed or recommended by the manufacturer 5 Clos...

Page 33: ...ted with water before applied Do not apply main wash detergent to the softener compartment To use liquid detergent manually applicable models only A First insert the provided liquid detergent containe...

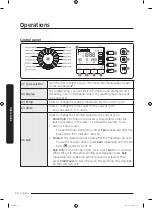
Page 34: ...ng speed for the current cycle Rinse Hold The final rinse process is suspended so that the laundry remains in the water To unload the laundry run a drain or spin process To use the Rinse Hold option p...

Page 35: ...nd Set the washing machine to finish your wash automatically at later time Choose a delay of between 1 to 24 hours in 1 hour increments 08 Pre Wash Press to add a preliminary washing process before th...

Page 36: ...le 3 Change the cycle settings Temp Rinse and Spin as necessary 4 Select desired options as necessary 5 Press Start Pause To change the cycle during operation 1 Press Start Pause to stop operation 2 S...

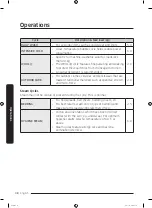
Page 37: ...trevira polyamide perlon nylon or the like 6 0 DELICATES For sensitive fabrics as rayon viscose and synthetics blended fibre For best performance use liquid detergent 2 0 RINSE SPIN For loads that nee...

Page 38: ...or outdoor clothes skiwear and sportswear that are made of functional materials such as spandex stretch and micro fibre 2 0 Steam Cycles Steam may not be visible or present during the cycle This is no...

Page 39: ...add the Delay End option to the current cycle with a 3 hour setting and then press Start Pause at 2 00 pm The washing machine starts operating at 3 00 pm and ends at 5 00 pm Provided below is the time...

Page 40: ...cle with preferred settings and use the cycle with the push of a single button To create your own cycle 1 Turn the Cycle selector to select a cycle 2 Change the cycle settings Temp Rinse and Spin as n...

Page 41: ...reminder blinks on the control panel once every 40 washes It is advisable to perform DRUM CLEAN regularly When you first see this reminder blinking you can ignore the reminder for 6 consecutive washe...

Page 42: ...ion code if a problem is detected 3 Run the Samsung Smart Washer app on your mobile device and tap Smart Check 4 Put the mobile device close to the washing machine s display so that the smartphone cam...

Page 43: ...tal object A 3 Put an empty spacious container around the cover and stretch the emergency drain tube to the container while holding the tube cap A B 4 Open the tube cap and let water in the emergency...

Page 44: ...oosen and disconnect the water hose from the back of the washing machine Cover the hose with a cloth to prevent water from gushing out 4 Use pliers to pull out the mesh filter from the inlet valve 5 T...

Page 45: ...g a soft brush Make sure the drain pump propeller inside the filter is not clogged 6 Reinsert the pump filter and then turn the filter knob clockwise 7 Close the filter cover NOTE Some pump filters fe...

Page 46: ...leak Make sure the filter is inserted properly after cleaning it Otherwise this may cause an operational failure or a leak Detergent drawer A B C 1 Open the drawer 2 While holding down the release lev...

Page 47: ...soft brush 5 Clean the drawer recess using a soft brush 6 Reinsert the liquid detergent container and the softener divider 7 Slide the drawer inward to close it NOTE To remove remaining detergent run...

Page 48: ...NOTE If the washing machine still doesn t operate normally repeat the steps above Care against an extended time of non use Avoid leaving the washing machine unused for an extended time However if you...

Page 49: ...detergent remains in the detergent drawer Make sure the washing machine is running with sufficient water pressure Make sure the detergent is added to the centre of the detergent drawer Make sure the r...

Page 50: ...lly The door does not open Press Start Pause to stop the washing machine It may take a few moments for the door lock mechanism to disengage The door will not open until 3 minutes after the washing mac...

Page 51: ...h taps Make sure the temperature selection is correct Make sure the hoses are connected to the correct taps Flush water lines Make sure the water heater is set to supply a minimum 120 F 49 C hot water...

Page 52: ...cy HE detergent to prevent oversudsing Has odours Excessive suds collect in recesses and can cause foul odours Run cleansing cycles to sanitise periodically Clean the door seal diaphragm Dry the washi...

Page 53: ...tes In the meantime the Power button will be disabled 4C2 Make sure the cold water supply hose is firmly connected to the cold water tap If it is connected to the hot water tap the laundry may be defo...

Page 54: ...roperly If the information code remains contact a customer service centre Low voltage detected Check if the power cord is plugged in If the information code remains contact a customer service centre H...

Page 55: ...inning process and the 0 message remains The machine operates normally without running the DRUM CLEAN cycle However it is recommended to run the cycle for hygienic purposes If any information code kee...

Page 56: ...n Delicate fabric Can be dry cleaned using any solvent Item can be washed at 95 C Dry clean Item can be washed at 60 C Dry clean with perchloride lighter fuel pure alcohol or R113 only Item can be was...

Page 57: ...not be connected to a power source Remove the door so that animals and small children cannot get trapped inside the appliance Do not exceed the detergent quantities recommended in the detergent manufa...

Page 58: ...mensions A Width 600 mm B Height 850 mm C Depth 600 mm D 680 mm E 1120 mm Water pressure 50 800 kPa Net weight 70 0 kg Wash and spin capacity 11 0 kg Power consumption Washing and heating AC 220 240 V...

Page 59: ...Memo Untitled 2 59 2019 07 18 PM 12 22 14...

Page 60: ...ONLINE AT AUSTRALIA 1300 362 603 Other 1300 425 299 HHP www samsung com au support NEW ZEALAND 0800 726 786 All Product 0800 6 726 786 Support for Smart Mobile Devices www samsung com nz support DC68...

Reviews: