background image

English - 14

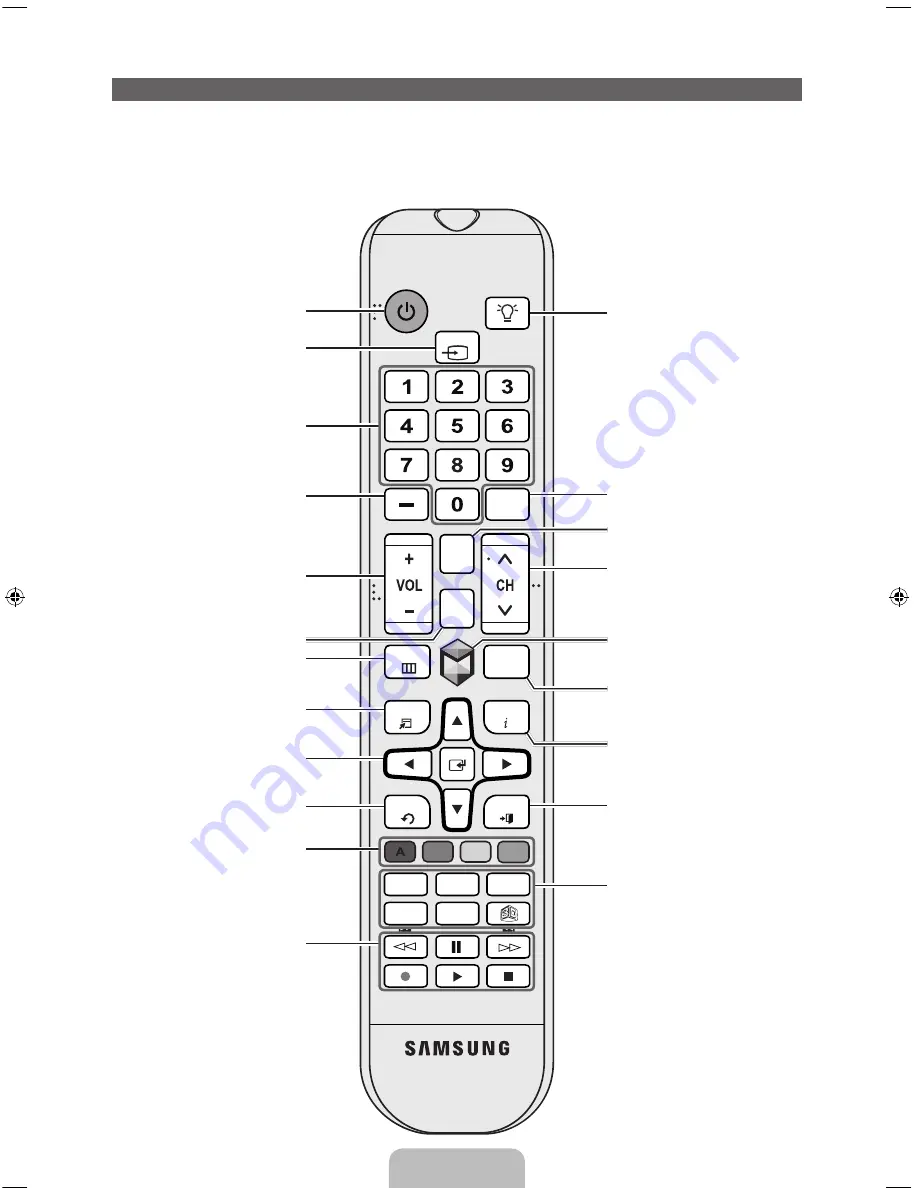
The Standard Remote Control

Learn where the function buttons are on your remote. Especially note 

SOURCE

MUTE

VOL

CH

MENU

TOOLS

E

INFO

CH LIST

RETURN

, and 

EXIT

.


This remote control has Braille points on the Power, Channel, and Volume buttons and can be used 
by visually impaired persons.

SOURCE

MUTE

MENU

HISTORY

INFO

TOOLS

RETURN

Family Story

SEARCH

CAMERA

SUPPORT

P.SIZE

EXIT

PRE-CH

CH

LIST

M

B

C

D

ll

l l

Turns the TV on and off.

Displays and selects the available video 

sources. (page 25)

Press to select additional digital 

channels being broadcast by the same 

digital station. For example, to select 

channel ‘54-3’, press ‘54’, then press 

‘-’ and ‘3’.

Adjusts the volume.

Opens the OSD (Menu).

Displays channel lists on the screen.

Quickly select frequently used functions. 

Use this button in a specific feature. For 

details, refer to the e-Manual.

Returns to the previous menu.

Use these buttons according to the 

directions on the TV's screen.

Use these buttons in a specific feature. 

For details, refer to the e-Manual.

Moves the cursor, selects the on-screen 

menu items, and changes the values 

seen on the TV's menu.

Turns the remote control light on or 

off. When on, the buttons become 

illuminated for a moment when pressed. 

(Using the remote control with this 

button set to On will reduce the battery 

usage time.)

Returns to the previous channel.

Changes channels.

Displays a list of recently used functions. 

You can select a function again easily 

and quickly.

Displays information on the TV screen.

Exits the menu.

Family Story

: Connect to the 

Family 

Story

 application. See e-Manual chapter 

Advanced Features 

 Family Story.

SEARCH

: Starts search function. See 

e-Manual chapter Advanced Features 

 Search.

CAMERA

: Connect to camera 

application.

SUPPORT

: Lets you use various 

support functions including the 

e-Manual. (page 49)

P.SIZE

: Lets you select the 

Picture 

Size

. See e-Manual chapter Basic 

Feature 

 Changing the Picture Size.

X

: Turns the 3D image on or off. See 

e-Manual chapter Advanced Features 


Using the 3D function.

Cuts off the sound temporarily.

Brings up the Smart Hub applications. 

See e-Manual chapter Advanced 

Features 

 Smart Hub.

Gives direct access to channels.

[UE7500-ZA]BN68-04032A-00Eng.indb   14

2012-06-21   �� 4:46:15

Summary of Contents for UN60ES7500F

Page 1: ...r Service 55 Standish Court Mississauga Ontario L5R 4B2 Canada U S A 1 800 SAMSUNG 726 7864 www samsung com Samsung Electronics America Inc 85 Challenger Road Ridgefield Park NJ 07660 LED TV user manu...

Page 2: ...MITED WARRANTY STATEMENT Subject to the requirements conditions exclusions and limitations of the original Limited Warranty supplied with Samsung Electronics SAMSUNG products and the requirements cond...

Page 3: ...vices 23 Connecting to a PC 24 The EX Link Cable Connection 24 Changing the Input Source 25 Using Smart Hub 26 SMART Interaction 27 Voice Control 28 Motion Control 30 Face recognition 33 The Evolution...

Page 4: ...TV by grouping and sorting apps to your taste AllShare Play Lets you access view or play photos videos or music located on USB devices digital cameras cell phones and PCs PCs and cell phones can be ac...

Page 5: ...tteries AA x 4 Remote Control AA59 00637A Batteries AAA x 2 User Manual Cleaning Cloth BN63 01798B Warranty Card Safety Guide 3D Active Glasses Power Cord AV Adapter Holder Wire stand Holder Ring x 4...

Page 6: ...ng it in Illustrations of common plugs and jacks are below Cable Plugs Ports Jacks HDMI USB Optical Warning Do not plug cables in upside down Be sure to check the orientation of the plug before pluggi...

Page 7: ...etailed instructions see the separate stand installation guide A B C 1 3 4 2 C Incorrect assembly Correct assembly Side View Place a soft cloth over a table to protect the TV and then place the TV on...

Page 8: ...iled instructions see the separate stand installation guide A B C 1 3 4 2 C Incorrect assembly Correct assembly Side View Place a soft cloth over a table to protect the TV and then place the TV on the...

Page 9: ...r injury to yourself or others if you elect to install the wall mount on your own To order the wall mount kit contact Samsung Customer Care at 1 800 SAMSUNG 1 800 726 7864 VESA Wall Mount Kit Notes an...

Page 10: ...n a wall Product Family TV size in inches VESA screw hole specs A B in millimeters Standard Screw Quantity LED TV 26 100 X 100 M4 4 32 40 200 X 200 M6 46 60 400 X 400 M8 Remove the screws in the mount...

Page 11: ...nstall your TV using a stand or a wall mount we strongly recommend you use parts provided by Samsung Electronics only If you use parts provided by another manufacturer it may cause difficulties with t...

Page 12: ...tape attached or not in rear of the TV camera and then you can use a TV camera after adjust a camera angle When you don t want to use a TV camera we recommend to use after a camera lens fixes to upwar...

Page 13: ...press the Controller To close the Menu Smart Hub or Source press the Controller for more than 1 second Standby mode Your TV enters Standby mode when you turn it off and continues to consume a small a...

Page 14: ...ture For details refer to the e Manual Moves the cursor selects the on screen menu items and changes the values seen on the TV s menu Turns the remote control light on or off When on the buttons becom...

Page 15: ...about the Smart Touch Control see page 40 NOTE Install the batteries so that the polarity of the batteries matches the illustration in the battery compartment Use the remote control within 23 feet of...

Page 16: ...TOOLS RETURN HISTORY MENU EXIT 1 2 3 5 4 1 MENUm button Displays the main on screen menu 2 TOOLST button Displays the Tools menus when available 3 E and Direction buttons Use the Direction buttons to...

Page 17: ...Language screen appears Select the menu language you want using your remote and then select Next The TV will display on screen menus using the language you select beginning with the next step in the S...

Page 18: ...o redisplay letters select 1F again 3 When done select Next if you have entered a security key or WPS PIN if you have entered a WPS PIN 4 The TV checks the wireless connection If the connection is suc...

Page 19: ...a cable connection without a set top box If you select this option go to 6 Auto Program 2 Step No I don t need to Select if you have a satellite or cable set top box You do not need to run Auto Progra...

Page 20: ...tion Control Setting the Voice and Motion Control function You can turn the Voice and Motion Control function on or off Select Off or On and then select Next 10 Setup Complete Review the Setup data an...

Page 21: ...uses an older version of HDMI the video and audio may not work If this occurs ask the manufacturer of the device about the HDMI version and if it is out of date request an upgrade Be sure to purchase...

Page 22: ...use MHL devices via an HDMI cable The TV will be recognized as the HDMI input In this case the TV may work differently than when you use MHL devices via a MHL cable For the best cable connection to th...

Page 23: ...you can hear sound output from the TV s optical jack When the TV is receiving a DTV signal the TV will send 5 1 CH sound to the home theater receiver When the source is a digital component such as a D...

Page 24: ...The optimal resolution is 1920 X 1080 60 Hz See the Display Resolution page for all available resolutions page 59 NOTE For an HDMI to DVI cable connection you must use the HDMI IN 1 DVI jack For PCs...

Page 25: ...ource list is displayed The following selections appear under Edit Name VCR DVD Cable STB Satellite STB PVR STB AV Receiver Game Camcorder PC DVI PC DVI Devices TV IPTV Blu ray HD DVD DMA Select an in...

Page 26: ...n you press the z button Web Browser Lets you browse the Internet Schedule Manager Lets you schedule shows and channels for viewing Source Lets you select a connected external video source to view All...

Page 27: ...use the TV Camera anymore we recommend rotating the TV Camera lens and tucking it into the bezel of the TV This will prevent any inadvertent and unintentional TV Camera functionalities and Face Recog...

Page 28: ...d to your TV from within 13 ft of your TV When you use microphone attached to your TV your voice may not be recognized because of ambient noise in your surrounding environment or other factors If this...

Page 29: ...remaining quiet select Next to conduct the Noise Test This measures the ambient noise in the room The ambient noise in your room should be below 40 decibels for Voice Control to work properly Mic Spea...

Page 30: ...Say Search All while in Voice Control mode 2 Say the word or phrase you wish to search for 3 The TV executes the spoken function Voice Text Input Mode performance may vary depending on the language s...

Page 31: ...rompt that reads Brightness Test failed This means that it is too dark for Motion Control to see your movements It is suggested that you increase the brightness in your room Also check the angle of th...

Page 32: ...nd that is indicated by the cursor or is highlighted Action Clench your fist Return Return to the previous menu Action Spread your hand and rotate counterclockwise Channel Volume Control Changes the c...

Page 33: ...nge account information The Change account information screen appears 4 Select Register Face A pop up message appears If you agree to use Face recognition select OK A QWERTY Keyboard screen appears 5...

Page 34: ...Turn your face towards the TV with your face level with the camera Password mode Pause RReturn 3 The TV starts Face recognition Face the front of the TV screen Try to hold still A green circle indicat...

Page 35: ...ed to accept an extension device called the Evolution Kit The Evolution Kit enables the TV to run a variety of the latest applications for a better user experience The Evolution Kit which may not be a...

Page 36: ...s IP Router or Modem that has a DHCP Server This TV supports the IEEE 802 11a b g and n communication protocols Samsung recommends using IEEE 802 11n If you play video using IEEE 802 11a b or g the vi...

Page 37: ...Modem Cable Not Supplied External Modem ADSL VDSL Cable TV The Modem Port on the Wall External Modem ADSL VDSL Cable TV IP Router that has a DHCP Server TV Rear Panel Modem Cable Not Supplied LAN Cab...

Page 38: ...w the directions on the screen 5 Enter your network security key or WPS PIN using your remote Enter numbers and letters using your remote If you are using the standard remote you can enter numbers by...

Page 39: ...rations on page 37 2 Turn on your TV and then go to the Network Settings screen Menu Network Network Settings 3 Select Start 4 The Network Connection screen appears and verifies the network connection...

Page 40: ...e Smart Touch Control press the Touch Pad If you press and hold the Touch Pad it has the same effect as pressing the MUTEM button on your remote However this action scrolls the page on a Web Browser P...

Page 41: ...d press any key on the Smart Touch Control 2 The connection icon appears at the bottom left of the screen and the Smart Touch Control is automatically connected to the TV If you want to perform the pa...

Page 42: ...ger on the Touch Pad and then slide it from one side to the other from top to bottom or bottom to top To move the Highlight continuously flick your finger across the Touch Pad from right to left left...

Page 43: ...URNR button to return to the general mode To Enter a channel number through Smart Touch Control 1 While watching a broadcast press the NUMBER button on the Smart Touch Control The TV displays the numb...

Page 44: ...r within 50 cm and 45 degrees of the up down left and right directions of the IR sensor of the external device IR Blaster OPEN ON OFF PAIRING OPEN 1 2 1 Power Switch Device Indicator LED IR Blaster sh...

Page 45: ...ase turn off and on the IR Blaster try again from step 2 OPEN ON OFF PAIRING OPEN IR Blaster PAIRING Reset button To set an Universal Remote Control after pairing an IR Blaster select Yes To use IR Bl...

Page 46: ...your TV Blu ray DVD player Which device do you want to control Previous Next 3 Select the port used to connect the external device and then press the Touch Pad Make sure that the selected device is on...

Page 47: ...Model and enter the correct model number for your Set top box What is the model number of your Set top box Previous Next 6 Select Download and then press the Touch Pad Download the configuration data...

Page 48: ...rd to the IR sensor of the external device and press the Touch Pad to test if the device works Point your remote towards the Set top box then press the button below until the power is turned off and o...

Page 49: ...ovies in a darkened room Picture modes apply preset adjustments to the picture N When your TV is connected to a PC via the HDMI to DVI cable you can only select Entertain and Standard Picture Picture...

Page 50: ...e The Index screen appears 2 To search for a topic select a letter The Index displays a list of topics and keywords that begin with the letter you selected 3 Select a topic or keyword you want 4 The e...

Page 51: ...there are no device issues Self Diagnosis User Menu Support Self Diagnosis Picture Test If the problem does not appear in the Picture test make sure Your connections are all consistent For example if...

Page 52: ...e TV turns on If you find that you are having trouble powering on your Samsung television there are a number of things to check before making a call to the service department If you re sure your power...

Page 53: ...input source Reboot the connected device by unplugging it and then reconnecting the device s power cable The remote control does not work Replace the remote control batteries Make sure the batteries a...

Page 54: ...uct can get scratched during cleaning Be sure to wipe the exterior and screen carefully using the cloth provided or a soft cloth to prevent scratches Do not spray water directly onto the product Any l...

Page 55: ...a wood screw screw and molly or other screw appropriate for the wall or cabinet you intend to secure the TV Holder string to We recommend a size M4xL20 wood screw TV Holder BN96 15753A Screw M8 X L19...

Page 56: ...ds for safety purposes Check the cord occasionally to make sure it is secure Before moving the TV separate the connected cord first 4 Verify all connections are properly secured Periodically check the...

Page 57: ...7 inches 52 0 x 154 0 x 19 5 mm Weight Without Batteries Including Batteries 0 1 lbs 84 0 g 0 2 lbs 130 0 g Specifications IR Blaster Model Name VG IRB2000 Power Source Battery AA x 4 To extend the b...

Page 58: ...13 8 kg 36 1 lbs 16 4 kg 40 3 lbs 18 3 kg Model Name UN60ES7500 Screen Size Diagonal 60 Class 60 0 measured diagonally Sound Output 10 W X 2 Dimensions W x H x D Body With stand 54 1 x 32 0 x 1 2 inch...

Page 59: ...640 x 480 800 x 600 800 x 600 800 x 600 1024 x 768 1024 x 768 1024 x 768 1152 x 864 1280 x 720 1280 x 800 1280 x 1024 1280 x 1024 1366 x 768 1440 x 900 1600 x 900RB 1680 x 1050 1920 x 1080 31 469 37 8...

Page 60: ...tandard bit rate frame rate above the compatible Frame sec listed in the table above If the Index Table is damaged the Seek Jump function is not supported When you play video over a network connection...

Page 61: ...55ES7500 15 7 15 7 16 5 6 7 UN60ES7500 15 7 15 7 19 2 8 7 NOTE All drawings are not necessarily to scale Some dimensions are subject to change without prior notice Refer to the dimensions prior to per...

Page 62: ...ional 9 IR Blaster Pairing 45 L Language 28 Licenses 54 M Menu Language 17 Motion Control 30 Motion Control Environment Test 31 S Securing the TV to the Wall 55 Setting up the Universal Remote Control...

Page 63: ...he equipment and receiver Connect the equipment into an outlet on a circuit different from that to which the receiver is connected Consult the dealer or an experienced radio TV technician for help FCC...

Page 64: ...ouillage est susceptible d en compromettre le fonctionnement For product available in the USA Canada market only channel 1 11 can be operated Selection of other channels is not possible This device an...

Reviews: