background image

English - 6

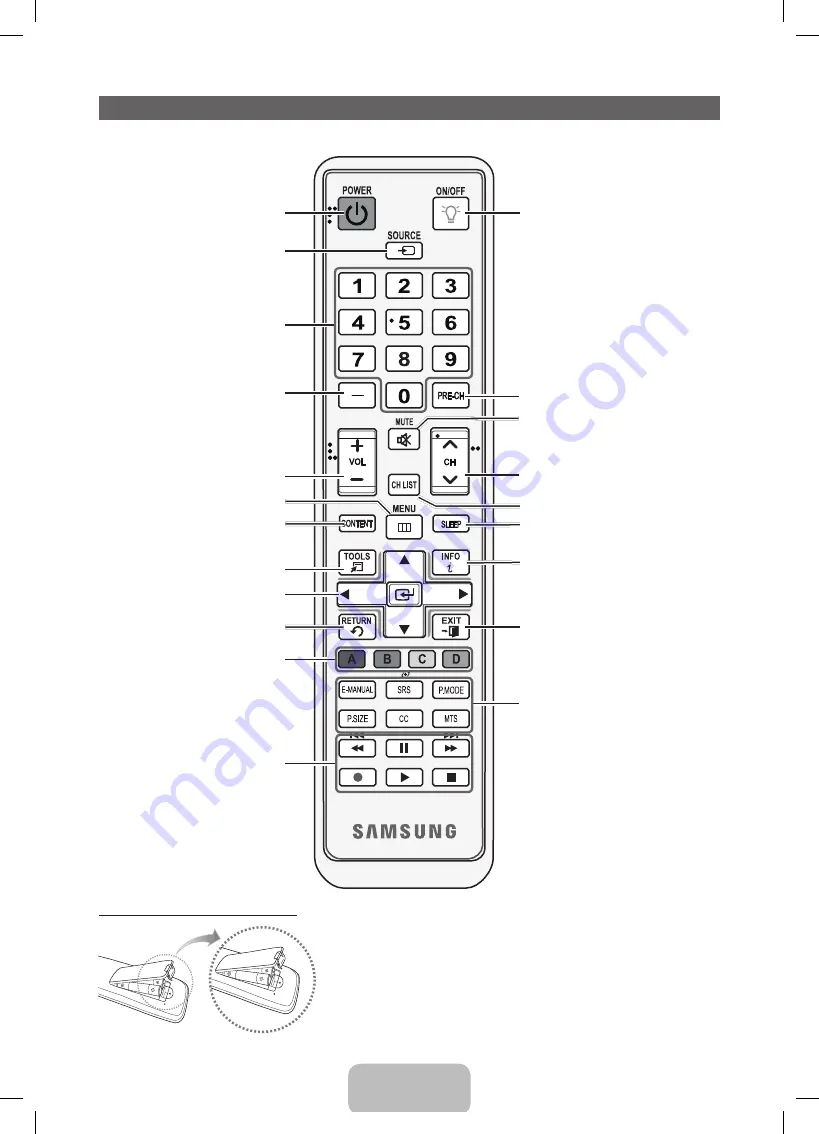
Remote Control Buttons


This remote control has Braille points on the Power, Channel, and Volume buttons and can be used by visually impaired 
persons.

Installing batteries (Battery size: AAA)


NOTE


x

Use the remote control within 23~33 feet from the TV.


x

Bright light may affect the performance of the remote control. 
Avoid using nearby special fluorescent light or neon signs.


x

The color and shape may vary depending on the model.

Turns the TV on and off.

Displays and selects the available video 

sources.

Turns the remote control light on or 
off. When on, the buttons become 
illuminated for a moment when pressed. 
(Using the remote control with this button 
set to On will reduce the battery usage 
time.)

Returns to the prevlous channel.

Cuts off the sound temporarily.

Displays channel lists on the screen.

Automatically shuts off the TV at a preset 
time.

Displays information on the TV screen.

Exits the menu.

Press to directly access to channels.

Press to select additional 

channels(digital) being broadcasted by 

the same station. For example, to select 

channel “54-3”, press “54”, then press 

“–” and “3”.

Displays the 

My Contents

Watch TV

 and 

Source

.

 Quickly select frequently used functions.

Returns to the previous menu.

Selects the on-screen menu items and 
changes the values seen on the menu.

Buttons used in the 

Channel List, Channel 

Manager, My Contents, Network, 

AllShare

™ menu, etc.

Use these buttons in 

My Contents

 and 

 modes. 

E-MANUAL

: Displays the 

e-Manual

 guide.

SRS

:  Lets you select the 

SRS TruSurround 

HD

 mode.

P.MODE

:  Lets you select the picture mode. 

P.SIZE

: Lets you choose the picture size.

CC

: Controls the caption decoder. 

MTS

:


Press to choose stereo, mono, 
or Separate Audio Program (SAP 
broadcast).

Changes channels.

Adjusts the volume.

Displays the main on-screen menu.

[UD5500-ZA]BN68-03431A-Eng.indb   6

2011-02-08   �� 5:26:10

Summary of Contents for UN32D5500

Page 1: ...cts please contact the SAMSUNG customer care center Comuníquese con SAMSUNG WORLDWIDE Si desea formular alguna pregunta o comentario en relación con los productos de Samsung comuníquese con el centro de atención al cliente de SAMSUNG Country Customer Care Center Web Site Address CANADA 1 800 SAMSUNG 726 7864 www samsung com Samsung Electronics Canada Inc Customer Service 55 Standish Court Mississa...

Page 2: ...Original Purchaser only The above described warranty repairs must be performed by a SAMSUNG Authorized Service Center Along with this Statement the Original Limited Warranty Statement and a dated Bill of Sale as Proof of Purchase must be presented to the Service Center Transportation to and from the Service Center is the responsibility of the purchaser Conditions covered are limited only to manufa...

Page 3: ...rds this spot on the TV Power Indicator Blinks and turns off when the power is on and lights up in standby mode SOURCEE Toggles between all the available input sources In the on screen menu use this button as you would use the ENTERE button on the remote control MENU Displays an on screen menu the OSD on screen display of your TV s features y Adjusts the volume In the OSD use the y buttons as you ...

Page 4: ... Front C M4 X L12 x4 Top View DO NOT USE CHEMICALS DO NOT USE GREASE DO NOT USE OIL ATTENTION 1 2 Place a soft cloth over the table to protect the TV and then place the TV on the cloth screen side down Insert the Stand Guide into the slot of TV bottom side Make sure to distinguish between the front and back of each component when assembling them Make sure that at least two persons lift and move th...

Page 5: ...able below x x Samsung wall mount kits contain a detailed installation manual and all parts necessary for assembly x x Do not use screws that do not comply with the VESA standard screw specifications x x Do not use screws that are longer than the standard length or do not comply with the VESA standard screw specifications Screws that are too long may cause damage to the inside of the TV set x x Fo...

Page 6: ...reen Automatically shuts off the TV at a preset time Displays information on the TV screen Exits the menu Press to directly access to channels Press to select additional channels digital being broadcasted by the same station For example to select channel 54 3 press 54 then press and 3 Displays the My Contents Watch TV and Source Quickly select frequently used functions Returns to the previous menu...

Page 7: ...ure Sound Channel Network System Support 2 Select an icon or option with the or button 3 ENTERE Press ENTERE to access the sub menu 4 Select the desired submenu with the or button 5 Adjust the value of an item with the or button The adjustment in the OSD may differ depending on the selected menu 6 ENTERE Press ENTERE to confirm the selection 7 EXITe Press EXIT For best cable connection to this pro...

Page 8: ...you selected Cable you ll go to the Cable System screen Use the or button to select Digital or Analog and then press ENTERE Use the or button to select the correct cable signal format STD HRC or IRC and then press ENTERE Most cable systems use STD Select the correct cable signal format for both the Digital and Analog systems When done select Search and the press ENTERE 5 Selecting and memorizing c...

Page 9: ... a problem occurs ask the manufacturer of the external device about the HDMI version and if out of date request an upgrade x x Be sure to purchase a certified HDMI cable Otherwise the picture may not display or a connection error may occur Using a Component up to 1080p or an Audio Video Cable 480i only Available devices DVD player Blu ray player cable box STB satellite receiver VCR For better pict...

Page 10: ... audio will be heard from the home theater receiver If you want to hear 5 1 CH audio connect the digital audio out jack from your DVD Blu ray player cable box STB satellite receiver directly to an amplifier or home theater AUDIO OUT Connects to the audio input jacks on your amplifier home theater x x When connecting use the appropriate connector x x When an audio amplifier is connected to the AUDI...

Page 11: ...orted SOG Sync On Green is not supported EX LINK Connector for service only Changing the Input Source Source Use to select TV or an external input source such as a DVD player Blu ray player cable box STB satellite receiver 1 Press the SOURCE button on your remote 2 Select a desired external input source TV PC AV Component HDMI1 DVI HDMI2 HDMI3 HDMI4 USB AllShare You can only choose external device...

Page 12: ... follow these steps 1 Connect your TV to your network as shown in the illustrations above 2 Turn on your TV press the MENU button on your remote and then select Network Network Settings 3 Select Wireless General and then press ENTERE twice 4 The Network function searches for available wireless network When done it displays a list of the available networks 5 In the list of networks press the or but...

Page 13: ...nnection for a network that uses DHCP follow these steps 1 Connect your TV to your network as shown in one of the illustrations above 2 Turn on your TV press the MENU button on your remote and then select the Network Network Settings 3 Select Wired 4 The network connection screen appears and verifies the network connection When the connection has been verified the Internet is connected successfull...

Page 14: ... Page e Exit Method 1 Method 2 1 If you want to use the menu that corresponds to an e Manual topic press the red button to select Try Now 2 To return to the e Manual screen press the E MANUAL button 1 Press the ENTERE button when a topic is displayed Do you want to execute this appears Select Yes and then press the ENTERE button The OSD window appears 2 To return to the e Manual screen press the E...

Page 15: ...us or next page Using the Zoom mode UMove R Return Select Zoom and then press ENTERE to magnify the screen You can scroll through the magnified screen by using the or buttons To return to the screen to normal size press the RETURN button How to search for a topic on the index page 1 To search for a topic press the left or right arrow button to select a letter and then press ENTERE The Index displa...

Page 16: ...ect the TV s correct input source by pressing the SOURCE button on the remote control Reboot the connected device by unplugging and then reconnecting the device s power cable The remote control does not work Replace the remote control batteries Make sure the batteries are installed with their correct polarities in the correct direction Clean the transmission window located on the top of the remote...

Page 17: ...your TV Make sure to use only the appropriate supplied screw If you use a different screw you can damage your TV 2 Firmly fasten the screw you provided size M4xL20 or similar to the wall or cabinet where the TV is to be installed If you fasten the screw to the wall we recommend you drive the screw into a stud If that is not possible use a molly to anchor the screw 3 Tie the TV Holder cord to the s...

Page 18: ...onally Sound Output 10 W X 2 Dimensions WxDxH Body With stand 30 2 X 1 2 X 18 4 inches 768 0 X 29 9 X 468 2 mm 30 2 X 9 4 X 20 9 inches 768 0 X 240 0 X 532 1 mm 35 0 X 1 2 X 21 2 inches 890 6 X 29 9 X 537 4 mm 35 0 X 10 0 X 23 7 inches 890 6 X 255 0 X 602 1 mm 37 6 X 1 2 X 22 6 inches 955 8 X 29 9 X 574 0 mm 37 6 X 10 0 X 25 1 inches 955 8 X 255 0 X 638 5 mm 43 0 X 1 2 X 25 6 inches 1091 8 X 29 9 ...

Page 19: ...ches Model name 1 2 3 4 5 6 UN32D5500RF 7 8 7 8 19 7 6 8 5 7 9 3 UN37D5500RF 7 8 7 8 22 7 6 8 7 8 9 3 UN40D5500RF 7 8 7 8 23 7 6 8 8 1 9 3 UN46D5500RF 15 7 15 7 29 6 6 8 9 3 9 3 NOTE All drawings are not necessarily to scale Some dimensions are subject to change without prior notice Refer to the dimensions prior to performing installation of your TV Not responsible for typographical or printed err...

Reviews: