


English - 12
Network Connection
You can set up your TV so that it can access the Internet through your local area network (LAN) using a wired or wireless
connection.
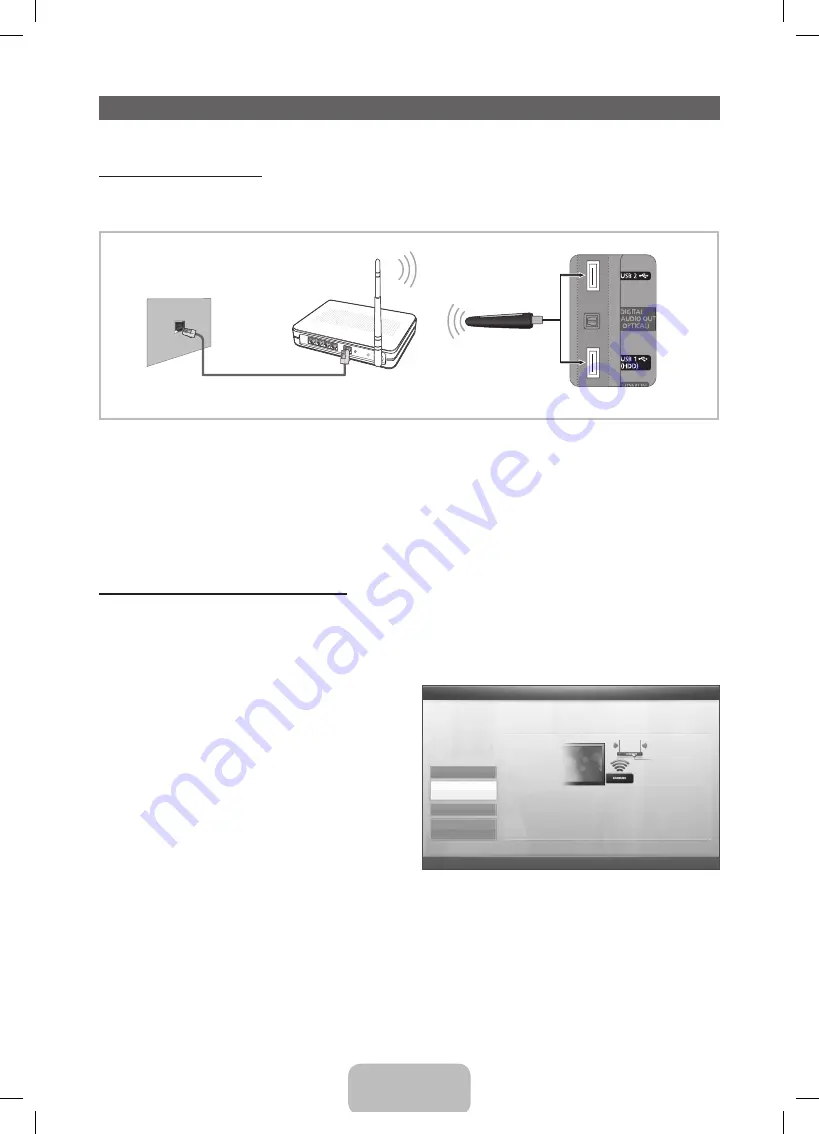
Network Connection - Wireless
You can connect your TV to your LAN through a standard wireless router or modem. To connect wirelessly, you must first
attach a Samsung Wireless LAN Adapter (WIS09ABGN, WIS09ABGN2, WIS10ABGN - sold separately) to either the USB
port
on the back of your TV. See the illustration below.
Samsung’s Wireless LAN adapter supports the IEEE 802.11a, IEEE 802.11b, IEEE 802.11g, and IEEE 802.11n wireless
communication protocols. For your TV to connect to your network, the wireless router or modem you use must also support
one of these protocols. The fastest of these protocols is IEEE 802.11n.
Most wireless network systems incorporate a security system that requires devices that access the network through an access
point or wireless router (typically a wireless modem or router) to transmit an encrypted security code called an access key.
For regular connections, your TV is compatible with the following security protocols:
•
Authentication Mode: OPEN, SHARED, WPAPSK, WPA2PSK
•
Encryption Type: WEP, TKIP, AES
Configuring the Network Connection - Wireless
The instructions below are for networks that use the Dynamic Host Configuration Protocol (DHCP) to configure network
connections automatically. If your have a Static IP network, see your user’s manual for configuration instructions.
To configure your network connection for a network that uses DHCP, follow these steps:
1.
Connect your TV to your network as shown in the illustrations above.
2.
Turn on your TV, press the
MENU
button on your remote,
and then select
Network
→
Network Settings
.
3.
Select
Wireless (General)
, and then press
ENTER
E
twice.
4.
The Network function searches for available wireless
network. When done, it displays a list of the available
networks.
5.
In the list of networks, press the
▲
or
▼
button to select
a network, then select
Next
and press
ENTER
E
.
6.
If you have selected an wireless router that has security,
the security key screen appears. Enter the
Security
key
(Security key or PIN), then select
Next
, and press
ENTER
E
.
✎
When you enter the
Security key
(Security key or
PIN), use
▲/▼/◄/►
buttons on your remote to select numbers and characters. You can also use the number keys
on the remote to enter numbers directly.
7.
The network connection screen appears and verifies the network connection. When the connection has been verified, the
“
Internet is connected successfully.
” message appears.
✎
For more detailed information, see “Connecting to a Wireless Network” in the e-Manual.
✎
If you want to set the connection manually, select
IP Settings
on the network connection screen. Set
IP Mode
to
Manual
. You must enter the
IP Address
,
Subnet Mask
,
Gateway
, and
DNS Server
manually.
TV Side Panel
The LAN Port on the Wall
LAN Cable
Wireless IP Sharer
(wireless router having
DHCP Server)
Samsung Wireless
LAN Adapter
U
Move
E
Enter
R
Return
Network Settings
Select a network connection type.
Wired
Wireless
(General)
WPS(PBC)
One Foot
Connection
Set up wireless network by selecting your Wireless
Router. You may need to enter security key depending
on the setting of the Wireless Router.
[UD5500-ZA]BN68-03431A-Eng.indb 12
2011-02-08 �� 5:26:23


