background image

UF-80

POWER

INT/E

XT

FOCU

S

AF

AWC

F

+

-

+

-

N

RED

1

2

3

4

7

8

5

6

BLU

E

TXT/IM

G

LAM

P

LAMP

ZOOM

+

-

Page 

20

1

2

3

4

LA

M

P

ZO

O

M

U

F-8

0D

X

SA

M

SU

N

G

  D

IG

ITA

L P

R

ES

EN

TE

R


FR

E

E

ZE

IN

T/E

X

T

AW

C

A

F

R

O

TA

TE

B

R

IG

H

T

+

-

LA

M

P

ZO

O

M

U

F-8

0D

X

SA

M

SU

N

G

  D

IG

ITA

L P

R

ES

EN

TE

R


FR

E

E

ZE

IN

T/E

X

T

AW

C

A

F

R

O

TA

TE

B

R

IG

H

T

+

-

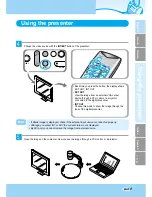
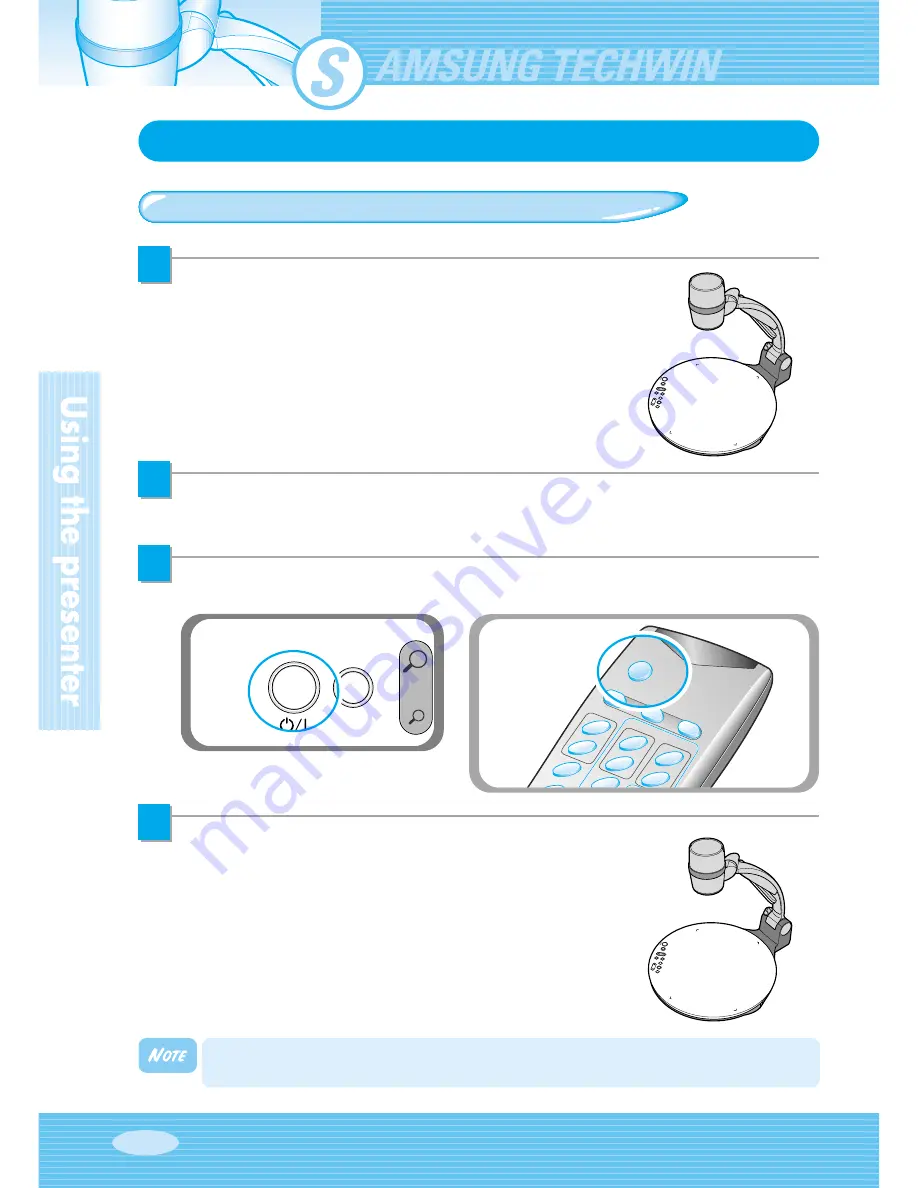
If there is no image on the PC monitor or the projector, check if the cable is properly 
connected and press the INT/EXT button of the presenter to select the input mode to INT OUT.

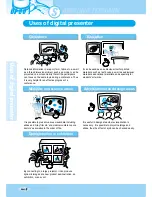
Using the presenter

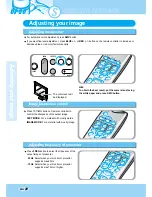
To project an object on the digital presenter

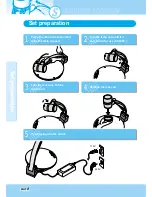
Set up your digital presenter properly.
(See page 14.)

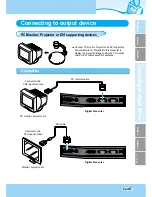
Connect the presenter to a PC monitor or projector to display the image.
(See page 15.)

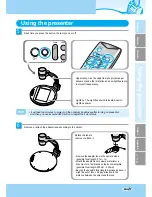
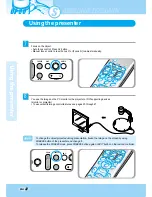
Turn the power of the output device and the digital presenter on.

Place the object on the Lightbox, and adjust the head to face the
object.

Summary of Contents for UF-80DX

Page 1: ...to operate this product Please read the instructions carefully www samsungpresenter com Before attempting to operate this product Please read the instructions carefully www samsungpresenter com LA M...

Page 2: ...ew or store the real time image in a PC and control the functions in a moment Also it is possible to control the functions by using RS 232C port By adopting DVI Digital Video Interactive output port U...

Page 3: ...mputer and the presenter with the INT EXT button on the control panel or on the remote controller To avoid from any interruption of presentation to reset the digital presenter you can preset up to 4 c...

Page 4: ...uter 16 Computer 17 PS 2 Mouse 17 Using the presenter 18 To show the image received from external device 18 To project an object on the digital presenter 20 Adjusting your image 23 Diffused Reflection...

Page 5: ...11 Except as specifically explained in this User s Manual do not attempt to service this product yourself Refer all servicing to qualified service personnel Opening or removing covers may expose you...

Page 6: ...s as well as audiovisual materials educational materials and especially for students art works Medicine and science areas It is possible to present various visual data including slides and X ray film...

Page 7: ...man Italian Spanish User s Manual DVI cable Remote controller Power cable PS 2 Mouse Lens cap PC Monitor cable etc Option Diffused Reflection Prevention Sheet Carrying bag Dust cover USB Cable UF 80 p...

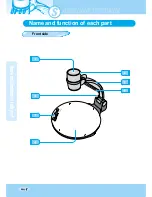
Page 8: ...UF 80 BR IG HT LA MP Name and function of each part Front side...

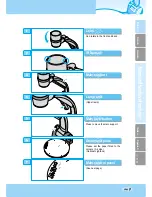
Page 9: ...HT Lens Can rotate to the front and back IR Sensor Main support Lamp unit Upper lamp Main lock button Press to move the main support Document plate Please set the paper fitted to the corners A4 size...

Page 10: ...se this to freeze the image INT EXT Use this to select internal or external image INT to view the image on this product EXT to view the VGA input from another device such as a PC monitor or a projecto...

Page 11: ...itor or projector by supplied DVI cable MOUSE Use this to connect PS 2 Mouse See page 17 RS 232C COMPUTER CONNECTION TERMINAL Use this to connect RS 232C cable VGA VIDEO OUTPUT Connect this to the RGB...

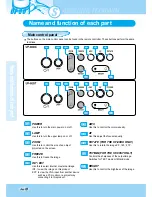
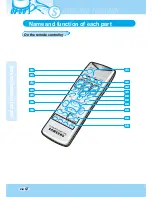
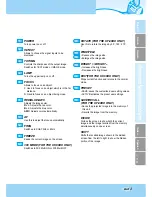
Page 12: ...CALL DIVIDE SHIFT ACTIVE FREQ FREEZE BRIGHT WIDE TELE BRIGHT ROTATE AF AWC 3X3 F N RED 1 2 3 4 7 8 5 6 BLUE TXT IMG LAMP DIGITAL PRESENTER UF 80 Page 12 1 2 5 7 8 12 15 3 4 6 10 11 9 14 13 16 17 Name...

Page 13: ...the screen 3X3 MODE FOR THE UF 80DX ONLY Switches to 3X3 Multi ON or 3X3 Multi OFF ROTATE FOR THE UF 80DX ONLY Use this to rotate the image by 90 180 270 0 WIDE TELE Reduces the image size Enlarges t...

Page 14: ...TER FR EE ZE INT EX T AW C AF RO TAT E BR IGH T LAM P ZO OM UF 80 DX SAM SUN G DIG ITAL PRE SEN TER FR EE ZE INT EX T AW C AF RO TAT E BR IGH T LA MP ZO OM FR EE ZE AW C AF RO TAT E IRI S BR IG HT U...

Page 15: ...ut terminal Connect to the DVI input terminal PC monitor projector etc PC monitor cable DVI cable Monitor projector etc Digital Presenter Digital Presenter Connecting to output device Connect PC monit...

Page 16: ...which is attached on computer main board It can make troubles in extended front side USB port or USB hub without power in accordance with computers Be sure to use the USB cable shorter than 5 0 m Caut...

Page 17: ...etc Connect the cable to VGA IN terminal using the VGA cable from the computer VGA IN terminal is available Connect the cable to VGA port on the computer equipped with XGA SXGA UXGA graphic card Digit...

Page 18: ...HT When the digital presenter is powered on the upper lamp turns on the upper lamp turns on To turn off press LAMP button of the presenter Using the presenter To show the image received from external...

Page 19: ...e current status is not displayed By DVI port you cannot recieve the image from external device Using the presenter Choose the video source with the INT EXT button of the presenter Open the image on t...

Page 20: ...ge on the PC monitor or the projector check if the cable is properly connected and press the INT EXT button of the presenter to select the input mode to INT OUT Using the presenter To project an objec...

Page 21: ...glish French German Italian Spanish Each time you press the button the lamp is on or off Remove or attach the adapter lens according to the object Rotate the lens to remove or attach it Remove the ada...

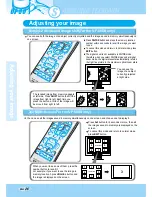
Page 22: ...on the screen by using FREEZE button of the presenter and change it To release the FREEZE mode press FREEZE button again or EXIT button on the remote controller LAMP ZOOM UF 80D X SAMSU NG DIGITA L PR...

Page 23: ...er to achieve the same result Diffused Reflection Prevention Sheet When conducting a presentation of a document with a reflective surface the light settings in the environment may cause a diffused ref...

Page 24: ...of presenter For automatic color adjustment press AWC button If you want fine level adjustment press BLUE or RED button on the remote controller to increase or decrease blue or red color factor manua...

Page 25: ...ge in memory For the UF 80DX only Image rotate control For the UF 80DX only For image rotation press ROTATE button To rotate the image by 90 180 270 0 press ROTATE button You can save the image up to...

Page 26: ...ton to recall it For example if you want to see the image in memory location 3 press BLUE button and the image is displayed on the screen Screen 2 divide and image shift For the UF 80DX only You can s...

Page 27: ...or next time use You can save up to 4 different custom user settings You can save the setting on the Zoom Focus Iris Lamp state and Color level buttons To save the current value press SAVE button and...

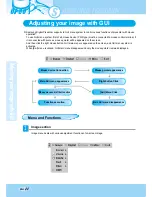
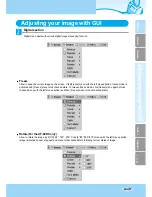
Page 28: ...ppeared on the screen And then click the right mouse button GUI main menu is appeared on the screen and GUI menu system is activated When Exit menu is clicked GUI main menu disappears and only the mou...

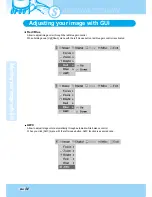
Page 29: ...Far Near menu with the left mouse button focus is activated Click Auto menu to work auto focus function Zoom Allow to change the image size When holding down Tele Wide menu with the left mouse button...

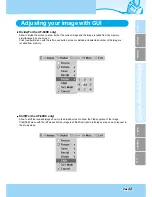
Page 30: ...ance control When you click AWC menu with the left mouse button AWC function is executed once Red Blue Allow to adjust image color through the red blue gain control When holding down Up Down menu with...

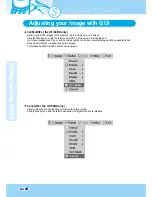
Page 31: ...is activated and Freeze menu turns checked state To release freeze mode click freeze menu again or click Cancel menu with the left mouse button and then Freeze menu turns unchecked state Rotate For th...

Page 32: ...80DX only Allow to save the projected image into the memory of digital presenter or recall the image from the memory To save recall the image with the proper save number Click numbers menu with the le...

Page 33: ...imultaneously on one screen Click numbers menu with the left mouse button screen is divided and selected number of the image is recalled from memory Shift For the UF 80DX only Allow to shift the recal...

Page 34: ...9 divide mode is activated and GUI menu disappeared If you click the image number on screen selected image will be expanded to full screen and GUI menu is appeared on the screen To Release 3x3 Multi m...

Page 35: ...w to save the customized user setting values or to activate the preset user setting Click numbers menu with the left mouse button current setting value is saved to flash ROM or load setting value from...

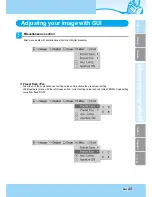
Page 36: ...rol the sharpness of the output image default On Click Aperture menu with the left mouse button to turn on off aperture mode IMAGE MODE TEXT MODE Lamp Allow to turn the lamp on or off Click this menu...

Page 37: ...n take any position of screen using Drag and Drop First of all click the moving point of main menu and then drag and drop to any position of screen where you want 1 Click the moving point image 2 Drag...

Page 38: ...ctivated Then Draw menu is activated See page 28 When Draw menu is clicked GUI Draw toolbar is appeared on the screen and GUI main menu disappeared 1 Exit Button 5 Line Width Selection 2 Tool Selectio...

Page 39: ...then 1 Place the cursor at a corner of the area you want to select 2 Click and drag the mouse until the selection is the size you want 3 Release the mouse button Drawing the freehand line To create a...

Page 40: ...olor Palette Foreground Background Color Palette Use the Color Palette to select the colors that you want to draw the line Move the cursor over the available colors panel Click left button to select a...

Page 41: ...G ITA L PRE SEN TER FR EE ZE INT EX T AW C AF RO TAT E BR IGH T LA MP ZO OM UF 8 0D X SAM SUN G DIG ITA L PRE SEN TER FR EE ZE INT EX T AW C AF RO TAT E BR IGH T LA MP ZO OM UF 8 0D X SAM SUN G DIG IT...

Page 42: ...DIG ITAL PRE SEN TER FR EE ZE INT EX T AW C AF RO TAT E BR IGH T 1 5 Page 42 PO WE R RA MP ZO OM FR EE ZE INT EX T AW C AF RO TAT E IRI S While you push the main lock button toward the front of the pr...

Page 43: ...er detailed information please refer to the program manual supplied with the product The image is out of focus When you use GUI the mouse is not seen or does not work normally Check if the adaptor len...

Page 44: ...UF 80 1 2 3 Page 44 Battery replacement Open the battery compartment lid at the back of the remote controller Insert new batteries Close the lid Battery type AAA type 1 5V...

Page 45: ...nput selection 2 channels Internal 1 External 1 On screen display Available Image freeze Available Image save Available 8 frames For the UF 80DX only Image recall Available 8 frames For the UF 80DX on...

Page 46: ...UF 80 Memo...

Reviews: