background image

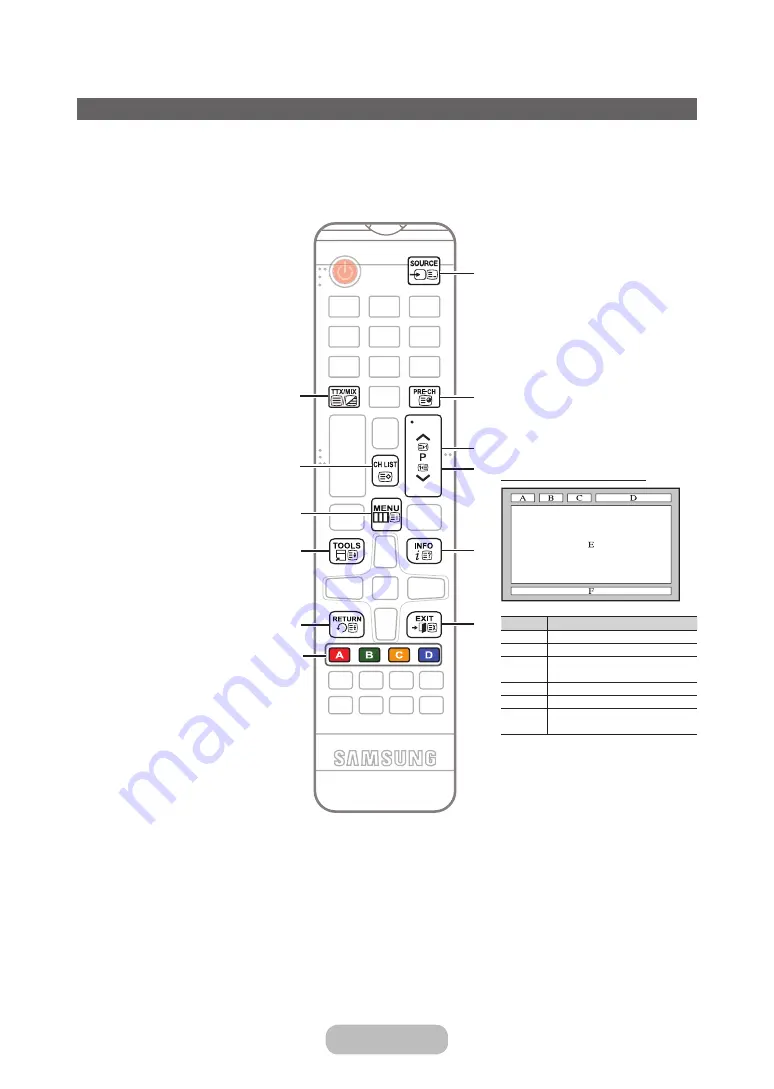
Analogue Channel Teletext Feature

The index page of the Teletext service gives you information on how to use the service. For Teletext information to be 
displayed correctly, channel reception must be stable. Otherwise, information may be missing or some pages may not 
be displayed.


You can change Teletext pages by pressing the numeric buttons on the remote control.

/

 (Teletext on/mix/off): 

Activates the Teletext mode for the 
current channel. Press the button 
twice to overlap the Teletext mode 
with the current broadcasting 
screen. Press it one more time to 
exit teletext.

8

 (store): Stores the Teletext 

pages.

3


6

 (index): Displays the index 

(contents) page at any time while 
you are viewing Teletext.

4

 (size): Displays the teletext 

on the upper half of the screen in 
double-size. To move the text to 
the lower half of the screen, press 
it again. For normal display, press 
it once again.

9

 (hold): Holds the display at 

the current page, in the case that 
there are several secondary pages 
that follow automatically. To undo, 
press it again.

Colour buttons (red, green, yellow, 
blue): If the FASTEXT system 
is used by the broadcasting 
company, the different topics on 
a Teletext page are colour-coded 
and can be selected by pressing 
the coloured buttons. Press the 
colour corresponding to the topic 
of your choice. A new colourcoded 
page is displayed. Items can be 
selected in the same way. To 
display the previous or next page, 
press the corresponding coloured 
button.

7


0

 (mode): Selects the Teletext 

mode (LIST/ FLOF). If pressed 
during LIST mode, switches 
the mode to List save mode. In 
List save mode, you can save a 
Teletext page into a list using the 
8(store) button.

7

8

9

0

!

@

3

1

4

5

6

2

8


1

 (sub-page): Displays the 

available sub-page.

9


2

 (page up): Displays the next 

Teletext page.

0


3

 (page down): Displays the 

previous Teletext page.

!


5

 (reveal): Displays the hidden 

text (answers to quiz games, for 
example). To display the normal 
screen, press it again.

@


7

 (cancel): Shrinks the Teletext 

display to overlap with the 
current broadcast.

Typical Teletext page

Part

Contents

A

Selected page number.

B

Broadcasting channel identity.

C

Current page number or search 
indications.

D

Date and time.

E

Text.

F

Status information. FASTEXT 
information.

English - 78

English - 79

Other Information

Summary of Contents for T22D390EW

Page 1: ...or purchasing this Samsung product To receive more complete service please register your product at www samsung com register Model _____________ Serial No _____________ TD590 T22D390EW T24D390EW T24D391EW T27D390EW T24D590EW T27D590EW TD390 TD391 ...

Page 2: ...ge an additional fee for such a service and you may be required to agree to terms and conditions of their business 5 Some Digital TV functions might be unavailable in some countries or regions and DVB C might not work correctly with some cable service providers 6 For more information please contact your local Samsung customer care centre The reception quality of TV may be affected due to differenc...

Page 3: ...6 y y Changing the Preset Picture Mode 27 y y Adjusting Picture Settings 28 y y Changing the Picture Size 29 y y Calibrating the Screen Display 31 y y Picture In Picture PIP 32 y y Changing the Picture Options 33 y y Changing the Preset Sound Mode 35 y y Adjusting Sound Settings 36 y y Memorizing Channels 38 y y Using the INFO button Now Next guide 40 y y Using the Channel Menu 40 y y Other Featur...

Page 4: ...e for your reference and may differ depending on models and countries Warning Avoid using a damaged power cord or plug or a loose power outlet Otherwise it may result in electric shock or fire Avoid connecting multiple electric appliances to a single wall outlet Otherwise it may result in fire due to overheating of the wall outlet Avoid plugging in or unplugging the power supply with wet hands Oth...

Page 5: ...ettes on the product Otherwise it may result in fire Ask an installation engineer or relevant company to install the product onto the wall Otherwise it may result in injury Make sure to use the specified wall mount Avoid installing the product in a badly ventilated location such as inside a bookshelf or closet Otherwise it may result in fire due to internal over heating Keep the plastic bags used ...

Page 6: ... let the product drop while moving it This may result in a problem with the product or injury Do not place the product face down on the floor This may damage the panel of the product When installing the product on a console or shelf make sure that the front of the product does not protrude out of the console or shelf Otherwise this may cause the product to fall off and result in a malfunction or i...

Page 7: ...agent when cleaning the product This may result in the exterior being deformed or the print being removed If you can t get the product clean with just the supplied cloth use a soft damp cloth with a monitor exclusive cleansing agent and wipe the product with it If no monitor exclusive cleansing agent is available dilute a cleansing agent with water at a ratio of 1 10 before cleaning the product Si...

Page 8: ... it may result in electric shock or fire Avoid moving the product by pulling the power cord or aerial cable Otherwise it may result in electric shock fire or a problem with the product due to damage to the cable GAS When a gas leak occurs do not touch the product or the power plug and ventilate immediately A spark may result in an explosion or fire During a thunder or lighting storm do not touch t...

Page 9: ...ating or short circuit or result in an electric shock Set the appropriate resolution and frequency for the product Otherwise it may result in eye strain Avoid turning the product upside down or move the product holding only the stand This may cause the product to fall resulting in damage to the product or injury Watching the product from too close a distance continuously may damage your eyesight A...

Page 10: ...t be returned for recycling purposes The customer is responsible for returning the used or rechargeable batteries for recycling The customer can return used or rechargeable batteries to a nearby public recycling centre or to a store selling the same type of the battery or rechargeable battery Do not place the adapter on top of another adapter Otherwise it may result in fire Keep power adaptor away...

Page 11: ...ur product using a stand or a wall mount we strongly recommend you use parts provided by Samsung Electronics only If you use parts provided by another manufacturer it may cause difficulties with the product or result in injury caused by the product falling Installation with a stand Installation with a wall mount 10 cm 10 cm 10 cm 10 cm 10 cm 10 cm 10 cm Other Warnings The actual appearance of the ...

Page 12: ...rd Warranty Card Safety Guide Quick Setup Guide Depending on the model S W Driver CD HDMI Cable TD590 D sub Cable TD390 TD391 Adapter TD390 TD391 TD590 Stand Base TD390 TD391 TD590 Stand Base Input Cables Sold Separately You will need one or more of these cables to connect your product to your antenna or cable outlet and your peripheral devices Blu ray players DVD players etc Component Composite A...

Page 13: ...ctions To change a parameter select it and then press the Controller Selecting the MEDIA P With the Function menu visible select MEDIA P by moving the Controller to the up direction The MEDIA P main screen appears Select an application by moving the Controller and then pressing the Controller Selecting the SOURCEs With the Function menu visible open the SOURCEs by pushing the Controller to the rig...

Page 14: ...ccess to channels Alternately select Teletext ON Double Mix or OFF Adjust the volume View the Media Play Display channel list on the screen page 40 Open the OSD Menu Quickly select frequently used functions Use this button in a specific feature Move the cursor select the on screen menu items and change the values seen on the TV s menu Return to the previous menu Use these buttons according to the ...

Page 15: ...o that the polarity of the batteries matches the illustration in the battery compartment Use the remote control within 7 m of the product Bright light may affect the performance of the remote control Avoid using it near fluorescent lights or neon signs The colour and shape of the remote may vary depending on the model Getting Started English 15 ...

Page 16: ...hen available 3 E and Direction buttons Use the Direction buttons to move the cursor and highlight an item Use the E button to select an item or confirm the setting 4 RETURNR button Returns to the previous menu 5 EXITe button Exits the on screen menu How to Operate the Main Menu OSD On Screen Display The access steps may differ depending on the menu option you select 1 MENUm The main menu options ...

Page 17: ...vel the product if the aerial cable is tightly connected You could break the aerial jack off the product Connecting the Power The picture may vary depending on the model Power Input Setup The initial setup dialog appears when the TV is first activated Follow the on screen instructions to finish the initial setup process including menu language choice country choice channel source choice channel sc...

Page 18: ...ot require an audio cable To connect the product to a digital device that does not support HDMI output use an HDMI to DVI cable and audio cables If you connect an external device to the product that uses an older version of HDMI the video and audio may not work If this occurs ask the manufacturer of the device about the HDMI version and if it is out of date request an upgrade Be sure to purchase a...

Page 19: ...he official MHL website http www mhlconsortium org MHL USE Connect an MHL cable to the mobile device and the displayer Press SOURCEs button and then select the MHL connector to display the mobile device s screen on the displayer The following remote control functions will also be available REW FF Play Pause Stop e Previous menu Restrictions MHL has several requirements If you are using an HDMI ada...

Page 20: ...O OUT PG Device Device Audio Cable Not Supplied Component Cable Not Supplied Red Red Blue White Green Audio Cable Video Cable For better picture quality we recommend the Component connection over the A V connection When you connect a Video cable to COMPONENT AV IN the colour of the COMPONENT AV IN VIDEO jack green will not match the video cable yellow Using a Scart Cable Available devices DVD VCR ...

Page 21: ...t jack on your product While the headphones are connected the sound from the built in speakers will be disabled The sound function may be restricted when you connect headphones to the product Headphone volume and product volume are adjusted separately The earphone jack supports only the 3 conductor tip ring sleeve TRS type English 21 Connections ...

Page 22: ...peakers for audio HDMI Cable D sub Cable HDMI to DVI Cable Stereo Cable Stereo Cable NOTE For an HDMI to DVI cable connection you must use the HDMI IN 1 DVI jack For PC s with DVI video out jacks use an HDMI to DVI cable to connect the DVI out on the PC to the HDMI IN 1 DVI jack on the product Use the PC s speakers for audio English 22 Connections ...

Page 23: ...ed the message Updating Completed is displayed indicating the channel list is updated NOTE You must obtain a CI or CI CARD from a local cable service provider When removing the CI or CI CARD carefully pull it out with your hands since dropping the CI or CI CARD may cause damage to it Insert the CI or CI CARD in the direction marked on the card The location of the COMMON INTERFACE slot may be diffe...

Page 24: ... 800 x 600 72Hz 48 077 72 188 50 000 VESA DMT 800 x 600 75Hz 46 875 75 000 49 500 MAC 832 x 624 75Hz 49 726 74 551 57 284 VESA DMT 1024 x 768 60Hz 48 363 60 004 65 000 VESA DMT 1024 x 768 70Hz 56 476 70 069 75 000 VESA DMT 1024 x 768 75Hz 60 023 75 029 78 750 VESA DMT 1152 x 864 75Hz 67 500 75 000 108 000 MAC 1152 x 870 75Hz 68 681 75 062 100 000 VESA DMT 1280 x 720 60Hz 45 000 60 000 74 250 VESA ...

Page 25: ...To access Edit Name open the Tools menu when the Source list is displayed The following selections appear under Edit Name VCR DVD Cable STB Satellite STB PVR STB AV Receiver Game Camcorder PC DVI PC DVI Devices TV IPTV Blu ray HD DVD DMA Select an input jack and then select the name of the device connected to that jack from the list that appears If you connect a PC to the HDMI IN 1 DVI port with a...

Page 26: ...ep your eyes directly in front of the screen Adjust the angle so light does not reflect on the screen Keep your forearms perpendicular to your upper arms and level with the back of your hands Keep your elbows at about a right angle Adjust the height of the product so you can keep your knees bent at 90 degrees or more your heels attached to the floor and your arms lower than your heart English 26 B...

Page 27: ... apply preset adjustments to the picture Dynamic Suitable for a bright room Standard Suitable for a normal environment Movie Suitable for watching movies in a dark room Entertain Sharpens the picture Suitable for games It is only available when connecting a PC English 27 Basic Features ...

Page 28: ...Back Mode or Standing Mode Gamma is not available Backlight Menu Picture Backlight Adjusts the brightness of the screen by adjusting the brightness of the individual pixels Contrast Menu Picture Contrast Increases or decreases the contrast between dark and light areas of the picture Brightness Menu Picture Brightness Adjusts the brightness of the screen Not as effective as Backlight Sharpness Menu...

Page 29: ... 4 3 Sets the picture to basic 4 3 mode Do not set your product to 4 3 format for a long time The borders displayed on the left and right or top and bottom of the screen may cause image retention screen burn which is not covered by the warranty Screen Fit Displays the full image without any cut off when HDMI 720p 1080i 1080p or Component 1080i 1080p signals are inputted Adjusts the Position by usi...

Page 30: ...omponent 1080i 1080p 16 9 Wide Zoom Zoom 4 3 Screen Fit HDMI 480i p 576i p 16 9 Wide Zoom Zoom 4 3 HDMI 720p 1080i 1080p 16 9 Wide Zoom Zoom 4 3 Screen Fit Depending on the input source the picture size options may vary The available items may differ depending on the selected mode HD High Definition 16 9 1080i 1080p 1920x1080 720p 1280x720 You can adjust and store settings for each external device...

Page 31: ...ings Using Your Product as a Computer PC Display Entering the Video Settings Based on Windows 7 8 For your product to work properly as a computer display you must enter the correct video settings Depending on your version of Windows and your video card the procedure on your PC will probably differ slightly from the procedure presented here However the same basic information will apply in most case...

Page 32: ...he product off while watching in the PIP mode the PIP function is reset to Off When you turn your product on you must turn PIP on again to watch in the PIP mode You may notice that the picture in the PIP screen becomes slightly unnatural when you use the main screen to view a game or karaoke PIP Settings Main picture TV PC AV Component HDMI1 DVI HDMI2 SCART Sub picture TV PC AV Component HDMI1 DVI...

Page 33: ... Black Tone Off Dark Darker Darkest Select the black level to adjust the screen depth Flesh Tone Emphasize pink Flesh Tone RGB Only Mode Off Red Green Blue Displays the Red Green and Blue colour for making fine adjustments to the hue and saturation Colour Space Auto Native Adjust the range of colours available to create the image White Balance Adjust the colour temperature for a more natural pictu...

Page 34: ...on the screen When the signal is weak try other options until the best picture is displayed Auto Visualisation When changing analogue channels displays signal strength Only available for analogue channels When bar is green you are receiving the best possible signal MPEG Noise Filter Off Low Medium High Auto Reduces MPEG noise to provide improved picture quality HDMI Black Level Low Normal Selects ...

Page 35: ...to its default settings Changing the Preset Sound Mode Sound Mode Menu Sound Sound Mode Sound modes apply preset adjustments to the sound Standard Selects the normal sound mode Music Emphasizes music over voices Movie Provides the best sound for movies Clear Voice Emphasizes voices over other sounds Amplify Increase the intensity of high frequency sound to allow a better listening experience for t...

Page 36: ...iser The Equaliser displays a series of sliders Use the arrow buttons to select a slider and change the slider s value To Reset the Equaliser select the Reset A pop up appears asking if you want to reset select Yes otherwise select No To exit select Close Balance L R Adjusts the balance between the right and left speaker 100Hz 300Hz 1kHz 3kHz 10kHz Bandwidth Adjustment Adjusts the loudness of spec...

Page 37: ...e the volume adjust between the range 0 and 10 respectively Dolby Digital Comp Line RF This function minimizes signal disparity between a dolby digital signal and a voice signal i e MPEG Audio HE AAC ATV Sound Select Line to obtain dynamic sound and RF to reduce the difference between loud and soft sounds at night time Line Set the output level for signals greater or less than 31dB reference to ei...

Page 38: ...to Broadcasting and select Auto Tuning Select Start when prompted with a message This initiates the Auto Tuning function The process can take up to 30 minutes to complete If Starting the Auto Tuning function when there is an existing index of channels overwrites the previous index Auto Tuning Scans for channels automatically and stores them in the TV s memory Cable Search Option when the aerial wa...

Page 39: ...ed a channel is updated in the channel list Analogue Channel Tuning Scans for a analogue channel 1 Select the New 2 Set the Programme Colour System Sound System Channel and Search 3 Select the Store When scanning has finished a channel is updated in the channel list Channel mode P programme mode When tuning is complete the broadcasting stations in your area have been assigned to position numbers f...

Page 40: ...nu Broadcasting Channel List Press CH LIST button while viewing TV to display a list you can use to jump between channels The list also displays the programme info favourites channels and the Schedule Viewing and Schedule Recording programmes The Channel List screen icons indicate the following An analogue channel A favourites channel A locked channel Change Channels Select a channel to jump to it...

Page 41: ...h digital channel s programming schedule including showtimes Check the programming schedules and even setup a Schedule Viewing or Schedule Recording Press Guide to launch the guide Make sure that the date and time is set properly under the System Time Clock menu Using Channel View a Quick Nav Press a button A popup window will open Each press of l or r arrow button moves the focus 24 hours back or...

Page 42: ... this function 1 Press the E button to select Schedule 2 Press the u d l r buttons to set the Aerial Channel Repeat Date or Start Time Aerial Select the desired antenna source Channel Select the desired channel Repeat Select Once Manual Sat Sun Mon Friri or Everyday to set at your convenience If you select Manual you can set the day you want The mark indicates the date is selected Date you can set...

Page 43: ...y specifying the time and date Run Schedule Manager and then select Schedule A popup menu will appear Select Schedule Viewing to proceed Specify that programme s Channel Repeat and Start Time and then select OK to finish Cancel a Schedule Viewing To cancel a Schedule Viewing for a specific programme select the programme from the Schedule Manager screen A popup menu will appear Select Delete to can...

Page 44: ...sing them again 2 Press b button A pop up appears asking Delete the selected channels select Yes The selected channel s will be deleted Rename Analogue Channels Select a channel you wish to rename from the Edit Channel screen press TOOLST button and then select Rename channels from the list Analogue channels only You can now rename the selected channel The new name can be up to 5 characters long E...

Page 45: ...ame Favourites from the list 2 Rename the list in the popup window The new name can be up to 20 characters long Rearrange the Favourites Channels List Rearrange the order of the channels in a Favourites Channels List 1 Press b button to bring up a favourites channels list and select the channel you wish to move 2 Press a button to rearrange the order of the selected channel Press E button Copy a F...

Page 46: ...torage to use this function The PIN input screen appears Enter the PIN using your remote Import from USB Import channel list from USB Export to USB Export channel list to USB This function is available when USB is connected USB format should be FAT32 and NTFS Delete CAM Operator Profile Menu Broadcasting Channel Settings Selects the CAM operator to delete Subtitle t Menu Broadcasting Subtitle Use ...

Page 47: ...on function on or off Volume Adjust the audio description volume Teletext Language Menu Broadcasting Teletext Language Set a desired language for teletext English is the default in cases where the selected language is unavailable in the broadcast Digital Text UK only Menu Broadcasting Digital Text ENTER If the programme broadcasts with digital text this feature is enabled MHEG Multimedia and Hyper...

Page 48: ...deo codec Application Info View information on the CAM inserted into the CI slot and on the CI or CI CARD which is inserted into the CAM You can install the CAM anytime whether the TV is on or off 1 Purchase a CI CAM module at your nearest dealer or by phone 2 Firmly insert the CI or CI CARD into the CAM in the direction of the arrow 3 Insert the CAM with the CI or CI CARD into the common interfac...

Page 49: ...rrect In this case set the time manually Manual Set the current time manually Clock Set Set the Date and Time manually You can set the current date and time using your remote Available only when the Clock Mode is set to Manual Time Zone Select your time zone This function is only available when the Clock Mode is set to Auto GMT Selects your time zone When Country is set to Others you can use this ...

Page 50: ...aining music or photo files you want played when the product turns on automatically If there is no music file on the USB device or you don t select a folder containing a music file the Timer function does not operate correctly If there is only one photo file in the USB the slide show will not play If a folder name is too long the folder cannot be selected Each USB you use is assigned its own folde...

Page 51: ...remain on if it s not receiving a signal Auto Power Off The product will automatically turn off if you don t press a button on your remote or product controller within 4 hours to prevent overheating Auto Protection Time Menu System Auto Protection Time If the screen displays a still image for a certain period of time you define the product activates the screen saver to prevent the formation of bur...

Page 52: ...rogramme Rating Lock will block it The screen will go blank and the popup message appears Enter the PIN to unblock the programme or movie using your remote Change PIN Menu System Change PIN The Change PIN screen will appear Choose any 4 digits for your PIN and enter them in the Enter New PIN Reenter the same 4 digits in the Confirm New PIN When the Confirm screen disappears select Close The produc...

Page 53: ...ecting a game console and connecting another external device set Game Mode to Off If you display the product menu in Game Mode the screen shakes slightly Game Mode is not available when the input source is set to TV or PC source Set Game Mode to On only after connecting a game console If you turn Game Mode on before you have attached the game console you may notice reduced picture quality If the G...

Page 54: ...EC instructions page 65 DivX Video On Demand Menu System DivX Video On Demand Shows the registration code authorized for the product If you connect to the DivX web site and register with 10 digit registration code you can download the VOD activation file Once you play it using Media Play the registration is completed For more information on DivX R VOD visit http vod divx com English 54 Preference ...

Page 55: ...r manual Sound Test Use the built in melody to check for sound problems Yes Select Yes if you can hear sound from only one speaker or from neither speaker during the sound test There may be a problem with the product Contact Samsung s Call Centre for assistance No Select No if you can hear sound from the speakers There may be a problem with your external equipment Please check your connections If ...

Page 56: ...e Menu Support Software Update The Software Update menu lets you upgrade your product s software to the latest version Current Version This is the software version already installed in the product Upgrading to the Latest Version Check your TV s software version and upgrade it if necessary The TV will turn off and on automatically after completing the software upgrade All video and audio settings r...

Page 57: ...vironments only If you select Store Demo some functions will not work and the picture settings will be reset every 5 minutes Contact Samsung Menu Support Contact Samsung View this information when your product does not work properly or when you want to upgrade the software You can find information regarding our call centres and how to download products and software English 57 Preference Features ...

Page 58: ...ot responsible for any data file damage or data loss The HDD Hard Disk Drive connected to USB is not supported Do not disconnect the USB device while it is loading The higher the resolution of the image the longer it takes to display on the screen The maximum supported JPEG resolution is 15360 x 8640 pixels For unsupported or corrupted files the Not Supported File Format message is displayed The s...

Page 59: ...we recommend use Disconnect USB Device function Media Play MENU Applications Media Play Enjoy photos music and movie files saved on a USB Mass Storage Class MSC device 1 Press the MEDIA P button 2 Press l r button to select desired menu then press the E button 3 Press l r button to select desired device then press the E button again 4 Press the u d l r button to select the desired file in the list...

Page 60: ...s through the file in 10 second increments Press This changes the playback speed by up to 300 To restore normal playback speed press Alternatively pause the video and then press to reduce the playback speed 1 8 normal 1 4 normal 1 2 normal Slow playback doesn t support audio and is available in the forward direction only Press to pause the screen and then to scan through the paused video in 1 fram...

Page 61: ...Size Select the Picture Size button and then select the picture size Picture Mode Select the Settings on screen button and then select Picture Mode Select a picture mode Sound Mode Select the Settings on screen button and then select Sound Mode Select a sound mode Information Select the Settings on screen button and then select Information to view detailed information about the current video Engli...

Page 62: ...elect Effects Playlist Creation From the Options list located at the top of the screen select Play Selected specify all the photos you want to play and then select Play This creates a playlist If the list is displayed in Folder view mode only the files contained in the current folder can be selected To select files from other folders change the view mode Opening a Different File Press l r Select t...

Page 63: ...the Zoom on screen button Zoom in by up to a factor of 4 Rotate Select the Rotate on screen button This rotates the photo Picture Mode Select the Settings on screen button and then select Picture Mode Select a picture mode Sound Mode Select the Settings on screen button and then select Sound Mode Select a sound mode Information Select the Settings on screen button and then select Information to vi...

Page 64: ...Music Playback Settings Shuffle Select the On on screen button Choose between normal and random play Repeat Select the Repeat on screen button This changes the repeat mode One Song repeats the current file only whereas All repeats all files contained in the playlist Sound Mode Select the Sound Mode on screen button Select a sound mode Information Press INFO from the playlist to view detailed infor...

Page 65: ... buttons on the product The product remote control may not work under certain conditions If this occurs reselect the Anynet device The Anynet functions do not operate with other manufacturers products For instructions explaining how to connect Anynet external devices refer to the device s user manual You must connect an Anynet device using an HDMI cable Some HDMI cables may not support Anynet func...

Page 66: ...lable device_name Title Menu Shows the title menu of the disc in the connected device E g If a DVD player is connected the title menu of the movie in the DVD player will appear Depending on the device this menu may not be available Setting up Anynet HDMI CEC Anynet HDMI CEC To use the Anynet Function Anynet HDMI CEC must be set to On When the Anynet HDMI CEC function is disabled all the Anynet rel...

Page 67: ...ompleted The menu appears only when you set Anynet HDMI CEC to On in the System menu Switching to the selected device may take up to 2 minutes You cannot cancel the switching operation while switching is in progress If you have selected an Anynet device using the Source function you cannot use the Anynet function Make sure to switch to an Anynet device English 67 Advanced Features ...

Page 68: ...rect jacks For example if you use the Component jacks labeled Pb Pr and Y to connect your product and video source make sure you have connected the blue Pb jack on the video source to the blue Pb jack on the product the red Pr jack on the source to the red Pr jack on the product Screen Brightness If you find that the colours on your Samsung product are correct but just a little too dark or bright ...

Page 69: ...he power button your PC is in sleep mode To take your PC out of sleep mode press a key on your keyboard or move the mouse Then try turning your product on If you re sure your power cord remote control and PC are functioning properly you may be having a cable issue If you have a cable or satellite box your product may appear to be off because the cable or satellite box is not outputting a signal To...

Page 70: ...for a channel that is broadcasting true HD content Cable Satellite subscribers Try HD channels from the channel line up Air Cable Aerial connection Try HD channels after performing an Auto Tuning Adjust the Cable Sat box video output resolution to 1080i or 720p The picture is distorted macro block error small block dots pixelization The compression of video contents may cause picture distortion es...

Page 71: ... connected to an audio input For aerial or cable connections check the signal information A low signal level may cause sound distortion Perform the Sound Test feature Menu Support Self Diagnosis Sound Test RF Cable Aerial Connection The product is not receiving all channels Make sure the coaxial cable is connected securely Please try Setup to add available channels to the channel list Go to Menu S...

Page 72: ...and reassemble it The channel menu is grayed out unavailable The Channel menu is only available when you select the product source Your settings are lost after 5 minutes or every time the product is turned off If the product is in the Store Demo mode it will reset audio and picture settings every 5 minutes Change the settings from Store Demo mode to Home Use mode using the Setup procedure Select T...

Page 73: ...b site by USB samsung com Support Downloads The product won t turn on Make sure the AC power cord is securely plugged in to the wall outlet and the product Make sure the wall outlet is working Try pressing the P button on the product to make sure the problem is not the remote If the product turns on refer to Remote control does not work below There is no picture video Check the cable connections R...

Page 74: ...l is Anynet compatible Anynet doesn t work in certain situations Searching channels operating Setup etc If you have removed and then reconnected the HDMI cable please make sure to search devices again or turn your product off and on again I want to start Anynet Check if the Anynet device is properly connected to the product and check if the Anynet HDMI CEC is set to On System Anynet HDMI CEC Open ...

Page 75: ... devices again Anynet requires an HDMI connection Make sure the device is connected to your product with an HDMI cable Some HDMI cables may not support Anynet functions If the connection is terminated because there has been a power failure or the HDMI cable has been disconnected please repeat the device scan Some functions and pictures shown in this manual are available on specific models only To ...

Page 76: ...tion Alpha ass Powerdivx psb Internal Xsub Container AVI SubStation Alpha Container MKV Advanced SubStation Alpha Container MKV SubRip Container MKV MPEG 4 Timed text Container MP4 Supported image resolutions File Extension Type Resolution jpg jpeg JPG 15360 x 8640 bmp BMP 4096 x 4096 mpo MPO 15360 x 8640 CMYK YCCK Colour space JPEG are not supported English 76 Other Information ...

Page 77: ... supported wav wav wav mid midi midi midi type 0 and type 1 Video Codec File Extension Container Video Codec Resolution Frame rate fps Bit rate Mbps Audio Codec avi mkv asf wmv mp4 3gp vro mpg mpeg ts tp trp mov flv vob svi divx AVI MKV ASF MP4 3GP MOV FLV VRO VOB PS TS Divx 3 11 4 5 6 1920 x 1080 6 30 30 AC3 LPCM ADPCM IMA MS AAC HE AAC WMA DD MPEG MP3 DTS Core G 711 A Law μ Law MPEG4 SP ASP H 26...

Page 78: ...ke longer to appear if the video s bit rate exceeds 10Mbps Some USB digital camera devices may not be compatible with the player Video Decoders Supports up to H 264 Level 4 1 does not support FMO ASO RS VC1 AP L4 is not supported GMC 2 is not supported Frame speed Below 1280x720 60 frame max Above 1280x720 30 frame max Audio Decoders WMA 10 Pro supports up to 5 1 channels Supports up to M2 profile...

Page 79: ... press it again 6 Colour buttons red green yellow blue If the FASTEXT system is used by the broadcasting company the different topics on a Teletext page are colour coded and can be selected by pressing the coloured buttons Press the colour corresponding to the topic of your choice A new colourcoded page is displayed Items can be selected in the same way To display the previous or next page press t...

Page 80: ...et 2 Place a soft cloth or cushion on a flat surface to protect the panel and place the product face down 3 Hold the main body of the product with your hand Pull the stand in the direction of the arrow as shown in the figure to separate it TD390 TD391 Attaching a Wall Mount Desktop Stand A Wall Desktop Stand Mount B Wall mount kit desktop stand not supplied English 80 Other Information ...

Page 81: ...desktop stand to the product and firmly fix the wall mount desktop stand by fastening the screw 5 Align the groove of the part of the product that is to be connected to the stand with the groove in the stand desk top stand wall mount stand or another stand and firmly fix the stand by fastening the screw English 81 Other Information ...

Page 82: ...n manual and all parts necessary for assembly are provided Do not use screws that do not comply with the VESA standard screw specifications Do not use screws that are longer than the standard dimension or do not comply with the VESA standard screw specifications Screws that are too long may cause damage to the inside of the TV set For wall mounts that do not comply with the VESA standard screw spe...

Page 83: ...not supplied by Samsung Optional Please find a K icon on the rear of the product The Kensington slot is beside the K icon To lock the product follow these steps 1 Wrap the Kensington Lock cable around a large stationary object such as desk or chair 2 Slide the end of the cable with the lock attached through the looped end of the Kensington Lock cable 3 Insert the locking device into the Kensington...

Page 84: ...hed during cleaning Be sure to wipe the exterior and screen carefully using the cloth provided or a soft cloth to prevent scratches Do not spray water directly onto the product Any liquid that goes into the product may cause a failure fire or electric shock Clean the product with a soft cloth dampened with a small amount of water Do not use a flammable liquid e g benzene thinners or a cleaning age...

Page 85: ...7 295 673 7 460 668 7 515 710 7 519 274 Open Source Licence Notice Open Source used in this product can be found on the following webpage http opensource samsung com Open Source Licence Notice is written only English Correct Disposal of This Product Waste Electrical Electronic Equipment Applicable in the European Union and other European countries with separate collection systems This marking on t...

Page 86: ...6 0 x 45 4 mm 547 3 x 334 7 x 44 3 mm 619 2 x 366 9 x 34 1 mm Weight With stand 3 75 kg 3 90 kg 5 25 kg Body 3 50 kg 3 50 kg 4 65 kg Model Name T24D390EW T27D390EW T24D590EW Screen Size Diagonal 23 6 inches 59 cm 27 inches 68 cm 23 6 inches 59 cm Display Resolution 1920 X 1080 60Hz Sound Output 5W x 2 Dimensions W x H x D With stand 547 8 x 422 9 x 209 8 mm 625 4 x 467 1 x 209 8 mm 541 8 x 422 4 x...

Page 87: ...und HD 36 Dynamic Contrast 33 E Eco Solution 51 Energy Saving 51 Entertain 27 Equaliser 36 F Film Mode 34 Fine Tune 46 Flesh Tone 33 G Game Mode 53 Gamma 33 General 53 H HDMI Black Level 34 L LED Clear Motion 34 Licence 85 M Media Play 59 Menu Language 53 Motion Lighting 33 MPEG Noise Filter 34 Music playback 64 N No Signal Power Off 51 O Off Timer 50 On Timer 50 P Panel Lock 53 Photo Playback 62 ...

Page 88: ...5 Sleep Timer 48 Software Update 56 Sound Effect 36 Sound Mode 35 Sound Test 55 Speaker Settings 37 Supported music file formats 77 Supported Subtitle and Media Play file formats 76 T Time 48 Tint G R 28 Troubleshooting 68 V Video Codec 77 Video Playback 60 W White Balance 33 English 88 Other Information ...

Page 89: ...680 726 786 0680PREMIUM 0680 773 648 http www samsung com hu support ITALIA 800 SAMSUNG 726 7864 HHP 800 Msamsung 800 67267864 www samsung com it support LUXEMBURG 261 03 710 www samsung com support MONTENEGRO 020 405 888 www samsung com support SLOVENIA 080 697 267 090 726 786 www samsung com si support NETHERLANDS 0900 SAMSUNG 0900 7267864 0 10 Min www samsung com nl support NORWAY 815 56480 www...

Reviews: