background image

110

Appendix

 Appendix

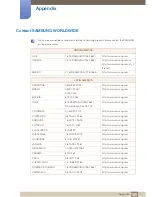
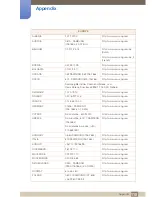
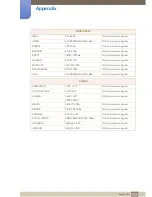
EUROPE

ALBANIA

42 27 5755

http://www.samsung.com

AUSTRIA

0810 - SAMSUNG 

(7267864, € 0.07/min)

http://www.samsung.com

BELGIUM

02-201-24-18

http://www.samsung.com/be 

(Dutch)

http://www.samsung.com/be_fr 

(French)

BOSNIA

05 133 1999

http://www.samsung.com

BULGARIA

07001 33 11

http://www.samsung.com

CROATIA

062 SAMSUNG (062 726 7864)

http://www.samsung.com

CZECH

800 - SAMSUNG (800-726786)

http://www.samsung.com

DENMARK

70 70 19 70

http://www.samsung.com

FINLAND

030 - 6227 515

http://www.samsung.com

FRANCE

01 48 63 00 00

http://www.samsung.com

GERMANY

01805 - SAMSUNG 

(726-7864,€ 0,14/Min)

http://www.samsung.com

CYPRUS

From landline : 8009 4000

http://www.samsung.com

GREECE

From landline : 80111-SAMSUNG 

(7267864)

From landline & mobile : (+30)

210 6897691

http://www.samsung.com

HUNGARY

06-80-SAMSUNG (726-7864)

http://www.samsung.com

ITALIA

800-SAMSUNG (726-7864)

http://www.samsung.com

KOSOVO

+381 0113216899

http://www.samsung.com

LUXEMBURG

261 03 710

http://www.samsung.com

MACEDONIA

023 207 777

http://www.samsung.com

MONTENEGRO

020 405 888

http://www.samsung.com

NETHERLANDS

0900 - SAMSUNG 

(0900-7267864) (€ 0,10/Min)

http://www.samsung.com

NORWAY

815-56 480

http://www.samsung.com

POLAND

0 801-1SAMSUNG (172-678)

+48 22 607-93-33

http://www.samsung.com

Samsung Electronics Czech and Slovak, s.r.o.,
Oasis Florenc, Sokolovská 394/17, 180 00, Praha 8

Summary of Contents for SyncMaster TS220C

Page 1: ...ual SyncMaster TS190C TS220C TS240C The color and the appearance may differ depending on the product and the specifications are subject to change without prior notice to improve the performance BN46 0...

Page 2: ...msung Electronics Microsoft Windows and Windows NT are registered trademarks of Microsoft Corporation VESA DPM and DDC are registered trademarks of the Video Electronics Standards Association An admin...

Page 3: ...nce only Real life situations may differ from what is shown in the images Warning A serious or fatal injury may result if instructions are not followed Caution Personal injury or damage to properties...

Page 4: ...able by the plug and do not touch the cable with wet hands Otherwise an electric shock may result 3 Wipe the monitor screen using a clean soft and dry cloth Do not apply a cleaning agent that contains...

Page 5: ...ow the amount of space as shown below or greater when installing the product The exterior may differ depending on the product Precautions for storage High glossy models can develop white stains on the...

Page 6: ...therwise an electric shock may result Insert the power cable all the way in so it is not loose An unstable connection may cause a fire Ensure you connect the power cable to a grounded power socket typ...

Page 7: ...to completely cut the power to the product Power to the product cannot be completely cut off with the power switch Hold the plug when disconnecting the power cable from the power socket An electric sh...

Page 8: ...Otherwise the product lifespan may be reduced or a fire may result Do not install the product within the reach of young children The product may fall and injure children Edible oil such as soybean oi...

Page 9: ...tomer Service Center 109page for repair Before moving the product turn off the power switch and disconnect the power cable and all other connected cables Otherwise the power cord may be damaged and a...

Page 10: ...as leakage is found do not touch the product or power cable Also ventilate the area immediately Sparks can cause an explosion or fire During a lightning or thunderstorm do not touch the power cable or...

Page 11: ...amsung Customer Service Center 109page Product failure an electric shock or fire may result Leaving the screen fixed on a stationary image for an extended period of time may cause afterimage burn in o...

Page 12: ...eyesight Do not hold the monitor upside down or move it by holding the stand The product may fall and break or cause a personal injury Do not use humidifiers or stoves around the product An electric s...

Page 13: ...he correct posture as follows Straighten your back Allow a distance of 45 to 50cm between your eye and the screen and look slightly downward at the screen Keep your eyes directly in front of the scree...

Page 14: ...Safety 7 Installation and Safety 9 Operation and Safety 13 Correct posture to use the product PREPARATIONS 19 Checking the Contents 19 Removing the Packaging 20 Checking the Components 21 Parts 21 Fro...

Page 15: ...r CONNECTING AND USING A SOURCE DEVICE 57 Before Connecting 57 Pre connection Checkpoints 58 Connecting and Using a PC 58 Connecting to a PC 60 Driver Installation 61 Setting Optimum Resolution 62 Cha...

Page 16: ...lor Tone 77 Configuring the Color Tone Settings 78 Gamma 78 Configuring Gamma RESIZING OR RELOCATING THE SCREEN 79 H Position V Position 79 Configuring H Position V Position 80 Image Size 80 Changing...

Page 17: ...89 Customized Key 89 Configuring Customized Key 90 Auto Source 90 Configuring Auto Source 91 Display Time 91 Configuring Display Time 92 Menu Transparency 92 Changing Menu Transparency INFORMATION MEN...

Page 18: ...7 Checking the Resolution and Frequency 97 Check the following 100 Q A SPECIFICATIONS 102 General 104 PowerSaver 105 Standard Signal Mode Table APPENDIX 109 Contact SAMSUNG WORLDWIDE 114 Correct Dispo...

Page 19: ...when you open the packaging with a sharp instrument 2 Remove the styrofoam from the product 3 Check the components and remove the styrofoam and plastic bag The appearance of actual components may dif...

Page 20: ...Components Components may vary depending on the country The stand base supplied with this product contains a circuit board Care should be taken when handling the base Items sold separately The followi...

Page 21: ...he current settings or lock the OSD control to prevent unintended changes to settings To lock the OSD control press the MENU button for five seconds To unlock the locked OSD control press the MENU but...

Page 22: ...duct or change the input source by pressing the button a message that shows the changed input source will appear at the top left corner of the screen Press the button to automatically adjust the scree...

Page 23: ...orts Connect to a USB device Connect to a network using the LAN cable Connect to an audio output device such as headphones Connect to the monitor using the D SUB cable Connect to the monitor using the...

Page 24: ...thout notice to improve quality Port Ports Connect to a PC or the stand base using the DVI cable Connect to a PC or the stand base using the D SUB cable Connect to DC 14V OUT on the stand base using a...

Page 25: ...place the product with the face down on top of the cloth or cushion Insert the stand base into the stand in the direction of the arrow Do not remove the fixing pin until you are finished attaching th...

Page 26: ...ing pin The monitor tilt and height can be adjusted Hold the top center of the product and adjust the height carefully 1 3 3 Rotating the Monitor You can rotate your monitor as shown below Be sure to...

Page 27: ...on the product with the corresponding parts on the wall mount kit or desktop stand you want to attach Place a protective cloth or cushion on a flat surface Next place the product with the face down o...

Page 28: ...kit on your own To mount the product on a wall ensure you purchase a wall mount kit that can be installed 10cm or farther away from the wall Be sure to use a wall mount kit that complies with the sta...

Page 29: ...r where the Citrix XendDesktop XenApp service is available information relating to the keyboard mouse audio video and display data is transmitted from the Client to the server over the network Compati...

Page 30: ...turn on the power switch on the stand base For details refer to 3 3 Connecting the Power 3 Press to change the input source to Analog 2 2 2 Connection Using the DVI Cable 1 Connect the DVI cable to DV...

Page 31: ...adphones or Speakers 1 Connect an audio output device headphones speakers etc to the AUDIO OUT port on the back or the port on the side of the stand base 2 2 4 Connecting a Microphone 1 Connect the mi...

Page 32: ...the LAN port on the back of the stand base to the server using the LAN cable It is not supported when the network speed is below or equal to 10Mbps 2 Connect USB devices keyboard mouse etc to on the b...

Page 33: ...ord that will be used to connect to the Citrix server Domain Enter the domain that will be used to connect to the Citrix server Ensure Broker Server is enabled under Network 2 3 2 Message Box MagicRMS...

Page 34: ...the Client Disconnect Message If the Client is disconnected from the network a message will appear indicating the disconnection In this case if you are logged on the desktops applications connected w...

Page 35: ...t a network connection type and speed To use a static IP deselect Enable DHCP and specify the IP To use DHCP select Enable DHCP Name Servers Configure the DNS Domain and DNS Server information on the...

Page 36: ...Requirements Local Network must be set to Enable DHCP Information about the Options IDs must be configured on the DHCP server Security Client provides a security function using IEEE802 1x authenticati...

Page 37: ...Identity information b Select a CA certificate file der pem crt cer c Select a Private key file d Enter the Private key password 3 Certification Management For you to manage authentication files that...

Page 38: ...e FTP server to connect to in order to upgrade the firmware on the Client The information configured will be used to upgrade the firmware when the Client boots up Address Enter the IP address of the F...

Page 39: ...r Multicast If the MagicRMS server is assigned with the same IP address and port number as the Client it will automatically connect to the Client Server Assignment If you know the static IP address an...

Page 40: ...MagicRMS Status You can check the connection status of the MagicRMS server If there are connection issues check the server connection and select Start Stop or Restart to start the server To view detai...

Page 41: ...can be used to check the connection status between the Client and network Ping Using the Ping command you can check the status of the network connection for the IPs entered Trace Route Using the Route...

Page 42: ...em 1 General Terminal Name Change the Client name The default name is TS_ MAC information Reset the system setting to factory default Reset the Client settings by selecting the checkbox Select Yes in...

Page 43: ...nt by changing the Screen Off setting The Client will activate Power Management if it is left idle for a specified amount of time The following time settings are available to choose from Never 5 minut...

Page 44: ...elect the Enable DayLight Saving checkbox and select the number of hours to apply Time Date Format Time Format Date Format Specify the format to display the time and date on the toolbar Time Servers E...

Page 45: ...Set the resolution of the selected display device The resolutions available vary depending on the display device 3 Multiple Display When two display devices are connected to the Client specify how yo...

Page 46: ...Client To display an extended desktop on the two displays select Extend The display selected as the primary screen will be placed on the left To set the selected display as the primary screen select...

Page 47: ...creen select the checkbox and minimize the toolbar To unhide the toolbar press the corresponding shortcut key Disable hotkey CTRL ALT UP to invoke toolbar Shrink the toolbar by pressing the correspond...

Page 48: ...cter encoding method to use on the Client Keyboard Language Specify the keyboard language Repeat Rate Specify the keyboard sensitivity 2 Mouse You can configure the mouse settings for the Client Mouse...

Page 49: ...type printer settings Information You can view the Client information General Firmware View the version of the firmware on the Client Checksum View the checksum of the firmware on the Client Citrix R...

Page 50: ...n View the display resolution configured on the Client System up Time View the amount of time the Client has been running Network IP Address View the IP information configured on the Client Subnet Mas...

Page 51: ...en Source Notice You can view details of the Open Source components used on the Client Shutdown You can log off close or restart the Client Open source license notice In the case of using open source...

Page 52: ...This option is enabled only when you are logged on to the Client To log off select Yes in the Notice window 2 Shutdown the system You can close the Client To close the Client select Yes in the Notice...

Page 53: ...53 Using Zero Client 2 2 Using Zero Client Remote Desktop You can view a list of desktops and applications on the Citrix Server the Client can connect to when logged on...

Page 54: ...he Desktop List The corresponding desktop or application row in the list will be highlighted as shown below You can connect to more than one desktop or application The names of the desktops and applic...

Page 55: ...lient Double click the desktop or application desired The corresponding desktop or application row in the list will be highlighted e g Double click Memo A notepad window will be displayed Status Icon...

Page 56: ...key is CTRL ALT F6 How to lock the two options Press and hold the shortcut key for a specified time about 8 seconds When the lock is on the options locked will be indicated on the toolbar as shown bel...

Page 57: ...ing a source device read the user manual provided with it The number and locations of ports on source devices may differ from device to device Do not connect the power cable until all connections are...

Page 58: ...wer socket Next turn on the power switch on the PC For details refer to 3 3 Connecting the Power 3 Press to change the input source to Analog Audio is not available if the PC and product are connected...

Page 59: ...DVI IN port on the back of the product and the HDMI port on the PC 2 Connect the DC power adapter to the product and a power socket Next turn on the power switch on the PC For details refer to 3 3 Con...

Page 60: ...product If the file provided is faulty visit the Samsung homepage http www samsung com and download the file 1 Insert the user manual CD provided with the product into the CD ROM drive 2 Click Windows...

Page 61: ...ge the resolution to the optimum value 1 Press to move to the language you want and press 2 To hide the information message press If the optimum resolution is not selected the message will appear up t...

Page 62: ...ution Using a PC Adjust the resolution and refresh rate in Control Panel on your PC to obtain optimum picture quality The picture quality of TFT LCDs may degrade if the optimum resolution is not selec...

Page 63: ...63 Connecting and Using a Source Device 3 3 Connecting and Using a Source Device Changing the Resolution on Windows Vista Go to Control Panel Personalization Display Settings and change the resolution...

Page 64: ...64 Connecting and Using a Source Device 3 3 Connecting and Using a Source Device Changing the Resolution on Windows 7 Go to Control Panel Display Screen Resolution and change the resolution...

Page 65: ...r cannot be attached to the back of the monitor Connect the power cable to the DC power adapter Next connect the DC power adapter to DC 14V IN on the stand base Connect the power extension cable to DC...

Page 66: ...ight is set to Dynamic Contrast mode This menu is not available when Eco Saving is set to On 4 1 1 Configuring Brightness 1 Press on the product 2 Press to move to PICTURE and press on the product 3 P...

Page 67: ...ast mode This menu is not available when Color is in Full or Intelligent mode 4 2 1 Configuring Contrast 1 Press on the product 2 Press to move to PICTURE and press on the product 3 Press to move to C...

Page 68: ...menu is not available when Color is in Full or Intelligent mode 4 3 1 Configuring Sharpness 1 Press on the product 2 Press to move to PICTURE and press on the product 3 Press to move to Sharpness and...

Page 69: ...ollowing screen will appear Custom Customize the contrast and brightness as required Standard Obtain a picture quality suitable for editing documents or using Internet Game Obtain a picture quality su...

Page 70: ...the product Lean Back Mode 1 Select this option to view from a place slightly lower than the product Lean Back Mode 2 Select this option to view from a place lower than Lean Back Mode 1 Standing Mode...

Page 71: ...g Coarse 1 Press on the product 2 Press to move to PICTURE and press on the product 3 Press to move to Coarse and press on the product The following screen will appear 4 Adjust the Coarse using the bu...

Page 72: ...7 1 Adjusting Fine 1 Press on the product 2 Press to move to PICTURE and press on the product 3 Press to move to Fine and press on the product The following screen will appear 4 Adjust the Fine using...

Page 73: ...the product 2 Press to move to COLOR and press on the product 3 Press to move to Color and press on the product The following screen will appear Off Disable Color Demo Compare normal screen mode with...

Page 74: ...u is not available when Color is in Full or Intelligent mode 5 2 1 Configuring Red 1 Press on the product 2 Press to move to COLOR and press on the product 3 Press to move to Red and press on the prod...

Page 75: ...is not available when Color is in Full or Intelligent mode 5 3 1 Configuring Green 1 Press on the product 2 Press to move to COLOR and press on the product 3 Press to move to Green and press on the p...

Page 76: ...is not available when Color is in Full or Intelligent mode 5 4 1 Configuring Blue 1 Press on the product 2 Press to move to COLOR and press on the product 3 Press to move to Blue and press on the pro...

Page 77: ...roduct The following screen will appear Cool 2 Set the color temperature to be cooler than Cool 1 Cool 1 Set the color temperature to be cooler than Normal mode Normal Display the standard color tone...

Page 78: ...ing Gamma 1 Press on the product 2 Press to move to COLOR and press on the product 3 Press to move to Gamma and press on the product The following screen will appear 4 Press to move to the option you...

Page 79: ...ring H Position V Position 1 Press on the product 2 Press to move to SIZE POSITION and press on the product 3 Press to move to H Position or V Position and press The following screen will appear 4 Pre...

Page 80: ...ture with an aspect ratio of 4 3 Wide Display the picture in full screen regardless of the aspect ratio of the input source Screen Fit Display the picture with the original aspect ratio without cuttin...

Page 81: ...n Menu V Position 1 Press on the product 2 Press to move to SIZE POSITION and press on the product 3 Press to move to Menu H Position or Menu V Position and press The following screen will appear 4 Pr...

Page 82: ...move to SETUP RESET and press on the product 3 Press to move to Reset and press on the product The following screen will appear 4 Press to move to the option you want and press 5 The selected option...

Page 83: ...1 Press on the product 2 Press to move to SETUP RESET and press on the product 3 Press to move to Language and press on the product The following screen will appear 4 Press to move to the language yo...

Page 84: ...press on the product 3 Press to move to Eco Saving and press on the product The following screen will appear 75 Change the monitor power consumption to 75 of the default level 50 Change the monitor p...

Page 85: ...move to Off Timer On Off and press on the product The following screen will appear Off Deactivate the off timer so that the product does not power off automatically On Activate the off timer so that t...

Page 86: ...when Off Timer On Off is set to On 7 5 1 Configuring Off Timer Setting 1 Press on the product 2 Press to move to SETUP RESET and press on the product 3 Press to move to Off Timer Setting and press on...

Page 87: ...onfiguring PC AV Mode 1 Press on the product 2 Press to move to SETUP RESET and press on the product 3 Press to move to PC AV Mode and press on the product The following screen will appear 4 Press to...

Page 88: ...move to Key Repeat Time and press on the product The following screen will appear Acceleration 1 sec or 2 sec can be selected If No Repeat is selected a command responds only once when a button is pr...

Page 89: ...Press to move to Customized Key and press on the product The following screen will appear Angle Bright Eco Saving Image Size 4 Press to move to the option you want and press 5 The selected option will...

Page 90: ...uct 3 Press to move to Auto Source and press on the product The following screen will appear Auto The input source is automatically recognized Manual Manually select an input source 4 Press to move to...

Page 91: ...menu to disappear 7 10 1 Configuring Display Time 1 Press on the product 2 Press to move to SETUP RESET and press on the product 3 Press to move to Display Time and press on the product The following...

Page 92: ...Press to move to SETUP RESET and press on the product 3 Press to move to Menu Transparency and press on the product The following screen will appear 4 Press to move to the option you want and press 5...

Page 93: ...ion will appear The displayed image may differ depending on the model 8 2 Configuring Brightness in the Initial Screen Adjust the Brightness using the buttons when the initial screen that displays no...

Page 94: ...olor is a color management system developed by Samsung Electronics to resolve this problem This software works with Samsung products only and enables you to adjust the displayed colors on the screen t...

Page 95: ...d with installation The software may not work properly if you do not restart the computer after the installation The MultiScreen icon may not appear depending on the computer system and the product sp...

Page 96: ...tware 9 9 Installing the Software 9 2 2 Removing the Software Click Start select Settings Control Panel and then double click Add or Remove Programs Select MultiScreen from the program list and click...

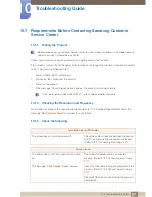
Page 97: ...uct is working normally If the screen remains blank check the PC system video controller and cable 10 1 2 Checking the Resolution and Frequency For a mode that exceeds the supported resolution refer t...

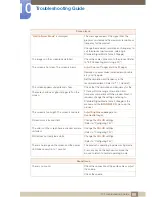
Page 98: ...within the range of resolution and frequency compatible with the product Next if required change the settings referring to Standard Signal Mode Table 105page in this manual and the INFORMATION menu o...

Page 99: ...olume If the volume is still low after turning it up to the maximum level adjust the volume on your PC sound card or software program Source device issue A beeping sound is heard when my PC is booting...

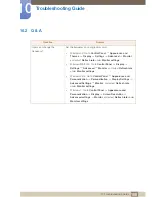
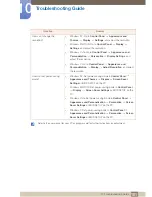
Page 100: ...Monitor settings Windows ME 2000 Go to Control Panel Display Settings Advanced Monitor and adjust Refresh rate under Monitor settings Windows Vista Go to Control Panel Appearance and Personalization...

Page 101: ...Windows 7 Go to Control Panel Appearance and Personalization Display Adjust Resolution and adjust the resolution How do I set power saving mode Windows XP Set power saving mode in Control Panel Appear...

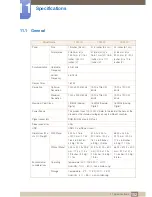
Page 102: ...og Digital Power Supply This product uses 100 to 240V Refer to the label at the back of the product as the standard voltage can vary in different countries Signal connectors RGB IN D Sub port DVI port...

Page 103: ...or installation takes place automatically However you can customize the installation settings if desired Panel Dots Pixels Due to the nature of the manufacturing of this product approximately 1 pixel...

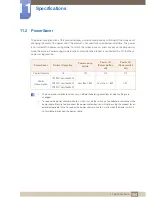
Page 104: ...n The power consumption level can vary in different operating conditions or when settings are changed To reduce the power consumption to 0 watts turn off the switch on the adapter or disconnect the po...

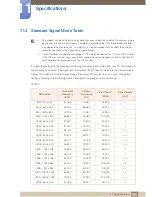
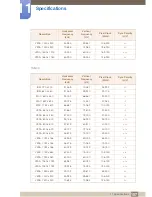
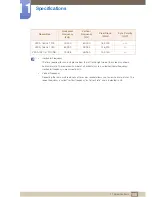
Page 105: ...transmitted from the PC does not belong to the standard signal modes the screen may be blank even though the power LED turns on In such a case change the settings according to the following table by r...

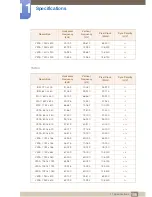
Page 106: ...480 37 861 72 809 31 500 VESA 640 x 480 37 500 75 000 31 500 VESA 800 x 600 35 156 56 250 36 000 VESA 800 x 600 37 879 60 317 40 000 VESA 800 x 600 48 077 72 188 50 000 VESA 800 x 600 46 875 75 000 4...

Page 107: ...x 480 37 861 72 809 31 500 VESA 640 x 480 37 500 75 000 31 500 VESA 800 x 600 35 156 56 250 36 000 VESA 800 x 600 37 879 60 317 40 000 VESA 800 x 600 48 077 72 188 50 000 VESA 800 x 600 46 875 75 000...

Page 108: ...Horizontal frequency is measured in kHz Vertical Frequency Repeating the same picture dozens of times per second allows you to view natural pictures The repeat frequency is called vertical frequency...

Page 109: ...ng com CHILE 800 SAMSUNG 726 7864 From mobile 02 482 82 00 http www samsung com COLOMBIA 01 8000112112 http www samsung com COSTA RICA 0 800 507 7267 http www samsung com DOMINICA 1 800 751 2676 http...

Page 110: ...5 SAMSUNG 726 7864 0 14 Min http www samsung com CYPRUS From landline 8009 4000 http www samsung com GREECE From landline 80111 SAMSUNG 7267864 From landline mobile 30 210 6897691 http www samsung com...

Page 111: ...ch_fr French U K 0330 SAMSUNG 7267864 http www samsung com EIRE 0818 717100 http www samsung com LITHUANIA 8 800 77777 http www samsung com LATVIA 8000 7267 http www samsung com ESTONIA 800 7267 http...

Page 112: ...w samsung com hk_en INDIA 1800 1100 11 3030 8282 1800 3000 8282 1800 266 8282 http www samsung com INDONESIA 0800 112 8888 021 5699 7777 http www samsung com JAPAN 0120 327 527 http www samsung com MA...

Page 113: ...g com SAUDI ARABIA 9200 21230 http www samsung com U A E 800 SAMSUNG 726 7864 http www samsung com AFRICA CAMEROON 7095 0077 http www samsung com COTE D LVOIRE 8000 0077 http www samsung com GHANA 080...

Page 114: ...these items for environmentally safe recycling Business users should contact their supplier and check the terms and conditions of the purchase contract This product and its electronic accessories sho...

Page 115: ...rom darker areas to brighter areas on the screen Changes to the screen brightness are expressed with black and white variation and grey scale refers to the medium area between black and white Changing...

Page 116: ...he number of horizontal pixels and vertical pixels that form a screen It represents the level of display detail A higher resolution displays a greater amount of information on the screen and is suitab...

Page 117: ...C to Use the Zero Client 30 Contact SAMSUNG WORLDWIDE 109 Contrast 67 Copyright 2 Correct Disposal 114 Correct posture to use the product 13 Customized Key 89 D Display Time 91 E Eco Saving 84 F Fine...

Page 118: ...ore Contacting Samsung Customer Service Center 97 Reset 82 S Safety Precautions 6 SAMSUNG MAGIC Angle 70 SAMSUNG MAGIC Bright 69 SAMSUNG MAGIC Color 73 Sharpness 68 Standard Signal Mode Table 105 T Te...

Reviews: