background image

30

Connecting and Using a Source Device

2

2 Connecting and Using a Source Device

2.3.4

Changing the Resolution Using a PC


z

Adjust the resolution and refresh rate in Control Panel on your PC to obtain optimum picture 

quality.

z

The picture quality of TFT-LCDs may degrade if the optimum resolution is not selected.


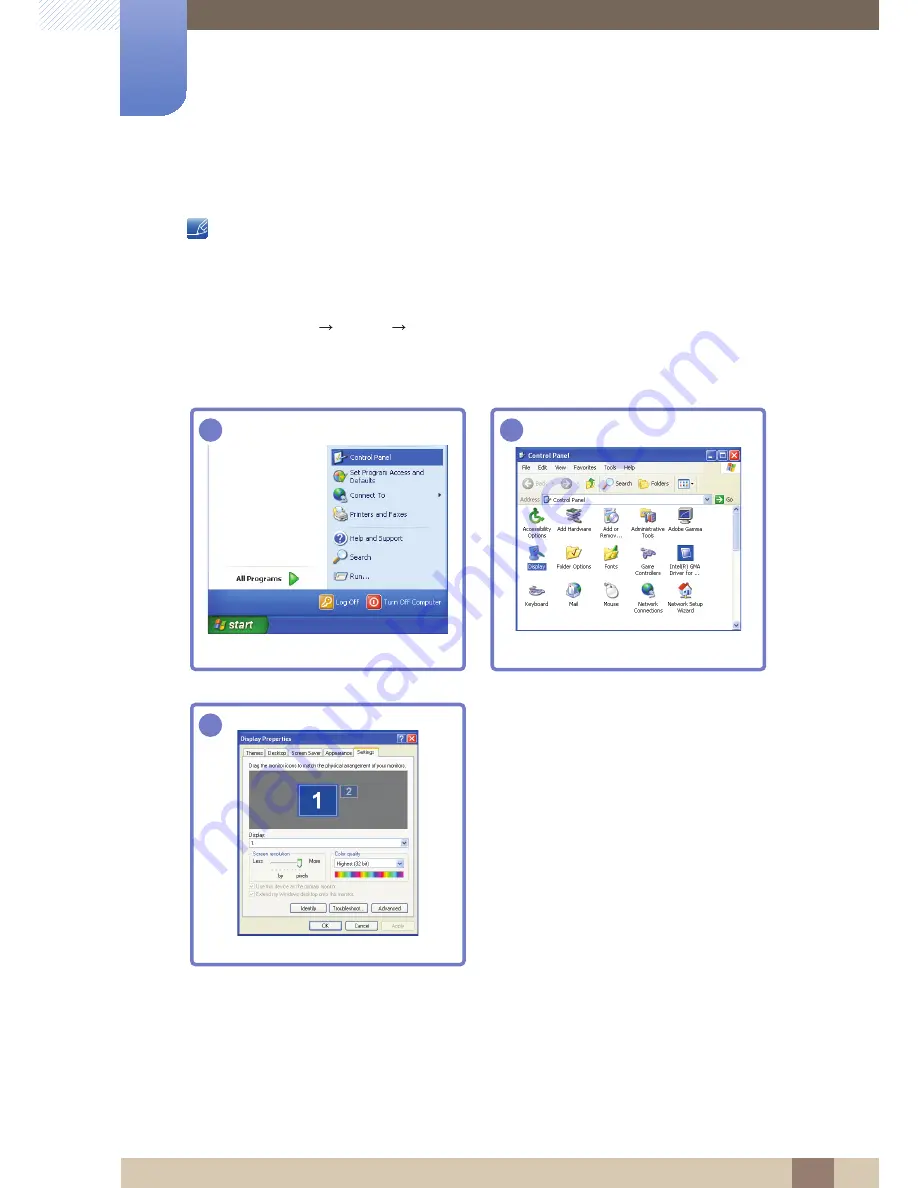
Changing the Resolution on Windows XP

Go to 

Control Panel


Display


Settings

 and change the resolution.

1

2

3

****

****

**********

Summary of Contents for SyncMaster S24C200BL

Page 1: ...W S19C200BR S19C200NR S20C200B S22C200NY S22C200N S22C200B S22C200BW S23C200B S24C200BL The color and the appearance may differ depending on the product and the specifications are subject to change wi...

Page 2: ...Installation and Safety 13 Operation and Safety 16 Correct posture to use the product PREPARATIONS 17 Checking the Contents 17 Removing the Packaging 18 Checking the Components 19 Parts 19 Frontal But...

Page 3: ...ness 34 Contrast 34 Configuring Contrast 35 Sharpness 35 Configuring Sharpness 36 SAMSUNG MAGIC Bright 36 Configuring SAMSUNG MAGIC Bright 37 SAMSUNG MAGIC Angle 37 Configuring SAMSUNG MAGIC Angle 38...

Page 4: ...Position Menu V Position 49 Configuring Menu H Position Menu V Position 50 Display Time 50 Configuring Display Time 51 Transparency 51 Changing Transparency SETUP AND RESET 52 Reset 52 Initializing S...

Page 5: ...the Initial Screen INSTALLING THE SOFTWARE 62 Magic Tune 62 What is MagicTune 62 Installing the Software 63 Removing the Software 64 MultiScreen 64 Installing the Software 65 Removing the Software TRO...

Page 6: ...WORLD WIDE 101 Responsibility for the Pay Service Cost to Customers 101 Not a product defect 101 A Product damage caused by customer s fault 101 Others 102 Correct Disposal 102 Correct Disposal of Th...

Page 7: ...mbols for safety precautions z An administration fee may be charged if either a an engineer is called out at your request and there is no defect in the product i e where you have failed to read this u...

Page 8: ...le by the plug and do not touch the cable with wet hands Otherwise an electric shock may result 3 Wipe the monitor screen using a clean soft and dry cloth z Do not apply a cleaning agent that contains...

Page 9: ...he product Be sure to allow the amount of space as shown below or greater when installing the product The exterior may differ depending on the product Precautions for storage Be sure to contact Samsun...

Page 10: ...t hands z Otherwise an electric shock may result Insert the power plug all the way in so it is not loose z An unstable connection may cause a fire Ensure you connect the power plug to a grounded power...

Page 11: ...o completely cut the power to the product Power to the product cannot be completely cut off with the power button Hold the plug when disconnecting the power cord from the power socket z An electric sh...

Page 12: ...Otherwise the product lifespan may be reduced or a fire may result Do not install the product within the reach of young children z The product may fall and injure children Edible oil such as soybean...

Page 13: ...modify the product on your own z An electric shock or fire may result z Contact Samsung Customer Service Center page 95 for repair If the product generates a strange noise a burning smell or smoke rem...

Page 14: ...re an electric shock or fire may result If a gas leakage is found do not touch the product or power plug Also ventilate the area immediately z Sparks can cause an explosion or fire Do not lift or move...

Page 15: ...e may result Leaving the screen fixed on a stationary image for an extended period of time may cause afterimage burn in or defective pixels z If you are not going to use the product for an extended pe...

Page 16: ...ct excessively may cause it to fall and result in personal injury Do not place heavy objects on the product z Product failure or personal injure may result Use the product in the correct posture as fo...

Page 17: ...careful not to damage the product when you open the packaging with a sharp instrument 2 Remove the styrofoam from the product 3 Check the components and remove the styrofoam and plastic bag This imag...

Page 18: ...f any item is missing z The appearance of the components and items sold separately may differ from the image shown Components Components may vary depending on the country Quick setup guide Warranty ca...

Page 19: ...ble To unlock the locked OSD control press the button for more than 10 seconds If the OSD control is locked z Brightness and Contrast can be adjusted and INFORMATION can be viewed z The Customized Key...

Page 20: ...th an Analog interface only Press the button to automatically adjust the screen settings z Changing the resolution in Display Properties will activate the Auto Adjustment function z This function is o...

Page 21: ...to change without notice to improve quality Port Ports Connect the power cord for your monitor to the POWER IN port on the back of the product Connect to a PC using the DVI cable The DVI IN terminal...

Page 22: ...e Stand in the direction shown by the figure Check if the Stand Connector is firmly connected Turn the connecting screw at the bottom of the stand fully so that it is completely fixed Place a soft clo...

Page 23: ...uct Tilt The color and shape of parts may differ from what is shown Specifications are subject to change without notice to improve quality z You can adjust the tilt of your monitor z Hold the lower pa...

Page 24: ...arts on the wall mount kit or desktop stand you want to attach Place a protective cloth or cushion on a flat surface Next place the product with the face down on top of the cloth or cushion Hold the m...

Page 25: ...mount kit that can be installed 10cm or farther away from the wall z Be sure to use a wall mount kit that complies with the standards 1 3 4 Anti theft Lock An anti theft lock allows you to use the pro...

Page 26: ...devices may differ from device to device z Do not connect the power cable until all connections are completed Connecting the power cable during connection may damage the product z Check the types of...

Page 27: ...le 1 Connect the D SUB cable to the RGB IN port on the back of the product and the RGB port on the PC 2 Press to change the input source to Analog This function is not available for products with an A...

Page 28: ...product z If the file provided is faulty visit the Samsung homepage http www samsung com and download the file 1 Insert the user manual CD provided with the product into the CD ROM drive 2 Click Wind...

Page 29: ...tion on your PC to the optimum setting 1 Press to move to the language you want and press 2 To hide the information message press z If the optimum resolution is not selected the message will appear up...

Page 30: ...Using a PC z Adjust the resolution and refresh rate in Control Panel on your PC to obtain optimum picture quality z The picture quality of TFT LCDs may degrade if the optimum resolution is not select...

Page 31: ...onnecting and Using a Source Device 2 2 Connecting and Using a Source Device Changing the Resolution on Windows Vista Go to Control Panel Personalization Display Settings and change the resolution 1 2...

Page 32: ...32 Connecting and Using a Source Device 2 2 Connecting and Using a Source Device Changing the Resolution on Windows 7 Go to Control Panel Display Screen Resolution and change the resolution 1 2 3 4...

Page 33: ...ailable when Eco Saving is set 3 1 1 Configuring Brightness 1 Press any button on the front of the product to display the Key Guide Next press to display the corresponding menu screen 2 Press to move...

Page 34: ...2 1 Configuring Contrast 1 Press any button on the front of the product to display the Key Guide Next press to display the corresponding menu screen 2 Press to move to PICTURE and press on the produc...

Page 35: ...g Sharpness 1 Press any button on the front of the product to display the Key Guide Next press to display the corresponding menu screen 2 Press to move to PICTURE and press on the product 3 Press to m...

Page 36: ...d press on the product The following screen will appear z Custom Customize the contrast and brightness as required z Standard Obtain a picture quality suitable for editing documents or using Internet...

Page 37: ...t this option to view directly in front of the product z Lean Back Mode 1 Select this option to view from a place slightly lower than the product z Lean Back Mode 2 Select this option to view from a p...

Page 38: ...een regardless of the aspect ratio of the input source z 4 3 Display the picture with an aspect ratio of 4 3 Suitable for videos and standard broadcasts z 16 9 Display the picture with an aspect ratio...

Page 39: ...o without cutting off Changing the screen size is available when the following conditions are satisfied except S19C200NR and S19C200BR models z A digital output device is connected using the DVI cable...

Page 40: ...t Screen Fit to adjust horizontal position in 0 6 levels 3 7 1 Configuring H Position V Position 1 Press any button on the front of the product to display the Key Guide Next press to display the corre...

Page 41: ...1 Press any button on the front of the product to display the Key Guide Next press to display the corresponding menu screen 2 Press to move to PICTURE and press on the product 3 Press to move to Coars...

Page 42: ...ting Fine 1 Press any button on the front of the product to display the Key Guide Next press to display the corresponding menu screen 2 Press to move to PICTURE and press on the product 3 Press to mov...

Page 43: ...00 A higher value will increase the intensity of the color 4 1 1 Configuring Red 1 Press any button on the front of the product to display the Key Guide Next press to display the corresponding menu sc...

Page 44: ...1 Configuring Green 1 Press any button on the front of the product to display the Key Guide Next press to display the corresponding menu screen 2 Press to move to COLOR and press on the product 3 Pres...

Page 45: ...1 Configuring Blue 1 Press any button on the front of the product to display the Key Guide Next press to display the corresponding menu screen 2 Press to move to COLOR and press on the product 3 Press...

Page 46: ...ove to Color Tone and press on the product The following screen will appear z Cool 2 Set the color temperature to be cooler than Cool 1 z Cool 1 Set the color temperature to be cooler than Normal mode...

Page 47: ...ront of the product to display the Key Guide Next press to display the corresponding menu screen 2 Press to move to COLOR and press on the product 3 Press to move to Gamma and press on the product The...

Page 48: ...ont of the product to display the Key Guide Next press to display the corresponding menu screen 2 Press to move to MENU SETTINGS and press on the product 3 Press to move to Language and press on the p...

Page 49: ...product to display the Key Guide Next press to display the corresponding menu screen 2 Press to move to MENU SETTINGS and press on the product 3 Press to move to Menu H Position or Menu V Position an...

Page 50: ...onfiguring Display Time 1 Press any button on the front of the product to display the Key Guide Next press to display the corresponding menu screen 2 Press to move to MENU SETTINGS and press on the pr...

Page 51: ...y the Key Guide Next press to display the corresponding menu screen 2 Press to move to MENU SETTINGS and press on the product 3 Press to move to Transparency and press on the product The following scr...

Page 52: ...to display the corresponding menu screen 2 Press to move to SETUP RESET and press on the product 3 Press to move to Reset and press on the product The following screen will appear 4 Press to move to t...

Page 53: ...enu screen 2 Press to move to SETUP RESET and press on the product 3 Press to move to Eco Saving and press on the product The following screen will appear z 75 Change the monitor power consumption to...

Page 54: ...press on the product 3 Press to move to Off Timer and press on the product The following screen will appear z Off Deactivate the off timer so that the product does not power off automatically z On Act...

Page 55: ...g Turn Off After 1 Press any button on the front of the product to display the Key Guide Next press to display the corresponding menu screen 2 Press to move to SETUP RESET and press on the product 3 P...

Page 56: ...the On Screen Display OSD You can select PC or AV 6 5 1 Configuring PC AV Mode 1 Press any button on the front of the product to display the Key Guide Next press to display the corresponding menu scre...

Page 57: ...ESET and press on the product 3 Press to move to Key Repeat Time and press on the product The following screen will appear z Acceleration 1 sec or 2 sec can be selected If No Repeat is selected a comm...

Page 58: ...move to SETUP RESET and press on the product 3 Press to move to Source Detection and press on the product The following screen will appear z Auto The input source is automatically recognized z Manual...

Page 59: ...esponding menu screen 2 Press to move to SETUP RESET and press on the product 3 Press to move to Customized Key and press on the product The following screen will appear z Angle Bright Eco Saving Imag...

Page 60: ...any button on the front of the product to display the Key Guide Next press to display the corresponding menu screen 2 Press to move to INFORMATION The current input source frequency and resolution wi...

Page 61: ...ttons in the initial screen where no OSD menu is displayed 1 Press any button on the front of the product when no menu screen is displayed to display the Key guide Next press The following screen will...

Page 62: ...n does not appear on the main screen find and double click the MagicTune setup file on the CD ROM 3 Select the installation language and click Next 4 Complete the remaining software installation steps...

Page 63: ...ick the Add or Remove Programs icon in the Control Panel 3 In the Add Remove window find and select MagicTune so that it is highlighted 4 Click Change or Remove Programs to remove the software 5 Selec...

Page 64: ...lation z The software may not work properly if you do not restart the computer after the installation z The MultiScreen icon may not appear depending on the computer system and the product specificati...

Page 65: ...tware 8 8 Installing the Software 8 2 2 Removing the Software Click Start select Settings Control Panel and then double click Add or Remove Programs Select MultiScreen from the program list and click...

Page 66: ...ct is working normally If the screen remains blank check the PC system video controller and cable 9 1 2 Checking the Resolution and Frequency For a mode that exceeds the supported resolution refer to...

Page 67: ...of resolution and frequency compatible with the product Next if required change the settings referring to Standard Signal Mode Table page 82 in this manual and the INFORMATION menu on the product Ther...

Page 68: ...itor settings z Windows ME 2000 Go to Control Panel Display Settings Advanced Monitor and adjust Refresh rate under Monitor settings z Windows Vista Go to Control Panel Appearance and Personalization...

Page 69: ...ndows 7 Go to Control Panel Appearance and Personalization Display Adjust Resolution and adjust the resolution How do I set power saving mode z Windows XP Set power saving mode in Control Panel Appear...

Page 70: ...back of the product as the standard voltage can vary in different countries Signal connectors 15pin to 15pin D sub cable Detachable Dimensions W x H x D Weight Without Stand 17 38 x 10 50 x 3 02 Inch...

Page 71: ...system optimizes the monitor settings Monitor installation takes place automatically However you can customize the installation settings if desired Panel Dots Pixels Due to the nature of the manufactu...

Page 72: ...s the standard voltage can vary in different countries Signal connectors 15pin to 15pin D sub cable Detachable DVI D to DVI D connector Detachable 15pin to 15pin D sub cable Detachable Dimensions W x...

Page 73: ...ystem optimizes the monitor settings Monitor installation takes place automatically However you can customize the installation settings if desired Panel Dots Pixels Due to the nature of the manufactur...

Page 74: ...Supply This product uses 100 to 240V Refer to the label at the back of the product as the standard voltage can vary in different countries Signal connectors 15pin to 15pin D sub cable Detachable DVI D...

Page 75: ...any Plug and Play compatible systems Two way data exchange between the monitor and PC system optimizes the monitor settings Monitor installation takes place automatically However you can customize the...

Page 76: ...fer to the label at the back of the product as the standard voltage can vary in different countries Signal connectors 15pin to 15pin D sub cable Detachable DVI D to DVI D connector Detachable Dimensio...

Page 77: ...system optimizes the monitor settings Monitor installation takes place automatically However you can customize the installation settings if desired Panel Dots Pixels Due to the nature of the manufactu...

Page 78: ...e label at the back of the product as the standard voltage can vary in different countries Signal connectors 15pin to 15pin D sub cable Detachable DVI D to DVI D connector Detachable Dimensions W x H...

Page 79: ...the monitor settings Monitor installation takes place automatically However you can customize the installation settings if desired Panel Dots Pixels Due to the nature of the manufacturing of this prod...

Page 80: ...watts Analog input condition Less than 0 1watts Analog input condition Power Consumption S19C200BW Typical 19 watts Less than 0 1watts Analog input condition Less than 0 1watts Analog input condition...

Page 81: ...to disconnect the power cable when you will not be using the product for an extended period of time To reduce the power consumption to 0 watts when the power switch is not available disconnect the po...

Page 82: ...C the screen will automatically be adjusted If the signal transmitted from the PC does not belong to the standard signal modes the screen may be blank even though the power LED turns on In such a case...

Page 83: ...284 VESA 640 x 480 31 469 59 940 25 175 VESA 640 x 480 37 861 72 809 31 500 VESA 640 x 480 37 500 75 000 31 500 VESA 800 x 600 35 156 56 250 36 000 VESA 800 x 600 37 879 60 317 40 000 VESA 800 x 600 4...

Page 84: ...5 VESA 640 x 480 37 861 72 809 31 500 VESA 640 x 480 37 500 75 000 31 500 VESA 800 x 600 35 156 56 250 36 000 VESA 800 x 600 37 879 60 317 40 000 VESA 800 x 600 48 077 72 188 50 000 VESA 800 x 600 46...

Page 85: ...5 VESA 640 x 480 37 861 72 809 31 500 VESA 640 x 480 37 500 75 000 31 500 VESA 800 x 600 35 156 56 250 36 000 VESA 800 x 600 37 879 60 317 40 000 VESA 800 x 600 48 077 72 188 50 000 VESA 800 x 600 46...

Page 86: ...861 72 809 31 500 VESA 640 x 480 37 500 75 000 31 500 VESA 800 x 600 35 156 56 250 36 000 VESA 800 x 600 37 879 60 317 40 000 VESA 800 x 600 48 077 72 188 50 000 VESA 800 x 600 46 875 75 000 49 500 VE...

Page 87: ...861 72 809 31 500 VESA 640 x 480 37 500 75 000 31 500 VESA 800 x 600 35 156 56 250 36 000 VESA 800 x 600 37 879 60 317 40 000 VESA 800 x 600 48 077 72 188 50 000 VESA 800 x 600 46 875 75 000 49 500 VE...

Page 88: ...861 72 809 31 500 VESA 640 x 480 37 500 75 000 31 500 VESA 800 x 600 35 156 56 250 36 000 VESA 800 x 600 37 879 60 317 40 000 VESA 800 x 600 48 077 72 188 50 000 VESA 800 x 600 46 875 75 000 49 500 V...

Page 89: ...800 x 600 35 156 56 250 36 000 VESA 800 x 600 37 879 60 317 40 000 VESA 800 x 600 48 077 72 188 50 000 VESA 800 x 600 46 875 75 000 49 500 VESA 1024 x 768 48 363 60 004 65 000 VESA 1024 x 768 56 476...

Page 90: ...800 x 600 35 156 56 250 36 000 VESA 800 x 600 37 879 60 317 40 000 VESA 800 x 600 48 077 72 188 50 000 VESA 800 x 600 46 875 75 000 49 500 VESA 1024 x 768 48 363 60 004 65 000 VESA 1024 x 768 56 476...

Page 91: ...800 x 600 35 156 56 250 36 000 VESA 800 x 600 37 879 60 317 40 000 VESA 800 x 600 48 077 72 188 50 000 VESA 800 x 600 46 875 75 000 49 500 VESA 1024 x 768 48 363 60 004 65 000 VESA 1024 x 768 56 476...

Page 92: ...0 75 000 31 500 VESA 800 x 600 35 156 56 250 36 000 VESA 800 x 600 37 879 60 317 40 000 VESA 800 x 600 48 077 72 188 50 000 VESA 800 x 600 46 875 75 000 49 500 VESA 1024 x 768 48 363 60 004 65 000 VES...

Page 93: ...800 x 600 35 156 56 250 36 000 VESA 800 x 600 37 879 60 317 40 000 VESA 800 x 600 48 077 72 188 50 000 VESA 800 x 600 46 875 75 000 49 500 VESA 1024 x 768 48 363 60 004 65 000 VESA 1024 x 768 56 476...

Page 94: ...28 322 MAC 640 x 480 35 000 66 667 30 240 MAC 832 x 624 49 726 74 551 57 284 MAC 1152 x 870 68 681 75 062 100 000 VESA 640 x 480 31 469 59 940 25 175 VESA 640 x 480 37 861 72 809 31 500 VESA 640 x 48...

Page 95: ...ttp www samsung com BOLIVIA 800 10 7260 http www samsung com BRAZIL 0800 124 421 4004 0000 http www samsung com CHILE 800 SAMSUNG 726 7864 From mobile 02 482 82 00 http www samsung com COLOMBIA 01 800...

Page 96: ...om latin_en English PERU 0 800 777 08 http www samsung com PUERTO RICO 1 800 682 3180 http www samsung com TRINIDAD TOBAGO 1 800 SAMSUNG 726 7864 http www samsung com VENEZUELA 0 800 100 5303 http www...

Page 97: ...http www samsung com LATVIA 8000 7267 http www samsung com LITHUANIA 8 800 77777 http www samsung com LUXEMBURG 261 03 710 http www samsung com MACEDONIA 023 207 777 http www samsung com MONTENEGRO 0...

Page 98: ...8 10 800 500 55 500 GSM 7799 http www samsung com KYRGYZSTAN 00 800 500 55 500 http www samsung com MOLDOVA 0 800 614 40 http www samsung com MONGOLIA 7 800 555 55 55 http www samsung com RUSSIA 8 800...

Page 99: ...1 800 8 SAMSUNG 726 7864 for Globe 02 5805777 http www samsung com SINGAPORE 1800 SAMSUNG 726 7864 http www samsung com TAIWAN 0800 329 999 0266 026 066 http www samsung com THAILAND 1800 29 3232 02 6...

Page 100: ...4 http www samsung com BOTSWANA 0800 726 000 http www samsung com CAMEROON 7095 0077 http www samsung com COTE D IVOIRE 8000 0077 http www samsung com GHANA 0800 10077 0302 200077 http www samsung com...

Page 101: ...ustomer requests software installation and setup for the productU z If a service technician removes cleans dusts or foreign materials inside of the productU z If customer requests an installation addi...

Page 102: ...the environment or human health from uncontrolled waste disposal please separate these items from other types of waste and recycle them responsibly to promote the sustainable reuse of material resour...

Page 103: ...ay an image although the refreshing is invisible to the naked eye The number of screen refreshes is called scanning rate and is measured in Hz A scanning rate of 60Hz means that the screen refreshes 6...

Page 104: ...the screen and is suitable for performing multiple tasks at the same time E g A resolution of 1920 x 1080 consists of 1 920 horizontal pixels horizontal frequency and 1 080 vertical lines vertical re...

Page 105: ...rrect posture to use the product 16 Customized Key 59 D Display Time 50 E Eco Saving 53 F Fine 42 G Gamma 47 General 70 Green 44 I Image Size 38 INFORMATION 60 Installation 22 K Key Repeat Time 57 L L...

Page 106: ...Index Index 106 SAMSUNG MAGIC Angle 37 SAMSUNG MAGIC Bright 36 Sharpness 35 Source Detection 58 Standard Signal Mode Table 82 T Transparency 51 Turn Off After 55...

Reviews: