background image

3-3

Using the Product

3-3

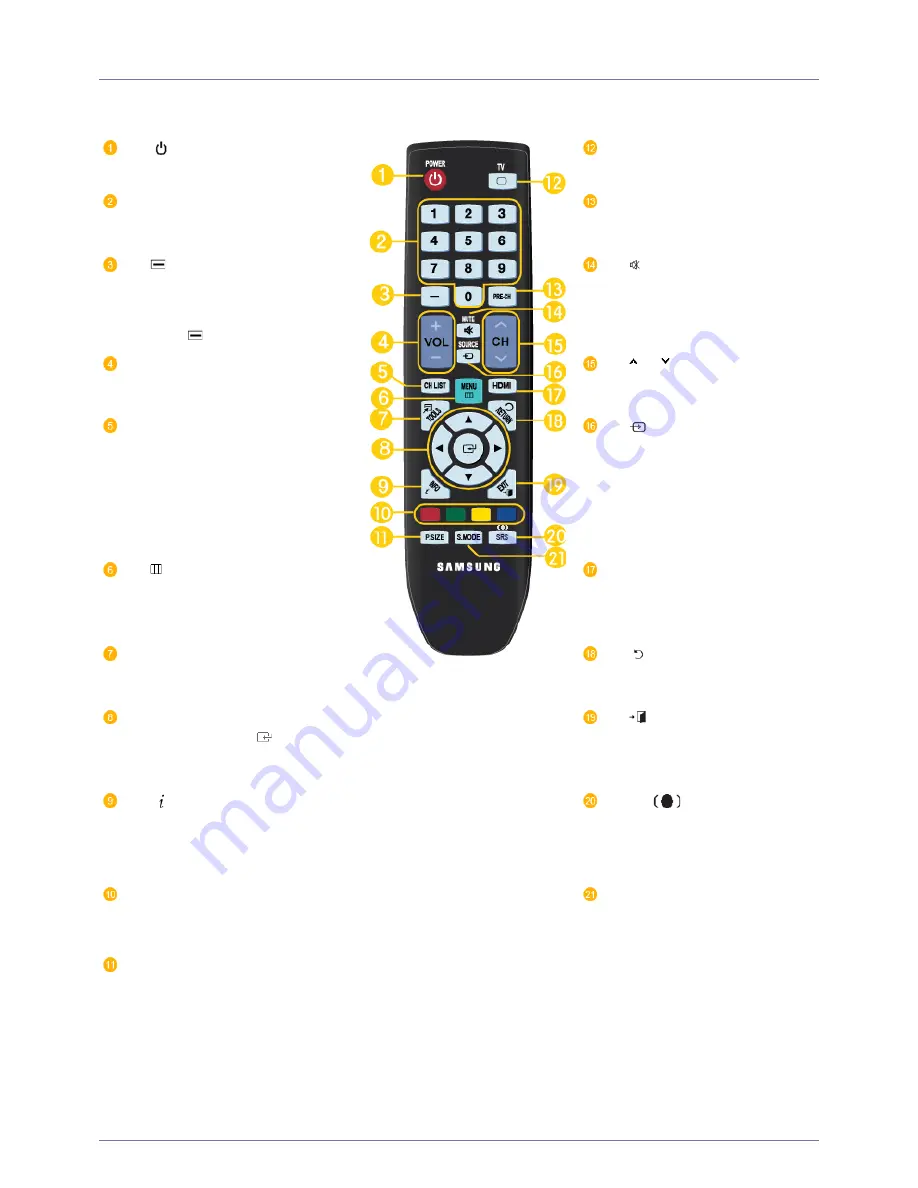
Remote Control


The performance of the remote control may be affected by a TV or other electronic device operating near the product, 
causing a malfunction due to interference with the frequency.


 POWER

Turns the product On/Off.

TV

Selects the TV mode directly.

Number Buttons

Press to change the channel.

PRE-CH

This button is used to return to 
the previous channel viewed.

 : Press to select additional chan-

nels (digital) being broadcast by the 
same station. For example, to select 
channel ‘54-3’, press ‘54’, then 
press ‘

’ and ‘3’.

 MUTE

Press to temporarily cut off the 
sound.

+ VOL -
Press to increase or decrease the 
volume.

 CH

Press to change channels.

CH LIST 

It displays 

"

Channel List

"

 on the 

screen.

 SOURCE

Press the button to change the 
input signal SOURCE.

Changing the SOURCE is only 
allowed for external devices that 
are connected to the monitor at 
the time.

 MENU

Opens the on-screen menu and 
exits from the menu or closes the 
adjustment menu.

HDMI

Selects the HDMI mode directly.

TOOLS

Use to quickly select frequently 
used functions.

 RETURN

Returns to the previous menu.

UP

/DOWN

/LEFT

/

RIGHT

/

ENTER 

 : Use to 

select on-screen menu items and 
change menu values.

 EXIT

Exits from the menu screen.

 INFO

Current picture information is dis-
played on the upper left corner of 
the screen.

SRS

Selects SRS TruSurround HD 
mode.

(Not Available)

COLOR BUTTONS 

Not available.

S.MODE

Press to select the 

sound mode.

P.SIZE

Picture size selection.

Summary of Contents for SyncMaster P2270HN

Page 1: ...aster P2270HN P2470HN LCD TV Monitor User Manual The color and the appearance may differ depending on the product and the specifications are subject to change without prior notice to improve the performance ...

Page 2: ...ng a Component cable 2 9 Connecting AV Devices 2 10 Connecting to an Amplifier 2 11 Connecting Headphones 2 12 Kensington Lock 2 13 USING THE PRODUCT Plug Play Feature 3 1 Viewing the Control panel 3 2 Remote Control 3 3 Using the Screen Adjustment Menu OSD On Screen Display 3 4 Installing the Device Driver 3 5 Standard Signal Mode Table 3 6 INSTALLING THE SOFTWARE Natural Color 4 1 MultiScreen 4 ...

Page 3: ... may not be partially or in whole reproduced distributed or used in any form without the written permission of Samsung Electronics Co Ltd The SAMSUNG logo and SyncMaster are the registered trademarks of Samsung Electronics Co Ltd Microsoft Windows and Windows NT are the registered trademarks of Microsoft Corporation VESA DPM and DDC are the registered trademarks of the Video Electronics Standard A...

Page 4: ...t may appear either brighter or darker than normal by appr 1ppm parts per million pixel The number of sub pixels of an LCD panel by size The number of Sub Pixels Max Horizontal Resolution x Max Vertical Resolution x 3 Example If the maximum resolution is 1920 x 1080 the number of sub pixels is 1920 x 1080 x 3 6 220 800 Clean the product with a soft dry cloth Avoid cleaning the product with an infl...

Page 5: ...may result in electric shock or fire Avoid connecting multiple electric appli ances to a single wall outlet Otherwise it may result in fire due to overheating of the wall outlet Avoid plugging in or unplugging the power supply with wet hands Otherwise it may result in electric shock Plug the power plug in firmly Otherwise it may result in fire Make sure to connect the power cord to a grounded wall...

Page 6: ...injury Make sure to use the specified wall mount Avoid installing the product in a badly venti lated location such as inside a bookshelf or closet Otherwise it may result in fire due to internal over heating Keep a distance of at least 10 cm 3 93 inches from the wall when installing the product for ventilation Otherwise it may result in fire due to internal over heating Keep the plastic bags used ...

Page 7: ...f make sure that the front of the product does not protrude out of the console or shelf Otherwise this may cause the product to fall off and result in a malfunction or injury Make sure to use a cabinet or shelf suitable to the size of the product When putting the product down handle it gently Otherwise it may result in a problem with the product or injury If the product is installed in a location ...

Page 8: ...lt in fire or electric shock If the product needs to be fixed contact a service center To move the product turn the power off and unplug the power cord the antenna cable and any other wires connected to the prod uct Otherwise it may result in electric shock or fire due to the damaged power cord If the product generates a strange noise a burning smell or smoke unplug the power plug immediately and ...

Page 9: ...lowerpot beverage cosmetics or drugs or a metal object over the product If water or substances enter the product turn the power off unplug the power cord and contact a service center Otherwise it may result in a problem with the product electric shock or fire Displaying a still image for a long time may create a persistent image or stain on the screen If you do not use the product for a long time ...

Page 10: ...amage due to leakage of the internal liquid Use only specified standard batteries Do not use new and used batteries together This may cause a battery to break or leak and may cause fire injury or contamination damage The batteries and rechargeable batteries are not ordinary refuse and must be returned for recycling purposes The cus tomer is responsible for returning the used or rechargeable batter...

Page 11: ...se you need to move the product at a later stage The cleaning cloth is supplied with black high glossy models only CONTENTS Installation Manual Product Warranty Not available in all locations User Manual Power Cord Cable Holder Batteries AAA X 2 Not available in all locations Stand Connector Stand Base Remote Control Cleaning Cloth Stereo Cable D Sub Cable SOLD SEPARATELY HDMI Cable ...

Page 12: ...n is facing downwards Insert the Stand Connector into the Stand Base in the direction shown by the figure Check if the Stand Connector is firmly connected Turn the connecting screw at the bottom of the Stand base fully so that it is completely fixed Place a soft cloth over the table to protect the product and place the product onto the cloth face down ...

Page 13: ... 2 Hold the main body of the product with your hand as shown by the figure Push the assembled stand into the main body in the direction of the arrow as shown in the figure Caution Do not lift the product holding only the stand ...

Page 14: ...the product and place the product face down Hold the main body of the product with your hand as shown by the figure Pull the stand in the direction of the arrow as shown in the figure to separate it Turn the connecting screw at the bottom of the Stand base to separate it from the Stand connector Take the Stand Connector out of the Stand base by pulling it in the direction of the arrow as shown in ...

Page 15: ...pecifications the inside of the product may be damaged For wall mounts that are not compatible with the standard VESA specifications the length of the screw may differ depending on the corresponding specifications Avoid using screws that are incompatible with the standard VESA specifications and avoid assembling them using excessive force This may result in damage to the product or injury due to t...

Page 16: ...e connecting part may differ depending on the product model When the graphics card provides a D Sub analog output Connect the PC IN port of the product to the D Sub port of the PC with the D Sub cable When the graphics card provides a DVI digital output Connect the DVI D IN port of the product to the DVI port of the PC with the DVI cable ...

Page 17: ...You may enjoy clear and quality sound from the computer sound card using the monitor s speakers You don t need to install separate speakers for your computer You may get a blank screen depending on the type of video card you are using if you connect the D sub and DVI cables simultaneously to one computer If you connect your monitor properly using the DVI connector but get a blank or fuzzy screen c...

Page 18: ... using an indoor antenna cable satellite terminal Check the antenna terminal on the wall and then connect the antenna cable satellite TV cable When using an outdoor antenna When using an outdoor antenna we strongly suggest using a qualified technician to install it 2 When the connections are completed connect the TV power 3 When the product is turned on for the first time after it was purchased th...

Page 19: ... of the AV device Blu Ray DVD Cable Satellite box to the HDMI IN terminal of the monitor using the HDMI cable Press the SOURCE button at the front of the monitor or on the remote control to select HDMI mode You do not need to make a separate audio connection when connecting via HDMI ...

Page 20: ...e monitor using a DVI to HDMI cable 2 Connect the red and white plugs of an RCA to stereo for PC cable to the same colored audio output terminals of the digital output device and connect the opposite plug to the HDMI PC DVI D AUDIO IN terminal of the product Press the SOURCE button at the front of the monitor or on the remote control to select HDMI mode ...

Page 21: ... input ports using a component video cable PR PB Y 2 Connect the audio port of the AV device DVD VCR Cable Satellite box to the COMPONENT IN R AUDIO L port of the monitor Press the SOURCE button at the front of the monitor or on the remote control to select the Component mode For an explanation of Component video consult your DVD VCR Cable Satellite box manual ...

Page 22: ...mcorder to the AV IN R AUDIO L port of the product 2 Connect the video output terminal of the AV device and the AV IN VIDEO of the monitor using a video cable 3 Select AV using the SOURCE button on the remote The audio video cables shown here are usually included with a Camcorder If not check your local electronics store ...

Page 23: ... OPTICAL terminal of your monitor to the optical input of your amplifier using an optical cable If no sound is emitted from the monitor you need to use an amplifier For information on how to connect a speaker and amplifier refer to the respective user manuals provided by their manufacturers ...

Page 24: ...2 12 Installing the Product 2 12 Connecting Headphones Connect your headphones to the Headphone connection terminal ...

Page 25: ...manufacturer for more information refer to the User Manual supplied with the locking device You have to purchase the locking device separately Locking the product 1 Insert the locking part of the locking device into the hole of the Kensington lock of the product and turn it in the locking direction 2 Connect the Kensington lock cable 3 Tie the Kensington lock cable to a desk or heavy object You ca...

Page 26: ...ld the MENU button on the TV for 5 seconds 4 The message Check antenna input is displayed with OK selected Press the button 5 Press the or button to select Air STD HRC or IRC then press the button 6 Press the button to select Start The TV will begin memorizing all of the available channels To stop the search before it has finished press the button with Stop selected 7 The Clock Set menu is display...

Page 27: ...used to exit the OSD or to return to a higher level OSD menu Moves from one menu item to another horizontally or adjusts selected menu values Adjusts the audio volume Use these buttons to navigate the menu or to adjust a value in the OSD Press to change channels in TV mode Press this button to turn the product on or off Power LED This LED is turned on when the product works normally For informatio...

Page 28: ...ease the volume CH Press to change channels CH LIST It displays Channel List on the screen SOURCE Press the button to change the input signal SOURCE Changing the SOURCE is only allowed for external devices that are connected to the monitor at the time MENU Opens the on screen menu and exits from the menu or closes the adjustment menu HDMI Selects the HDMI mode directly TOOLS Use to quickly select ...

Page 29: ...h the diagram inside the compartment 3 Close the cover Remove the batteries and store them in a cool dry place if you won t be using the remote control for a long time If the remote control doesn t work check the following Is the TV power on Are the plus and minus ends of the batteries reversed Are the batteries drained Is there a power outage or is the power cord unplugged Is there a special fluo...

Page 30: ...nnel List Fine Tune Color System Setup Plug Play Language Time Child Lock Change PIN Caption Melody Light Effect Light Level Energy Saving AV Color Sys tem PIP Input Source List Edit Name Anynet HDMI CEC Indicates the signal when PC or DVI is selected in the Source List This is the PC video signal that is connected to and input through the PC or DVI terminals Indicates the signal when AV is select...

Page 31: ...nal and adjusts to create an optimum contrast Custom Although the values are carefully chosen by our engineers the pre configured values may not be comfortable to your eyes depending on your taste If this is the case adjust the Brightness and Contrast by using the OSD menu Press the TOOLS button to display the Tools menu You can also set the MagicBright by selecting Tools MagicBright Contrast Brig...

Page 32: ...djusting the frequency Coarse PC Position Adjusts the screen location horizontally and vertically Image Reset Image parameters are replaced with the factory default values Available in PC Mode Only Picture Options Color Tone The tone of the color can be changed Available in PC DVI mode only Cool Normal Warm Custom R Gain G Gain B Gain Adjusts the individual R G B Red Green Blue color controls Size...

Page 33: ...Adjusts color saturation of the picture Tint G R Adjusts the color tint of the picture Advanced Settings Samsung s new TVs allow you to make even more precise picture settings than previous models See below to adjust detailed picture settings Advanced Settings is available in Standard or Movie mode Black Tone You can select the level on the screen to adjust the screen depth Off Dark Darker Darkest...

Page 34: ...Select by pressing the or button Use the or button to move the picture up and down After selecting use the or button to magnify or reduce the picture size in the vertical direction Wide Zoom Move the screen up down using the or button after selecting the by pressing the or ENTER button After selecting Screen Fit in HDMI 1080i 1080p or Component 1080i 1080p mode Select by pressing the or button Use...

Page 35: ...alues OK Cancel MENU DESCRIPTION Mode Standard Choose Standard for the standard factory settings Music Choose Music when watching music videos or concerts Movie Choose Movie when viewing movies Clear Voice Emphasizes voice over other sounds Custom Choose Custom if you want to adjust the settings according to personal preference Equalizer You can adjust the left and right sound balance and equalize...

Page 36: ...nnecting to a Home theater turn the TV speakers off so you can listen to sound from the Home theater s external speakers External Speaker Used to listen to the sound of the External Home Theater Speakers TV Speaker Used to listen to the sound of the TV Speakers If you select External Speaker in the Speaker Select menu the sound settings will be limited The volume and MUTE buttons do not operate wh...

Page 37: ...channel is not added Lock Unlock This feature allows you to prevent unauthorized users such as children from watching unsuitable programmes by muting out video and audio This function is available only when the Child Lock is set to on Move to the field by pressing the buttons select a channel to be locked and press the button The PIN number input screen appears Enter your 4 digit PIN number The de...

Page 38: ... Product Setup MENU DESCRIPTION Plug Play This brings up the menu items that appeared when you first plugged in the TV Language You can set the menu language The language chosen affects only the language of the OSD ...

Page 39: ...ivate Off Time Set the hour minute am pm and activate inactivate To activate the timer with the setting you ve chosen set to Activate Repeat Select Once Mon Fri Everyday Mon Sat or Sat Sun Volume Set the desired volume level Channel You can set the hour minute and channel by pressing the number buttons on the remote control Auto Power Off When you set the timer On the television will eventually tu...

Page 40: ...tion Field 2 carries additional information that supplements the information in Field 1 For example Channel 1 may have subtitles in English while Channel 2 has subtitles in Spanish Melody A melody sound can be set to come on when the monitor is powered On or Off Off Low Medium High Light Effect You can turn the LED on off on the front of monitor You can turn it off to save power Off Activates the ...

Page 41: ...so configure PIP related settings by selecting Tools PIP PIP Settings If you turn the TV off while watching in PIP mode and turn it on again the PIP window will disappear You may notice that the picture in the PIP window becomes slightly unnatural when you use the main screen to view a game or karaoke You can activate or deactivate the PIP function On Off Source You can select a source of the sub ...

Page 42: ...ternal input source connected to the Monitor Use to select the screen of your choice You can use the SOURCE button on the remote control PC DVI TV AV Component HDMI Edit Name Name the input device connected to the input jacks to make your input source selection easier VCR DVD Cable STB Satellite STB PVR STB AV Receiver Game Cam corder PC DVI PC DVI TV IPTV Blu Ray HD DVD DMA Anynet HDMI CEC Anynet...

Page 43: ... or 2 directly to the Amplifier or Home Theatre not the TV Connect only one Home Theatre You can connect an Anynet device using the HDMI 1 3 cable Some HDMI cables may not support Anynet functions Anynet works when the AV device supporting Anynet is in the Standby or On status Anynet supports up to 10 AV devices in total Note that you can connect up to 3 devices of the same type Setting Up Anynet ...

Page 44: ... Off automatically when the TV is turned off The active source on the TV remote must be set to TV to use the Anynet function If you set Auto Turn Off to Yes connected external devices are also turned off when the TV is turned off If an external device is still recording it may or may not turn off Searching Connec tions The message Configuring Anynet Connection is displayed When searching devices c...

Page 45: ...msung Electronics website www samsung com and download the driver 1 Insert the driver installation CD into the CD ROM drive 2 Click on Windows Driver 3 Select the model of your product from the model list 4 Complete the remaining installation steps according to the instructions displayed on the screen 5 Check if the appropriate resolution and screen refresh rate are displayed in the Control Panel ...

Page 46: ... RESOLUTION HORIZONTAL FREQUENCY KHZ VERTICAL FREQUENCY HZ CLOCK FREQUENCY MHZ POLARITY H V IBM 640 x 350 31 469 70 086 25 175 IBM 640 x 480 31 469 59 940 25 175 IBM 720 x 400 31 469 70 087 28 322 MAC 640 x 480 35 000 66 667 30 240 MAC 832 x 624 49 726 74 551 57 284 MAC 1152 x 870 68 681 75 062 100 000 VESA 640 x 480 37 861 72 809 31 500 VESA 640 x 480 37 500 75 000 31 500 VESA 800 x 600 35 156 56...

Page 47: ...represented in Hz RESOLUTION SCAN VERTICALFREQUENCY HZ INPUT SOURCE 720 x 240 Progressive 60 Hz Component 720 x 480 Interlaced 60 Hz Component HDMI 720 x 480 Progressive 60 Hz Component HDMI 720 x 576 Interlaced 50 Hz Component HDMI 1440 x 480 Progressive 50 Hz Component HDMI 1440 x 576 Interlaced 60 Hz HDMI 1280 x 720 Interlaced 50 Hz HDMI 1280 x 720 Progressive 50 Hz Component HDMI 1920 x 1080 P...

Page 48: ... to adjust the displayed colors on the product so they more closely match the colors of printed pictures For more information refer to the online help of the software F1 Natural Color is provided online You can download it from the website below and install http www samsung com us consumer learningresources monitor naturalcolorexpert pop_download html ...

Page 49: ...if you do not restart the computer after the installation The MultiScreen icon may not appear depending on the computer system and the product specifications If the shortcut icon does not appear press the F5 key MultiScreen Installation Requirements The MultiScreen installation may be affected by the graphics card motherboard and the networking environment Operating System OS Windows 2000 Windows ...

Page 50: ... if the product and the PC are properly connected perform the self diagnosis function according to the procedures below 1 Turn the product and the PC off 2 Remove the D Sub cable from the product 3 Turn the product on 4 If the product is working properly the Check Signal Cable message appears In this case if a blank screen is displayed again make sure that there is no problem with the PC and the c...

Page 51: ...rates Check if the resolution and frequency set for the computer video card falls in the range supported by the monitor If not reset them referring to the current Information under the monitor menu and Preset Timing Modes Ghost images are shown in the picture The image is too light or too dark Adjust the Brightness and Contrast Refer to the Brightness Contrast Screen is blank and the power indicat...

Page 52: ... 2 Troubleshooting NOTE ON THE PRODUCT APPEARANCE You may see small particles if you look closely at the edge of the bezel surrounding the screen This is part of the product s design and is not a defect ...

Page 53: ...digital TVs The most widely known types of digital TV are HDTV and SDTV They are classified according to the screen quality and the video specifications HDTV High Definition TV High screen quality SDTV Standard Definition TV Common standard digital TV An SDTV has an aspect ratio of 4 3 which is the same as that of an analog TV HDTV has an aspect ratio of 16 9 which is similar to a cinema screen Th...

Page 54: ...log DVI Digital Visual Interface 0 7 Vp p 5 Separate Type H V Sync Composite TTL Level V high 2 0 V V low 0 8 V Maximum Pixel Clock 162 000MHz Analog Digital Power Voltage This product supports 100 240 V Since the standard voltage may differ from country to country please check the label on the back of the product Dimension Width x Height x Depth Weight 536 3 x 345 2 x 66 mm 21 1 x 13 6 x 2 6 inch...

Page 55: ...g mode When the product is in power saving mode the power is not turned off and you can turn the screen on again by pressing any key or clicking the mouse However the power saving function only works when the product is connected to a computer that provides the power saving function If there is no power cut off switch the power consumption is 0 only when the power cord is disconnected POWER SAVING...

Page 56: ...amsung com latin ECUADOR 1 800 10 7267 http www samsung com latin EL SALVADOR 800 6225 http www samsung com latin GUATEMALA 1 800 299 0013 http www samsung com latin HONDURAS 800 7919267 http www samsung com latin JAMAICA 1 800 234 7267 http www samsung com latin PANAMA 800 7267 http www samsung com latin PUERTO RICO 1 800 682 3180 http www samsung com latin REP DOMINICA 1 800 751 2676 http www sa...

Reviews: