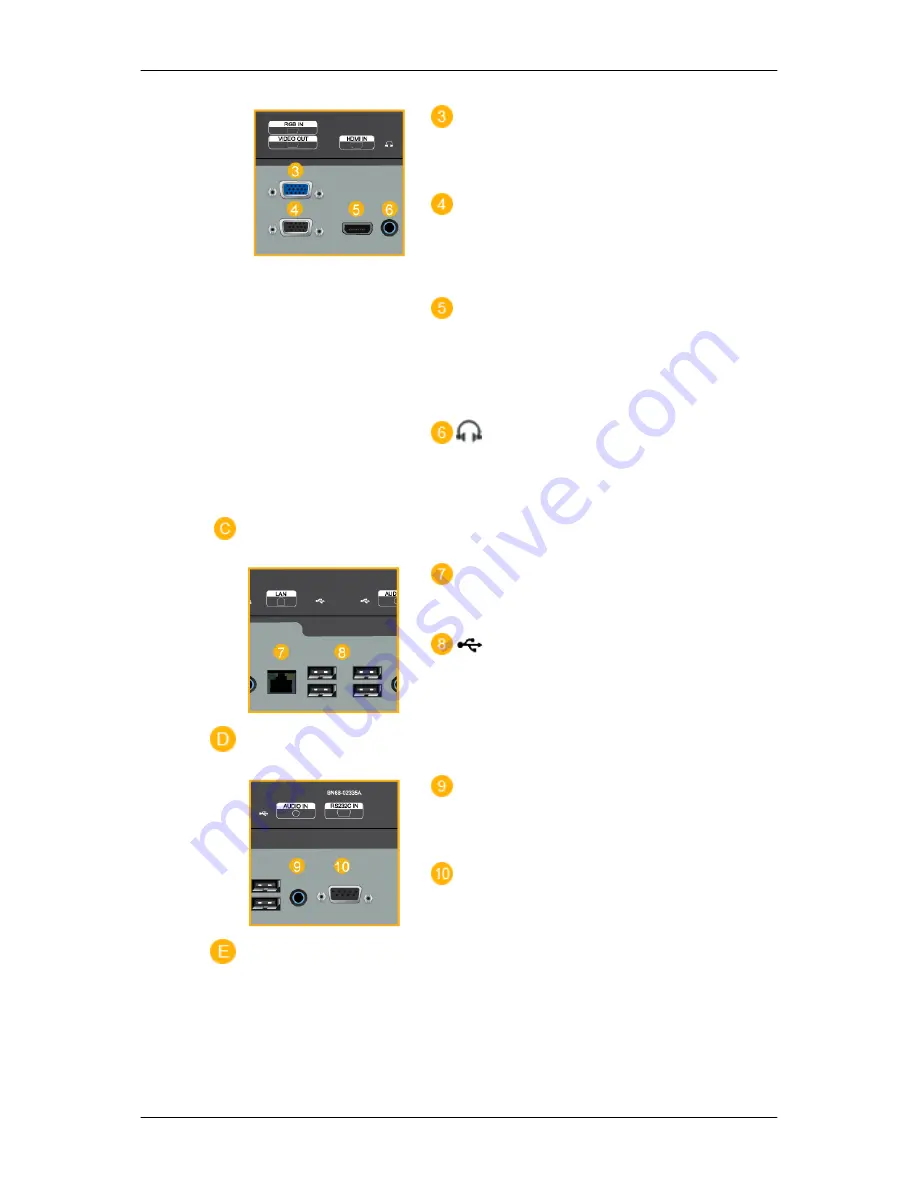
background image

 RGB IN

Connect the RGB IN terminal at the back of

your product to your computer.

 VIDEO OUT

Connect between the [VIDEO OUT] port on

the product and the D-Sub port on your mon-

itor using a D-Sub cable.

 HDMI IN

Connect  the  HDMI  terminal  at  the  back  of

your  LCD  Display  to  the  HDMI  terminal  of

your digital output device using a HDMI ca-

ble.


Connect  your  headphones  to  the  Head-

phone connection terminal.


 LAN

LAN Connection Terminal


Keyboard  /  Mouse,  Mass  Storage  Device

Compatible.


 AUDIO IN

Connect the audio cable for your product to

the audio port on the back of your computer.

 RS232C IN

MDC(Multiple Display Control) Program Port


Introduction

Summary of Contents for SyncMaster BN59-00977A-00

Page 1: ...SyncMaster 230TSN 230MXN LCD Display User Manual...

Page 2: ...period of time set your computer to DPM If using a screen saver set it to active screen mode The images here are for reference only and are not applicable in all cases or countries Shortcut to Anti Af...

Page 3: ...to contact an authorized Service Center when installing your monitor in a location with heavy dust high or low temperatures high hu midity and exposed to chemical substances and where it operates for...

Page 4: ...internal temperature Ensure that the packaging vinyl is kept away from children Otherwise it may result in serious harm suffocation if children play with it If the height of your monitor is adjustabl...

Page 5: ...r the product and that it is not wet Otherwise this may result in electric shock fire or a malfunc tion Others The product is a high voltage product Do not disassemble re pair or modify the product yo...

Page 6: ...n a product malfunction electric shock or fire Do not use or keep combustible spray or flammable material near the product Otherwise this may result in an explosion or fire Do not insert any metal suc...

Page 7: ...e Do not place any heavy items or toys or confectionery such as cookies etc that may attract the attention of children and to the product Your children may hang onto the product causing it to fall and...

Page 8: ...ediately If a spark occurs it may cause an explosion or fire If the product has been turned on for a long time the display panel becomes hot Do not touch it Keep the small accessories in a location ou...

Page 9: ...osture when using this prod uct Adjust the angle of the product so that light is not reflected onto the screen Keep your elbow at a right angle and keep your arm level with the back of your hand Keep...

Page 10: ...with your LCD Display If any items are missing contact your dealer Contact a local dealer to buy optional items Unpacking LCD Display Manuals Quick Setup Guide Warranty Card Not available in all loca...

Page 11: ...the plug Installing a Wall Mount This product provides a wall mount of 100 mm x 100 mm that complies with the VESA spec ifications 100 mm x 100 mm A Wall Mount Base B Wall Mount Kit Optional 1 Turn t...

Page 12: ...s or due to an installation not performed by an authorized installation engineer When installing the product using a wall mount purchase a wall mount that provides at least 4 inches 10 cm of space fro...

Page 13: ...regarding power saving functions For energy conservation turn your LCD Display OFF when it is not needed or when leaving it unattended for long periods Remote Control Sensor Aim the remote control tow...

Page 14: ...HDMI terminal at the back of your LCD Display to the HDMI terminal of your digital output device using a HDMI ca ble Connect your headphones to the Head phone connection terminal LAN LAN Connection T...

Page 15: ...f the Kensington Lock may be different depending on the model Using the Anti Theft Kensington Lock 1 Insert the locking device into the Ken sington slot on the Monitor and turn it in the locking direc...

Page 16: ...to use MagicInfo 4 DEL GUIDE but ton The button is used to select Digital channels Electronic Program Guide EPG display This function does not work for this LCD Display 5 VOL Adjusts the audio volume...

Page 17: ...elect MTS Multichannel Television Stereo mode Audio Type MTS S_Mode Default FM Stereo Mono Mono Manual Change Stereo Mono Stereo SAP Mono SAP Mono DUAL STEREO MONO DUAL l DUAL ll and MONO NICAM MONO N...

Page 18: ...19 RETURN Returns to the previous menu 20 EXIT Exits from the menu screen 21 MagicInfo MagicInfo Quick Launch Button Introduction...

Page 19: ...ct the audio cable for your LCD Display to the audio port on the back of your computer Note Turn on both your computer and the LCD Display Contact a local SAMSUNG Electronics Service Center to buy opt...

Page 20: ...terminal of a digital output device to the HDMI terminal of the LCD Display using a DVI to HDMI cable Connect the red and white jacks of an RCA to stereo for PC cable to the same colored audio output...

Page 21: ...OUT port to display the same picture on another monitor For presentation purposes Connecting a LAN Cable Note Connect the LAN cable Connecting a USB device You can connect USB devices such as a mouse...

Page 22: ...Connections...

Page 23: ...oper ating system you have Prepare a blank disk and download the driver program file at the Internet web site shown here Internet web site http www samsung com Installing the Monitor Driver Automatic...

Page 24: ...ft Windows Vista Operating System 1 Insert your Manual CD into your CD ROM drive 2 Click Start and Control Panel Then double click on Appearance and Personal ization 3 Click Personalization and then D...

Page 25: ...e your system The certified driver will be posted on Samsung Monitor homepage 6 Click Update Driver in the Driver tab 7 Check the Browse my computer for driver software checkbox and click Let me pick...

Page 26: ...that matches your monitor from the list of monitor models on the screen and click Next 10 Click Close Close OK OK on the following screens displayed in sequence Microsoft Windows XP Operating System...

Page 27: ...Click Display icon and choose the Settings tab then click Advanced 4 Click the Properties button on the Monitor tab and select Driver tab 5 Click Update Driver and select Install from a list or then c...

Page 28: ...owing message window click the Continue Anyway button Then click OK button Note This monitor driver is under certifying MS logo and this installation will not damage your system The certified driver w...

Page 29: ...button is active click the Properties button then follow the next steps 5 Click Driver and then click on Update Driver then click on the Next button 6 Choose Display a list of the known drivers for t...

Page 30: ...utton if you see the screen working normally after clicking Test If the screen is not normal change to a different mode lower mode of resolution colors or frequency Note If there is no Mode at All Dis...

Page 31: ...lation Status window appears 7 Click Finish 8 When the installation is complete the MDC executable icon appears on your desktop Double click the icon to start the program MDC execution icon may not ap...

Page 32: ...Using MDC Using the Software...

Page 33: ...a standard of serial communication is used for the communication between a PC and a display Therefore a serial cable should be connected between the serial port on a PC and the serial port on a displ...

Page 34: ...g for the PC Serial Port can change The original value is COM1 5 Click Select all or Clear to select or clear all displays 6 Use Grid to view brief information on selected display 7 Select a display f...

Page 35: ...the Port Selection Menu 3 If the exact port name that is connected to the LCD Display using a serial cable is not selected communication will be unavailable 4 The selected port is stored in the progr...

Page 36: ...Info Grid shows some basic information necessary to Power Control 1 Power Status 2 Input 3 Image Size 4 On Timer 5 Off Timer 2 Use the Select All button or Check Box to choose a display to control...

Page 37: ...f the Mute function of the selected display When selecting one set at a time turn on the Mute function for the selected set The Mute function is disabled automatically when you adjust the volume level...

Page 38: ...PC Mode...

Page 39: ...of the selected display to DTV 6 AV Changes the Input Source of the selected display to AV 7 S Video Changes the Input Source of the selected display to S Video 8 Component Changes the Input Source of...

Page 40: ...he current Image Size of the display in use 3 Input Info Grid displays only the displays whose Input Source is PC BNC DVI 4 PC Source When you click Image Size the PC Source tab first appear The Image...

Page 41: ...AV S Video Component or DVI HDCP as input source 3 Switch Image Size of the selected display randomly Note Auto Wide Zoom1 and Zoom2 are not available for selection when the input signal type for Comp...

Page 42: ...atus Source Volume of the selected display 3 Off Time Setup Set the Hour Minute and AM PM Status for Off Time Setup of the selected display 4 Shows the On Time settings 5 Shows the Off Time settings T...

Page 43: ...splay and changes the size to Large 4 Small Turns on the PIP of the selected display and changes the size to Small 5 Double 1 Turns on the PIP of the selected display and changes the size to Double 1...

Page 44: ...elected display to DVI 5 AV Changes the source of the PIP of the selected display to AV 6 S Video Changes the source of the PIP of the selected display to S Video 7 Component Changes the source of the...

Page 45: ...and displays it on the slide bar When Select All is chosen the default value is displayed Changing a value in this screen will automatically change the mode to CUSTOM 1 Picture Available only for TV A...

Page 46: ...ilable only for the displays whose power status is ON and if no selection is made the factory default is displayed Settings Picture PC 1 Click Settings of the main icons and the Settings Control scree...

Page 47: ...r Temp Adjusts the Color Temp for the selected display 9 Brightness Sensor Adjusts the Brightness Sensor for the selected display 10 Dynamic Contrast Adjusts the Dynamic Contrast for the selected disp...

Page 48: ...mode to CUSTOM 1 Audio Controls audio settings for all input sources 2 Bass Adjusts Bass of the selected display 3 Treble Adjusts Treble of the selected display 4 Balance Adjusts Balance of the select...

Page 49: ...djusts Fine of the selected display 4 Position Adjusts Position of the selected display 5 Auto Adjustment Self Adjust to the incoming PC signal The Input source of MagicInfo works only on MagicInfo mo...

Page 50: ...p Control 3 Manual Lamp Control Allows you to adjust the backlight of the selected display regardless of the time The Auto Lamp Control automatically turns off if you adjust using the Manual Lamp Cont...

Page 51: ...e when the Safety Screen function must be performed The Type item can be set to Scroll Pixel Bar Eraser All White or Pattern 4 Safety Screen2 This function is used to prevent afterimages from occurrin...

Page 52: ...all Screen divider The screen can be divided into You can select a number of screens with a different layout when dividing z Select a mode from Screen divider z Select a display from Display Selection...

Page 53: ...t appear on the other Control Info Grids Check to see if the display power is ON You can check this in Power Control Info Grid Check if you can change the input source of the display 3 The dialogue bo...

Page 54: ...value for the selected display 3 Selected one display ID1 and add another display ID3 The program which was displaying the settings value of ID 1 fetches and displays the value of ID3 4 Selected all s...

Page 55: ...I or other external input sources connected to the LCD Display Use to select the screen of your choice 1 PC 2 HDMI 3 MagicInfo Note The direct button on the remote control is the SOURCE button Edit Na...

Page 56: ...alue Not available when Dynamic Contrast mode is set to On 1 Entertain High brightness For watching motion pictures such as from a DVD or VCR 2 Internet Medium brightness For working with a mixture of...

Page 57: ...rast mode is set to On Note By adjusting the picture using the Custom function MagicBright will change to Custom mode Contrast MENU ENTER ENTER ENTER ENTER Adjusts the Contrast Brightness MENU ENTER E...

Page 58: ...ou set the Color Tone to Off the Color Control function is disabled Color Control Adjusts individual Red Green Blue color balance MENU ENTER ENTER Not available when Dynamic Contrast mode is set to On...

Page 59: ...ts are not obtained using the Fine adjustment use the Coarse adjustment and then use Fine again Available in PC mode only Not available when Dynamic Contrast mode is set to On MENU ENTER ENTER Coarse...

Page 60: ...he resolution in the control panel the auto function is performed Available in PC mode only Not available when Dynamic Contrast mode is set to On Note The direct button on the remote control is the AU...

Page 61: ...gnal Control MENU ENTER ENTER ENTER 1 R Gain MENU ENTER ENTER ENTER ENTER ENTER ENTER 2 G Gain MENU ENTER ENTER ENTER ENTER EN TER ENTER 3 B Gain MENU ENTER ENTER ENTER ENTER ENTER ENTER 4 R Offset ME...

Page 62: ...R ENTER ENTER 6 B Offset MENU ENTER ENTER ENTER ENTER ENTER ENTER Size MENU ENTER ENTER ENTER The Size can be switched Not available when Dynamic Contrast mode is set to On 1 16 9 2 4 3 Dynamic Contra...

Page 63: ...stribution of the inputted visual signal and adjusts to create optimum brightness 1 Off 2 On Picture HDMI Mode Available Modes PC HDMI MagicInfo Mode MENU ENTER ENTER ENTER The LCD Display has four au...

Page 64: ...preference MENU ENTER ENTER Not available when Dynamic Contrast mode is set to On Contrast MENU ENTER ENTER ENTER ENTER Adjusts the Contrast Brightness MENU ENTER ENTER ENTER ENTER Adjusts the Brightn...

Page 65: ...dual Color components are also user adjustable Not available when Dynamic Contrast mode is set to On 1 Off 2 Cool2 3 Cool1 4 Normal 5 Warm1 6 Warm2 Note If you set the Color Tone to Cool2 Cool1 Normal...

Page 66: ...ER The Size can be switched 1 16 9 2 Zoom 1 3 Zoom 2 4 4 3 5 Just Scan Note The Zoom1 Zoom2 are unavailable in HDMI mode Digital NR Digital Noise Reduction MENU ENTER ENTER ENTER Turns the Digital Noi...

Page 67: ...In HDMI mode this function is available when the input signal is interlaced scan it is not available in progressive scan 1 Off 2 On Dynamic Contrast MENU ENTER ENTER ENTER Dynamic Contrast automatica...

Page 68: ...lifier 1 Standard Selects Standard for the standard factory settings 2 Music Selects Music when watching music videos or concerts 3 Movie Selects Movie when viewing movies 4 Speech Selects Speech when...

Page 69: ...R ENTER ENTER Emphasizes low frequency audio Treble MENU ENTER ENTER ENTER ENTER Emphasizes high frequency audio Balance MENU ENTER ENTER ENTER ENTER Allows you to Adjusts the sound balance between th...

Page 70: ...pelling virtual surround sound ex perience through any two speaker playback system including internal television speakers It is fully compatible with all multichannel formats 1 Off 2 On Note The direc...

Page 71: ...Time Selects from one of 4 time settings Clock Set Sleep Timer On Timer and Off Timer MENU ENTER ENTER Clock Set MENU ENTER ENTER ENTER ENTER Current Time Setting Sleep Timer MENU ENTER ENTER ENTER EN...

Page 72: ...ls the mode and the volume level at the time the LCD Display turns on automatically Off Timer MENU ENTER ENTER ENTER ENTER Turns the LCD Display off automatically at a preset time Menu Transparency ME...

Page 73: ...he password can be changed Lock On MENU ENTER ENTER Safety Lock EN TER ENTER Lock On 0 9 0 9 0 9 0 9 Turns Off On the Video Wall function of the selected display Off On Energy Saving MENU ENTER ENTER...

Page 74: ...by configuring the HDMI black level 1 Normal 2 Low Video Wall A Video Wall is a set of video screens connected together so that each screen shows a part of the whole picture or where the same picture...

Page 75: ...o see a divided screen 1 Full Provides a full screen without any margins 2 Natural Displays a natural image with the original aspect ratio intact Horizontal MENU ENTER ENTER ENTER ENTER Sets how many...

Page 76: ...ct a display in Display Selection The selection will be set up by pressing a number in the selected mode Safety Screen The Safety Screen function is used to prevent afterimages that may appear when a...

Page 77: ...Pixel Shift is not available when Video Wall is On Horizontal Dot MENU ENTER ENTER ENTER ENTER EN TER Sets how many pixels the screen moves horizontally Five adjustment levels 0 1 2 3 and 4 Vertical...

Page 78: ...TER ENTER ENTER ENTER ENTER You can set the timer for Screen Burn Protection If you start the operation to erase any residual image the operation will be performed for the set period of time and then...

Page 79: ...specify a time for execution Mode Scroll 1 5 sec Mode Bar Eraser 10 50 sec Scroll MENU ENTER ENTER ENTER This function helps to remove after images on the screen by moving all the pixels on the LCD a...

Page 80: ...tangular pattern Resolution Select MENU ENTER ENTER ENTER When the picture is not displayed properly on the screen when setting the graphics card resolution of the computer to 1024 x 768 60Hz 1280 x 7...

Page 81: ...s resolution is set to 1024 x 768 60Hz 1280 x 768 60Hz 1360 x 768 60Hz or 1366 x 768 60Hz Power On Adjustment MENU ENTER ENTER ENTER Adjusts the Power On time for the screen Side Gray MENU ENTER ENTER...

Page 82: ...is being used MENU ENTER ENTER Image Reset MENU ENTER ENTER ENTER ENTER Note Available in PC mode only Note The Reset function is not available when Video Wall is On Color Reset MENU ENTER ENTER ENTE...

Page 83: ...ntrol Available Modes PC HDMI MagicInfo Multi Control Assigns an individual ID to the SET MENU ENTER ENTER 0 9 ID Setup Assigns distinctive IDs to the SET ID Input Use to select the transmitter functi...

Page 84: ...LCD Display is in the process of shutting down since this may cause system errors on the LCD Display In the OSD image of MagicInfo Network mode is the same as Device When using MagicInfo with the Magi...

Page 85: ...Windows starts 2 Select TCP IP step 2 In step 2 of MagicInfo Setup Wizard you don t have to go to Network Setting on the desktop to make your settings for TCP IP You just do that at step 2 of MagicIn...

Page 86: ...ultiple languages you can choose and set a specific language among them 4 Select Screen Type step 4 You can select which rotation type will be applied to your device 5 Setup Information Adjusting the...

Page 87: ...ttings that have been selected by the user Note If the MagicInfo icon is not displayed on the notification area double click the MagicInfo icon on the window desktop The icon will appear Adjusting the...

Page 88: ...and reconnect the video cable then turn on both your com puter and the LCD Display If your LCD Display screen remains blank after using the previous procedure check your video controller and computer...

Page 89: ...If you installed a new video card or if you assembled the PC check if you installed the Adaptor video 4 Check if the scanning ratio of the video screen is set to between 50 Hz 85 Hz Do not exceed 60Hz...

Page 90: ...ly A Check if the signal cable is securely connected Re connect it if necessary Refer to Connecting a Computer Q The image is not clear picture is blurred A Run Frequency Coarse and Fine tuning A Turn...

Page 91: ...n check the cable connection between the LCD Display and the computer to en sure that the connector is properly connected Problems related to Audio Note Problems related to audio signals and their sol...

Page 92: ...Set the resolution in the Control Panel Display Settings Contact the video card manufacturer for details Q How can I set the Power Saving function A Windows XP Set the resolution in the Control Panel...

Page 93: ...ideo Note that some of the codecs can be incompatible Note Before calling for assistance check the information in this section to see if you can remedy any problems yourself If you do need assistance...

Page 94: ...ated 1 RGB Analog HDMI 0 7 Vp p 5 Separate H V sync Composite SOG TTL level V high 2 0 V V low 0 8 V Maximum Pixel Clock 164MHz Analog Digital Power Supply This product supports 100 240 V Since the st...

Page 95: ...not from bad quality and you can use it without any problems For example the number of TFT LCD sub pixels contained in this product are 6 220 800 Note Design and specifications are subject to change w...

Page 96: ...809 31 500 VESA 640 x 480 37 500 75 000 31 500 VESA 800 x 600 35 156 56 250 36 000 VESA 800 x 600 37 879 60 317 40 000 VESA 800 x 600 48 077 72 188 50 000 VESA 800 x 600 46 875 75 000 49 500 VESA 102...

Page 97: ...rescent lamp the screen has to repeat the same image many times per second to display an image to the user The frequency of this repetition is called the Vertical Frequency or Refresh Rate Unit Hz Spe...

Page 98: ...Auto Adjustment function in display screen that is ap peared as window termination button is pressed If there s still noise after the automatic adjustment use the Fine Coarse adjustment function When...

Page 99: ...ations Stock Markets Banks and Controlling Systems We recommend that you follow set up of your display system program as below Display Information together with Logo or Moving image cycle Ex Cycle Dis...

Page 100: ...ditions are defined as continuously changing video patterns When the LCD panel is operated for a long time with a fixed pattern over 12 hours there may be slight difference in voltage between electrod...

Page 101: ...Our LCD Monitor satisfies ISO13406 2 Pixel fault Class II Information...

Page 102: ...www samsung com co COSTA RICA 0 800 507 7267 http www samsung com lat in ECUADOR 1 800 10 7267 http www samsung com lat in EL SALVADOR 800 6225 http www samsung com lat in GUATEMALA 1 800 299 0013 ht...

Page 103: ...7864 http www samsung com no POLAND 0 801 1SAMSUNG 172678 022 607 93 33 http www samsung com pl PORTUGAL 808 20 SAMSUNG 7267864 http www samsung com pt SLOVAKIA 0800 SAMSUNG 726 7864 http www samsung...

Page 104: ...sung com nz PHILIPPINES 1 800 10 SAMSUNG 726 7864 1 800 3 SAMSUNG 726 7864 1 800 8 SAMSUNG 726 7864 02 5805777 http www samsung com ph SINGAPORE 1800 SAMSUNG 726 7864 http www samsung com sg THAILAND...

Page 105: ...ution The number of horizontal and vertical dots used to compose the screen image is called the resolution This number shows the accuracy of the display A high resolution is good for performing multip...

Page 106: ...tural resources and to promote material reuse please separate batteries from other types of waste and recycle them through your local free bat tery return system Note The rechargeable battery incorpor...

Page 107: ...Appendix...

Reviews: