background image

English - 10

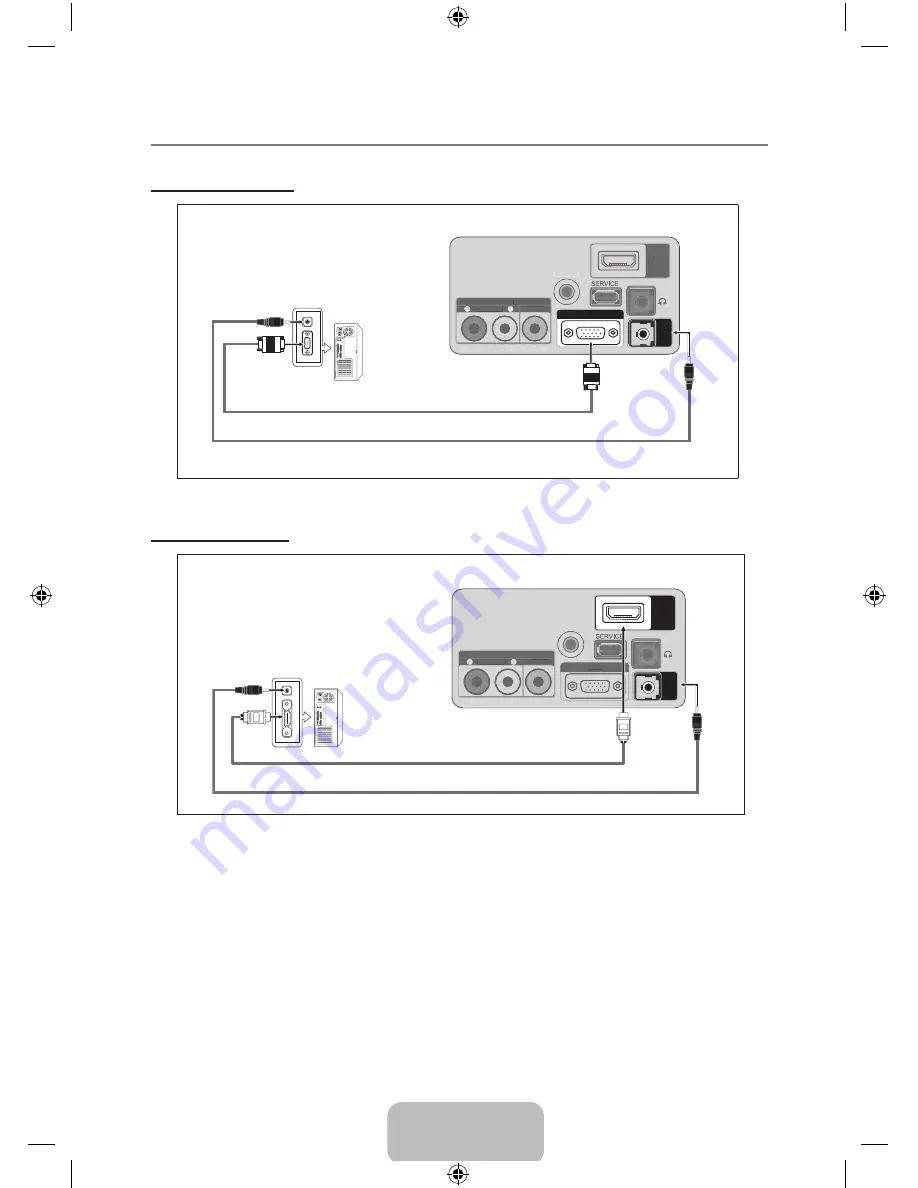
Connecting a PC


¦

Using the D-Sub Cable

ANT IN

HDMI IN

AV IN

-   AUDIO   -

VIDEO

R

L

PC IN

HDMI / PC

AUDIO IN

ANT IN

HDMI IN

AV IN

-   AUDIO   -

VIDEO

R

L

ANT IN

HDMI IN

AV IN

-   AUDIO   -

VIDEO

R

L

PC IN

HDMI / PC

AUDIO IN

ANT IN

AV IN

-   AUDIO   -

VIDEO

R

L

PC IN

TV Rear Panel

PC

1

 D-Sub Cable

When connecting a PC, match the color of the connection terminal to the cable


N

.

Using the HDmI Cable

ANT IN

HDMI IN

AV IN

-   AUDIO   -

VIDEO

R

L

PC IN

HDMI / PC

AUDIO IN

ANT IN

AV IN

-   AUDIO   -

VIDEO

R

L

PC IN

PC

TV Rear Panel

1

 HDmI Cable (Not supplied)

2

 Stereo Cable (Not supplied)

Each PC has a different back panel configuration


N

.

2

 Stereo Cable (Not supplied)

BN59-00905F_eng.indd   10

2009-11-10   9:30:41

Summary of Contents for SyncMaster 933HD Plus

Page 1: ...the possibilities Thank you for purchasing this Samsung product To receive more complete service please register your product at Model Serial No SyncMaster 933HD Plus www samsung com register BN59 00...

Page 2: ...stationary patterns or dark bars On LCD models that offer picture sizing features use these controls to view different formats as a full screen picture Be careful in the selection and duration of tele...

Page 3: ...CONTROL Configuring the Channel Menu 12 Managing Channels 13 Picture Control Configuring the Picture Menu TV AV HDMI 15 Using Your TV as a Computer PC Display 18 Setting up the TV with your PC 19 Soun...

Page 4: ...vary depending on the model N N 1 SOURCE 2 3 5 6 4 7 8 9 10 MENU 1 SOURCEE Toggles between all the available input sources In the on screen menu use this E button as you use the button on the remote...

Page 5: ...n your PC 6 Connect your headphones to the Headphone connection terminal 7 HDMI PC AUDIO IN Connect the HDMI PC AUDIO IN terminal at the back of your product to your computer s sound card 8 POWER INPU...

Page 6: ...ed MUTE M Press to temporarily cut off the sound CH Press to change channels SOURCE Press to display and select the available video sources FAV CH Press to switch to your favorite channels MENU Displa...

Page 7: ...n leads under the screws on a 300 75 adapter not supplied Use a screwdriver to tighten the screws 2 Plug the adaptor into the ANT IN terminal on the back of the TV Antennas with 75 Round Leads Plug th...

Page 8: ...plitter Cable Box Incoming cable TV Rear ANT IN RF A B Switch 1 Find and disconnect the cable that is connected to the ANT IN terminal on your cable box This terminal might be labeled ANT IN VHF IN or...

Page 9: ...e and has the HDCP High Bandwidth Digital Copy Protection coding feature installed Each DVD Blu Ray player Satellite receiver Set Top Box has a different back panel N N configuration The TV may not ou...

Page 10: ...ion When connecting a DVD Blu Ray player Satellite receiver Set Top Box match the N N color of the connection terminal to the cable Connecting a VCR ANT IN HDMI IN AV IN AUDIO VIDEO R L PC IN HDMI PC...

Page 11: ...has a different back panel configuration N N When connecting a Camcorder match the color of the connection terminal to the cable N N Using an HDMI Cable ANT IN HDMI IN AV IN AUDIO VIDEO R L PC IN HDMI...

Page 12: ...L PC IN TV Rear Panel PC 1 D Sub Cable When connecting a PC match the color of the connection terminal to the cable N N Using the HDMI Cable ANT IN HDMI IN AV IN AUDIO VIDEO R L PC IN HDMI PC AUDIO I...

Page 13: ...ignals In Cable mode you can select the correct signal source among N N STD HRC and IRC by pressing the or button then press the E button If you have Digital cable select the cable system signal sourc...

Page 14: ...arts to remove scrambled channels Clearing N N Scrambled Channels The Auto program menu then reappears If you want to stop Auto Programming press the N N E button The Stop Auto Program message will be...

Page 15: ...the same time The c mark appears to the left of the selected channels TOOLS Tools Displays the Add or Delete Add to Favorite or Delete from Favorite Timer Viewing Channel Name Edit Select All or Dese...

Page 16: ...Edit analog channels only Channels can labeled so that their call letters appear whenever the channel is selected The names of digital broadcasting channels are automatically assigned and cannot be l...

Page 17: ...ignificantly reduced if the level of Backlight is reduced N N and that this will reduce the overall running cost Advanced Settings Samsung s new TVs allow you to make even more precise picture setting...

Page 18: ...nnected to an input of the TV Size Occasionally you may want to change the size of the image on your screen Your TV comes with six screen size options each designed to work best with specific types of...

Page 19: ...al received by your TV is weak you can activate the Digital Noise Reduction feature to help reduce any static and ghosting that may appear on the screen When the signal is weak select one of the other...

Page 20: ...alog box the correct value is 60 or 60 Hz Otherwise just click OK and exit the dialog box Display Modes If the signal from the system equals the standard signal mode the screen is adjusted automatical...

Page 21: ...n After the noise has been reduced re adjust the picture so that it is aligned on the center of the screen Coarse Fine The purpose of picture quality adjustment is to remove or reduce picture noise If...

Page 22: ...cast N N Multi Track Sound MTS only analog channel Press the O O MTS button on the remote control repeatedly to select Mono Stereo or SAP Mono Choose for channels that are broadcasting in mono or if y...

Page 23: ...tomatically N N Clock Set You can set the current time manually This function is only available when N N Clock Mode is set to Manual You can set the month day year hour and minute directly by pressing...

Page 24: ...ng to a game console such as PlayStationTM or XboxTM you can enjoy a more realistic gaming experience by selecting the game menu Restrictions on game mode Caution N N To disconnect the game console an...

Page 25: ...of America MPAA has implemented a rating system that provides parents or guardians with advance information on which films are appropriate for children G General audience no restrictions PG Parental g...

Page 26: ...casting station it may not be available for use Parental restriction levels differ depending on the broadcasting station The default menu name N N and Downloadable US rating changes depending on the d...

Page 27: ...N Digital Caption Options digital channels only Size This option consists of Default Small Standard and Large The default is Standard Font Style This option consists of Default Style0 Style 7 You can...

Page 28: ...rnal input sources such as DVD Blu Ray players Satellite receivers Set Top Box connected to the TV Use to select the input source of your choice Press the O O SOURCE button on the remote control to vi...

Page 29: ...nels you cannot fine tune a digital channel You can however adjust your antenna to improve the reception of available digital channels If the signal strength meter indicates that the signal is weak ph...

Page 30: ...he Anynet feature To be sure your Samsung device has this feature check if there is an Anynet logo on it To connect to a TV TV HDMI IN AV IN AUDIO R L VIDEO HDMI IN DVI D IN PC IN ANT IN ANT IN COMPON...

Page 31: ...Auto Turn Off No Yes Setting an Anynet Device to turn Off Automatically when the TV is Turned Off The active source on the TV remote must be set to TV to use N N the Anynet function If you set N N Au...

Page 32: ...the red button to search for the connected device If you have selected external input mode by pressing the N N SOURCE button you cannot use the Anynet function Make sure to switch to an Anynet device...

Page 33: ...tton on the TV remote control and select a device other than Anynet devices Press z CH LIST PRE CH and FAV CH to change the TV mode Note that the channel button operates only when a tuner embedded Any...

Page 34: ...r Select the monitor which you want to install Samsung Samsung OK CANCEL 4 Complete the remaining installation steps according to the instructions displayed on the screen 5 Check if the appropriate re...

Page 35: ...allation N N The MultiScreen icon may not appear depending on the computer system and the product N N specifications If the shortcut icon does not appear press the F5 key N N MultiScreen Installation...

Page 36: ...annel Adjust the antenna No picture or sound Try another channel Press the SOURCE button Make sure the TV is plugged in Check the antenna connections No sound or sound is too low at maximum volume Fir...

Page 37: ...ou have a computer connected to the PC input If the setting is not correct use your computer utility program to change the display settings Your TV supports multiscan display functions within the foll...

Page 38: ...ol Panel Appearance and Themes Display Screen Saver Setting or configure it in the BIOS SETUP of the computer For more information refer to the Windows user manual for the computer How can I clean the...

Page 39: ...own by the figure 3 Turn the connecting screw at the bottom of the stand fully so that it is completely fixed Disconnecting the Stand 1 2 1 Place the front of the TV onto a soft cloth or cushion on a...

Page 40: ...ls to follow the product installation instructions Do not install your Wall Mount Kit while your TV is turned on It may result in personal injury due to electric shock Using the Anti Theft Kensington...

Page 41: ...N N If you use parts provided by another manufacturer it may result in a problem with the product or an injury due to the product falling If you use parts provided by another manufacturer it may resu...

Page 42: ...ifications are subject to change without prior notice N N This device is a Class B digital apparatus N N For the power supply and Power Consumption refer to the label attached to the product N N Power...

Page 43: ...E 800 SAMSUNG 726 7864 www samsung com cl COLOMBIA 01 8000112112 www samsung com co COSTA RICA 0 800 507 7267 www samsung com latin ECUADOR 1 800 10 7267 www samsung com latin EL SALVADOR 800 6225 www...

Reviews: