1-8
Samsung Electronics
Disassembly and Reassembly
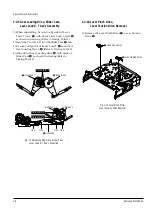
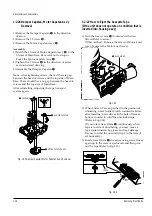
1-2-9 Gear Loading Drive, Slider Cam,
Lever Load S, T Ass’y Assembly
1) When reinstalling, be sure to align dot of Lever
Load T Ass'y
Œ
with dot of Lever Load S Ass'y
´
as shown in drawing, (Refer to Timing Point 1).
2) Insert the Pin A,B,C,D into the Slider Cam
ˇ
hole,
3) Be sure to align dot of Lever Load T
Œ
and dot of
Gear Loading Drive
¨
, (Refer to Timing Point 2).
4) Aline dot of Gear Loading drive
¨
with mark of
Slider Cam
ˇ
as shown in drawing(Refer to
Timing Point 3).
´
LEVER LOAD S
Œ
LEVER LOAD T
LEVER LOAD S
LEVER LOAD T
PIN A
PIN C
PIN B
PIN D
ˇ
SLIDER CAM
TIMING POINT 2
TIMING POINT 1
TIMING POINT 3
1-2-10 Lever Pinch Drive,
Lever Tension Drive Removal
1) Remove the Lever Pinch Drive
Œ
, Lever Tension
Drive
´
.
Œ
LEVER PINCH DRIVE
´
LEVER TENSION DRIVE
Fig. 1-14 Gear Loading Drive, Slider Cam,
Lever Load S, T Ass’y Assembly
Fig. 1-15 Lever Pinch Drive,
Lever Tension Drive Removal
Summary of Contents for SV-G180UM
Page 10: ...2 6 Alignment and Adjustment Samsung Electronics MEMO ...
Page 18: ...Exploded View and Parts List 3 8 Samsung Electronics MEMO ...
Page 32: ...Schematic Diagrams 5 4 Samsung Electronics 5 2 S M P S Power Free Voltage ...
Page 33: ...Schematic Diagrams Samsung Electronics 5 5 5 3 Logic Ø ˆ Œ ˇ Ω ...
Page 35: ...Schematic Diagrams Samsung Electronics 5 7 5 4 Audio Video ˇ ˆ Ø Œ ...
Page 37: ...Schematic Diagrams Samsung Electronics 5 9 5 5 Hi Fi Option Œ ˇ ...
Page 42: ...Schematic Diagrams 5 14 Samsung Electronics MEMO ...
Page 61: ...1 18 Samsung Electronics Disassembly and Reassembly MEMO ...

