background image

GB

51

50

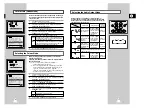
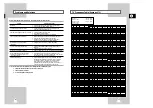
TV Frequency Table (System-L'/L)

001~004 :L’

120~142 :CATV

005~010 :L-VHF

170~199 :CATV

021~069 :L-UHF

201~221 :CATV

070~085 :CATV
101~118 :CATV

DISP   CH    Band         Fp              STD

DISP   CH    Band         Fp              STD

DISP   CH    Band         Fp              STD

070

B

V-L     116.75        CATV

071

C

V-L     128.75        CATV

072

D

V-L     140.75        CATV

073

E

V-H   

152.75        CATV

074

F

V-H   

164.75        CATV

075

G

V-H    

176.75        CATV

076

H

V-H    

188.75        CATV

077

I

V-H    

200.75        CATV

078

J

V-H    

212.75        CATV

079

K

V-H    

224.75        CATV

080

L

V-H    

236.75        CATV

081

M

V-H    

248.75        CATV

082

N

V-H    

260.75        CATV

083

O

V-H    

272.75        CATV

084

P

V-H    

284.75        CATV

085

Q

V-H    

296.75        CATV

101

01

V-H    

307.25        CATV

102

02

V-H    

315.25        CATV

103

03

V-H    

323.25        CATV

104

04

V-H    

331.25        CATV

105

05

V-H    

339.25        CATV

106

06

V-H    

347.25        CATV

107

07

V-H    

355.25        CATV

108

08

V-H    

363.25        CATV

109

09

V-H    

371.25        CATV

110

10

V-H    

379.25        CATV

111

11

V-H    

387.25        CATV

112

12

V-H    

395.25        CATV

113

13

V-H    

403.25        CATV

114

14

V-H    

411.25        CATV

115

15

V-H    

419.25        CATV

116

16     UHF   

427.25        CATV

117

17     UHF   

435.25        CATV

118

18     UHF  

443.25        CATV

120

70       V-L  

120.25        CATV

121

71       V-L     128.25        CATV

122

72       V-L     136.25        CATV

123

73       V-L     144.25        CATV

124

74      V-H  

152.25        CATV

125

75      V-H     160.25        CATV

126

76      V-H  

168.25        CATV

127

77      V-H  

176.25        CATV

128

78      V-H  

184.25        CATV

129

79      V-H  

192.25        CATV

130

80      V-H  

200.25        CATV

131

81      V-H  

208.25        CATV

132

82      V-H  

216.25        CATV

133

83      V-H  

224.25        CATV

134

84      V-H  

232.25        CATV

135

85      V-H  

240.25        CATV

136

86      V-H  

248.25        CATV

137

87      V-H  

256.25        CATV

138

88      V-H  

264.25        CATV

139

89      V-H  

272.25        CATV

140

90      V-H  

280.25        CATV

141

91      V-H  

288.25        CATV

142

92      V-H 

296.25        CATV

170

70       V-L  

120.75        CATV

171

71       V-L  

131.25        CATV

172

72

V-L     141.75        CATV

173

73

V-H     152.25        CATV

174

74

V-H     162.75        CATV

175

75

V-H     173.25        CATV

176

76

V-H     183.75        CATV

177

77

V-H     194.25        CATV

178

78

V-H     204.75        CATV

179

79

V-H     215.25        CATV

180

80

V-H     225.75        CATV

181

81

V-H     236.25        CATV

182

82

V-H     246.75        CATV

183

83

V-H     257.25        CATV

184

84

V-H     267.75        CATV

185

85

V-H     278.25        CATV

186

86

V-H     288.75        CATV

187

87

V-H     299.25        CATV

188

88

V-H     309.75        CATV

189

89

V-H     320.25        CATV

190

90

V-H     330.75        CATV

191

91

V-H     341.25        CATV

192

92

V-H     351.75        CATV

193

93

V-H     362.25        CATV

194

94

V-H     372.75        CATV

195

95

V-H     383.25        CATV

196

96

V-H     393.75        CATV

197

97

V-H     404.25        CATV

198

98

V-H     414.75        CATV

199

99

V-H     425.25        CATV

201

H1

V-H     303.25        CATV

202

H2

V-H     311.25        CATV

203

H3

V-H     319.25        CATV

204

H4

V-H     327.25        CATV

205

H5

V-H     335.25        CATV

206

H6

V-H     343.25        CATV

207

H7

V-H     351.25        CATV

208

H8

V-H     359.25        CATV

209

H9

V-H     367.25        CATV

210

H10

V-H     375.25        CATV

211

H11

V-H     383.25        CATV

212

H12

V-H     391.25        CATV

213

H13

V-H     399.25        CATV

214

H14

V-H     407.25        CATV

215

H15

V-H     415.25        CATV

216

H16

V-H     423.25        CATV

217

H17    UHF  

431.25        CATV

218

H18  UHF  

439.25        CATV

219

H19  UHF  

447.25        CATV

220

H20   UHF  

455.25        CATV

221

H21   UHF  

463.25        CATV

001

FA

V-L

47.75

L’

002

FB

V-L

55.75

L’

003

FC1

V-L

60.50

L’

004

FC

V-L

63.75

L’

005

F1

V-H       176.00           L

006

F2

V-H       184.00

L

007

F3

V-H

192.00

008

F4

V-H

200.00

L

009

F5

V-H

208.00

L

010

F6

V-H

216.00

L

021

E21

UHF

471.25

CCIR

022

E22

UHF

479.25

CCIR

023

E23

UHF

487.25

CCIR

024

E24

UHF

495.25

CCIR

025

E25

UHF

503.25

CCIR

026

E26

UHF

511.25

CCIR

027

E27

UHF     519.25

CCIR

028

E28

UHF

527.25

CCIR

029

E29

UHF

535.25

CCIR

030

E30

UHF

543.25

CCIR

031

E31

UHF

551.25

CCIR

032

E32

UHF

559.25

CCIR

033

E33

UHF

567.25

CCIR

034

E34

UHF

575.25

CCIR

035

E35

UHF

583.25

CCIR

036

E36

UHF

591.25

CCIR

037

E37

UHF

599.25

CCIR

038

E38

UHF

607.25

CCIR

039

E39

UHF

615.25

CCIR

040

E40

UHF

623.25

CCIR

041

E41

UHF

631.25

CCIR

042

E42

UHF

639.25

CCIR

043

E43

UHF

647.25

CCIR

044

E44

UHF

655.25

CCIR

045

E45

UHF

663.25

CCIR

046

E46

UHF

671.25

CCIR

047

E47

UHF

679.25

CCIR

048

E48

UHF

687.25

CCIR

049

E49

UHF

695.25

CCIR

050

E50

UHF

703.25

CCIR

051

E51

UHF

711.25

CCIR

052

E52

UHF

719.25

CCIR

053

E53

UHF

727.25

CCIR

054

E54

UHF

735.25

CCIR

055

E55

UHF

743.25

CCIR

056

E56

UHF

751.25

CCIR

057

E57

UHF

759.25

CCIR

058

E58

UHF

767.25

CCIR

059

E59

UHF

775.25

CCIR

060

E60

UHF

783.25

CCIR

061

E61

UHF

791.25

CCIR

062

E62

UHF

799.25

CCIR

063

E63

UHF

807.25

CCIR

064

E64

UHF

815.25

CCIR

065

E65

UHF

823.25

CCIR

066

E66

UHF

831.25

CCIR

067

E67

UHF

839.25

CCIR

068

E68

UHF

847.25

CCIR

069

E69

UHF

855.25

CCIR

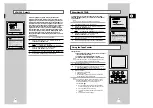
Problems and Solutions

Before contacting the after-sales service, perform the following simple checks.

Problem

Explanation/Solution

No power

Check that the power plug is connected to a wall outlet.

Have you pressed the M.A./VCR. button?

You cannot insert a video cassette

A video cassette can only be inserted with the window 
side up and the safety tab facing you.

The television programme was not recorded

Check the VCR aerial connections.

Is the VCR tuner properly set?

Check if the safety tab is intact on the cassette.

Timer recording was unsuccessful

Was the M.A./VCR. button pressed to activate the timer?

Re-check the recording start/stop time settings.

If there was a power failure or interruption during timer 
recording, the recording will have been cancelled.

No playback picture or the picture 

Check to see if you are using a prerecorded tape. 

is distorted

You cannot see normal broadcasts

Check the TUNER/EXTERNAL setting. It should be on 
TUNER.

Check the TV/VCR aerial connections.

Noise bars or streaks on playback

Press the ST./AJUST. (

$

or 

) buttons to minimize this effect.

When the 

II 

button is pressed during   

A still picture may have “noise bars”, depending on the 

playback, the still picture has severe

condition of the tape. Press the ST./AJUST. (

$

or 

) buttons

“noise bars” streaks

during SLOW motion to minimize this effect.

Video Head Cleaning 

If poor pictures appear on a variety of cassettes, the video 
heads may need cleaning. This is not a common problem 
and unless it appears, the heads should not be cleaned. 
When cleaning the video heads, read all instructions 
provided with the head cleaning cassette. Incorrect head 
cleaning can permanently damage the video heads.

If you are unable to solve the problem after reading the above instructions, note:

The model and serial number on the rear of your VCR

The warranty information

A clear description of the problem

Summary of Contents for SV-647F

Page 1: ... NICAM A2 STEREO SV 647F Instruction Manual PAL PAL SECAM LECTURE STOP MARCHE MINUT OK M A VCR M A TV RALENTI SHUTTLE STAB ANNUL RàZ IM IM INDEX TV VCR ENTRÉE RÉPÉT VOL ST AJUST AUDIO ENRG MENU VITESSE DUB TV VCR PROG AFFICH SELECT ...

Page 2: ...R OVERVIEWS Front View of the VCR 5 Rear View of the VCR 5 Infrared Remote Control 6 Display Indicator 7 Accessories 7 CONNECTING YOUR VIDEO CASSETTE RECORDER Deciding How to Connect Your VCR 8 Connecting Your VCR to the TV using the Coaxial Cable and SCART cable 9 Connecting a Decoder for scrambled PAY TV broadcasts 10 Connecting the Audio Output Cable 10 Connecting Your VCR to the Satellite rece...

Page 3: ...T place any objects on the VCR or remote control During a storm and or light ning unplug the VCR from the mains socket and aerial If the remote control is not used for a long period of time remove the batteries and store it in a cool dry place TV AV2 DEC EXT AV1 EURO AV R D L G AUDIO OUT SORTIE AV2 IN DECODEUR EXT SCART EURO 21 SOCKET AV1 EURO AV IN OUT SCART EURO 21 SOCKET AERIAL IN CONNECTOR OUT...

Page 4: ...CR STANDBY ON BUTTON SLOW BUTTON SHUTTLE BUTTON V LOCK BUTTON CLEAR AND RESET BUTTON TV BUTTON VCR BUTTON VOLUME BUTTONS AUDIO MODE SELECTION BUTTON STOP BUTTON REWIND REVERSE PICTURE SEARCH BUTTON RECORD BUTTON MENU SELECTION BUTTON MENU SELECTION DOWN BUTTON RECORDING SPEED SELECTION BUTTON AUDIO DUBBING BUTTON TV STANDBY ON BUTTON INDEX BUTTON FRAME ADVANCE BUTTON TUNER AV1 AV2 AUX SELECTION RE...

Page 5: ... when connecting audio or video systems Types of connectors available on your systems Systems connected permanently to the VCR satellite receiver for example or temporarily camcorder for example Your VCR is equipped with the following connectors Connector Location Type Direction Recommended Use AV1 Rear SCART In Out Television Satellite receiver Other VCR AV2 Rear SCART In Out Decoder for scramble...

Page 6: ...ear of your VCR Respect the colour coding of the left and right channels 3 Plug the other end of the audio cable into the appropriate input connectors on your Hi Fi stereo system AV2 DEC EXT AV1 EURO AV R D L G AUDIO OUT SORTIE 2 2 TV AV2 DEC EXT AV1 EURO AV R D L G AUDIO OUT SORTIE 1 TV AV2 DEC EXT AV1 EURO AV R D L G AUDIO OUT SORTIE SCART Cable SCART Cable DECODER Aerial TV Aerial Connector AV1...

Page 7: ...ins The message L INSTALLATION AUTO VA DEBUTER VERIFIER LES BRANCHEMENTS DE VOTRE MAGNETOSCOPE will be displayed It will automatically tune itself in and store TV stations in the memory 3 The process will finish after a few minutes Then the date and time are set automatically from the broadcast signal but this function will not operate if there is no Teletext signal TV TV AV2 DEC EXT AV1 EURO AV R...

Page 8: ...You must set the date and time when You purchase the video cassette recorder The date and time are set automatically from the broadcast signal but this function will not operate if there is no Teletext signal Do not forget to reset the time when you change clocks from winter to summer time and vice versa 1 Press MENU on the remote control Result The programming menu is displayed 2 Press the corres...

Page 9: ...stations may have been stored more than once select the stations with the best reception and delete the ones no longer required see page 17 INSTALLATION PROG OPTIONS INSTALL CLOCK BONUS LANG OK FIN MENU INSTALL INSTALL INSTALLATION AUTO INSTALLATION MANUELLE RÉGLAGE AV LINK FIN MENU SÉLECTION DU PAYS FRANCE ÖSTERREICH BELGIQUE DEUTSCHLAND DENMARK FINLAND ESPAÑA NETHERLANDS ITALIA SCHWEIZ NORGE POR...

Page 10: ...e frequency band is scanned and the first station found is displayed If you know the number of the channel you want press the numeric buttons on the remote control for example for channel E21 first press 0 and then press 2 1 see page 51 11 Press the button until the DÉCODEUR is selected 12 Press the button to activate or deactivate use of the decoder for the TV station if necessary 13 Press the or...

Page 11: ...s the OK button to select this option Result The INSTALLATION menu is displayed 4 Press the or buttons to select INSTALLATION MANUELLE option And then press the button to select this option Result The LISTE STATIONS TV menu is displayed 5 Press the corresponding or buttons until the required preset TV programme is selected Result The selected station is displayed at the same time on the television...

Page 12: ...time remaining on a cassette you must indicate the type of cassette inserted 1 Press MENU on the remote control Result The programming menu is displayed 2 Press the corresponding or buttons to select the RÉGLAGES UTILISATEUR option 3 Press the OK button to select this option 4 Press the corresponding or buttons until the SÉLECT CASSETTE option is selected 5 Press the or buttons as many times as re...

Page 13: ...ettes have a safety tab to prevent accidental erasure When this tab has been removed you cannot record on the tape 1 If you wish to protect a cassette break off the tab using a small screwdriver 2 To re record over a protected cassette safety tab broken cover the hole with adhesive tape 1 Before recording a programme you must have preset the corres ponding station unless you are recording via an e...

Page 14: ...er press the or buttons respectivly If you wish to store the title press OK 24 Using the ShowView Feature Before presetting your VCR Switch on both the television and your VCR Check that the date and time are correct Insert the cassette on which the programme is to be recorded safety tab intact Up to six programmes can be preset 1 Press the PROG button Result The OPTIONS PROG is displayed 2 Press ...

Page 15: ...BONUS LANG OK FIN MENU PROG M A VCR M A TV RALENTI SHUTTLE 17 The TIMER Programming feature allows you to preset the VCR to record a programme up to one month before that programme is to be broadcast Up to six programmes can be preset Before presetting a recording check that the date and time are correct 1 Insert the cassette Press the PROG button Press the or buttons to select the NORMALE option ...

Page 16: ...television and your VCR 2 Insert the video cassette to be played If the safety tab on the cassette is intact press II Otherwise the cassette is played automatically When a cassette is loaded the tape position is optimized automatically to reduce disturbance Digital Auto Tracking When playing a cassette if the end of the tape is reached the cassette is rewound automatically NTSC tapes can be played...

Page 17: ... corresponding or buttons until the FORMAT 16 9 option is selected 5 Press the button to select AUTO OUI NON AUTO Set when you use a wide TV The VCR detects wide TV programmes and normal TV programmes automatically when playing back and recording OUI The VCR always plays back and records in the mode compatible with 16 9 wide screen Set if the VCR cannot detect wide TV programmes with AUTO set NON ...

Page 18: ... the Slow Motion function for more than about five minutes the VCR will automatically play to protect the Cassette Video heads You can Stop the cassette at a given frame image Advance one frame at a time No sound is heard when playing back frame by frame 1 Press II to start playing the cassette II to stop the tape at a given frame IM IM to advance frame by frame 2 To return to normal playback pres...

Page 19: ...ayback from that point Depending on the direction selected the indexes are numbered as follows etc Prev Seq Seq being played Next Seq etc 2 1 1 2 This VCR uses a standard indexing system VISS As a result it will recognize any indexes marked by other VCRs using the same system and vice versa INTRO SCAN 1 To search for a specific index press INDEX 2 Press the or buttons depending on the direction wh...

Page 20: ...n completion press MENU twice to exit the menu 7 To select interval during playback press the ENTRÉE RÉPÉT button at the desired start point Result RÉGL RÉPÉT PROGRAMMÉE is displayed Press the ENTRÉE RÉPÉT button one more time at the desired end point Result The tape is automatically rewound to the start point RÉPÉTITION PROGRAMMÉE is displayed Interval Repeat Play Info Tag Information Tag Functio...

Page 21: ...r theme press OK during the timer programming procedure or in the timer programming screen The title inserting screen will be displayed 2 The first letter of the theme will be flashes To select a character press the or buttons until the required character is displayed 3 To move to the next or previous character press the or buttons respectively 4 If you wish to store the title press OK If you do n...

Page 22: ...s of 10 minutes 6 To turn off press or buttons repeatedly until NON shows ShowView EXTEND 0 00 00 ANNUL RàZ IM IM INDEX TV VCR ENTRÉE RÉPÉT VOL ST AJUST AUDIO AFFICH SELECT 2 2 FONCTIONS AVANCÉES PROG OPTIONS INSTALL CLOCK BONUS LANG OK FIN MENU BONUS PDC VPS PAR DEFAUT NON ÉTENDRE SHOWVIEW NON VEILLE AUTO NON RÉPÉTITION TOTALE NON NOMBRE RÉPÉT PROGRAMMÉE 5 INFO TAG DELETE FIN MENU BONUS Programme...

Page 23: ...le 21 pins a mutual control is available with the TV VCR SAT receiver etc The VCR automatically stores all your current TV stations in the VCR in the same position order as the TV channels TV CH DOWNLOAD Even if the TV is in standby mode the TV automatically turns on and displays the video picture when you start playback on the VCR The VCR automatically selects the same picture as you are watching...

Page 24: ...he AV LINK menu is displayed 4 Press the or buttons until the ENREGISTREMENT DIRECT option is selected 5 To Press or until Record the same picture OUI is displayed as you are watching on the TV when you press ENRG button on the your VCR remote control Record the selected picture on NON is displayed your VCR when you press ENRG button on your VCR remote control 6 Press the MENU button twice to exit...

Page 25: ...your VCR You can also use a RCA audio and video cable to connect the AUX input on the front of your VCR 2 Insert a blank cassette in your VCR 3 Insert the pre recorded cassette in the other video source VCR or camcorder 4 Press the ENTRÉE button to select the appropriate input on your VCR AV1 or AV2 for the SCART input AUX for the RCA input 5 Start playing back the cassette to be copied 6 Press th...

Page 26: ...sions If you encounter problems operate the television directly M A VCR M A TV RALENTI SHUTTLE STAB ANNUL RàZ IM IM INDEX TV VCR ENTRÉE RÉPÉT SELECT C RÉPÉT VOL ST AJUST AUDIO AFFICH ANNUL RàZ IM IM INDEX TV VCR ENTRÉE RÉPÉT VOL ST AJUST AUDIO AFFICH SELECT TV VCR ENTRÉE RÉPÉT VOL ST AJUST AUDIO AFFICH 1 2 2 6 6 7 3 5 5 4 With the Audio Dubbing function you erase the previously recorded sound and ...

Page 27: ...ult The programming menu is displayed 2 Press the corresponding or buttons to select the RÉGLAGES UTILISATEUR option 3 Press the OK button to select this option Result The RÉGLAGES UTILISATEUR menu is displayed 4 Press the corresponding or buttons until the MODE ÉCO is selected 5 Press the button to turn LOW 3Watts mode on Now when the VCR is standby mode the front display panel will shut off Even...

Page 28: ... H 208 00 L 010 F6 V H 216 00 L 021 E21 UHF 471 25 CCIR 022 E22 UHF 479 25 CCIR 023 E23 UHF 487 25 CCIR 024 E24 UHF 495 25 CCIR 025 E25 UHF 503 25 CCIR 026 E26 UHF 511 25 CCIR 027 E27 UHF 519 25 CCIR 028 E28 UHF 527 25 CCIR 029 E29 UHF 535 25 CCIR 030 E30 UHF 543 25 CCIR 031 E31 UHF 551 25 CCIR 032 E32 UHF 559 25 CCIR 033 E33 UHF 567 25 CCIR 034 E34 UHF 575 25 CCIR 035 E35 UHF 583 25 CCIR 036 E36 ...

Page 29: ...R 065 E65 UHF 823 25 CCIR 066 E66 UHF 831 25 CCIR 067 E67 UHF 839 25 CCIR 068 E68 UHF 847 25 CCIR 069 E69 UHF 855 25 CCIR 071 X V L 69 25 CCIR 072 Y V L 76 25 CCIR 073 Z V L 83 25 CCIR 074 Z 1 V L 90 25 CCIR 075 Z 2 V L 97 25 CCIR 101 S01 V L 105 25 CCIR 102 S02 V L 112 25 CCIR 103 S03 V L 119 25 CCIR 104 S04 V L 126 25 CCIR 105 S05 V L 133 25 CCIR 106 S06 V L 140 25 CCIR 107 S07 V H 147 25 CCIR 1...

Reviews: