


GB
17
GB
16
Presetting the Stations Manually
INSTALLATION
PROG OPTIONS INSTALL
CLOCK BONUS LANG
INSTALL
$
❷!!
➛❿!!
OK
END:
MENU
Your VCR contains a built-in tuner used to receive television
broadcasts.
You must preset the stations received through the tuner. This can
be done:
◆
Plug & Auto Set up (see page 11)
◆
Automatically (see page 16)
◆
Manually
You can store up to 50 stations.
☛
You do not need to preset the stations manually if you
have already set them automatically.
1
Press the MENU button on the remote control.
Result:
The programming menu is displayed.
2
Press the corresponding
$
,
❷
or
➛
,
❿
buttons to select the
INSTALLATION
option.
3
Press the OK button to select this option.
Result:
The
INSTALLATION
menu is displayed.
4
Press the corresponding
$
or
❷
buttons, until the
MANUAL SET
UP
option is selected.
5
Press the
❿
button to select
MANUAL SET UP
option.
Result:
The
TV STATION TABLE
menu is displayed.
6
Press the
$
or
❷
buttons to select a programme number as
required.
7
Press the
❿!!
button to preset the station.
Result:
The
MANUAL TUNING
menu is displayed.
8
Press the
➛
or
❿
buttons to start scanning.
Result:
The frequency band is scanned and the first station
found is displayed.
If you know the number of the channel you want, press the
numeric buttons on the remote control for example, for channel
04, first press “0” and then press “0”, “4” (see page 39).
9
If you...
Then...
Wish to store the
◆
Press the corresponding
$
or
❷!
buttons,
station displayed
until the
MFT
is selected.
◆
Press the
➛
or
❿
buttons to adjust the
picture, if necessary.
◆
Press OK to store the station .
Do not wish to
◆
Press the corresponding
$
or
❷!
buttons,
store the station
until the
CH
is selected.
displayed
◆
Press the
➛
or
❿
buttons to go on
scanning the frequency band and display
the next station
◆
Go back to the beginning of Step
9
10
Repeat this procedure from Step
6 onwards, until all the required
stations have been stored.
11
On completion, press the MENU button three times to exit the menu.
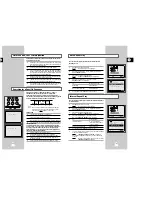
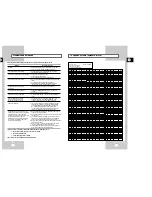
INSTALL
AUTO SET UP
MANUAL SET UP
TV SYSTEM :G
VCR OUTPUT CH :CH36
$
❷
❿
END:
MENU
** TV STATION TABLE **
PR
CH
1
002
2
---
3
---
4
---
5
---
$
❷
❿
SWAPPING:
OK
DELETE:
CLR/RST MENU
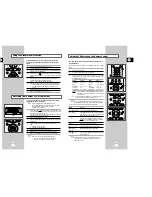
** MANUAL TUNING **
PR
:
1
CH
: ---
MFT
: -
$
❷
➛❿
MEMORY:
OK
END:
MENU
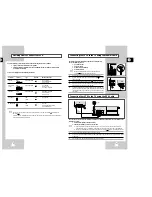
Presetting the Stations Automatically
☛
You do not need to preset the stations if you have already
set them automatically (see Plug & Auto Set Up on
page 11).
Your VCR contains a built-in tuner used to receive television
broadcasts.
You must preset the stations received through the tuner. This can
be done:
◆
Plug & Auto Set up (see page 11)
◆
Automatically
◆
Manually (see page 17)
You can store up to 50 stations.
1
Press the MENU button on the remote control.
Result:
The programming menu is displayed.
2
Press the corresponding
$
,
❷
or
➛
,
❿
buttons to select the
INSTALLATION
option.
3
Press the OK button to select this option.
Result:
The
INSTALLATION
menu is displayed.
4
Press the corresponding
$
or
❷
buttons, until the
AUTO SET
UP
option is selected.
Press the
❿
button to select this option.
5
Press OK to start the auto scanning.
Result:
◆
The
PLEASE WAIT
indication flashes on the
television screen.
◆
The first frequency band is scanned and the first
station found is displayed and stored.
◆
The VCR then searches for the second station and
so on.
◆
When the automatic scanning procedure has
finished, the VCR switches automatically to
programme 1.
➢
The number of stations automatically stored by the VCR
depends on the number of stations that it has found.
6
If you wish to cancel the auto scanning before the end, press the
MENU button three times to exit the menu.
➢
◆
Once the auto scanning procedure has finished, some
stations may have been stored more than once; select
the stations with the best reception and delete the
ones no longer required (see page 18).
INSTALLATION
PROG OPTIONS INSTALL
CLOCK BONUS LANG
INSTALL
$
❷!!
➛❿!!
OK
END:
MENU
AUTO SET UP
PLEASE WAIT
2
%
I--------------------I
END:
MENU
YOUR DATA WILL BE LOST
PRESS
OK
TO CONTINUE
MENU
TO EXIT
INSTALL
AUTO SET UP
MANUAL SET UP
TV SYSTEM :G
VCR OUTPUT CH :CH36
$
❷
❿
END:
MENU


