background image

9

!

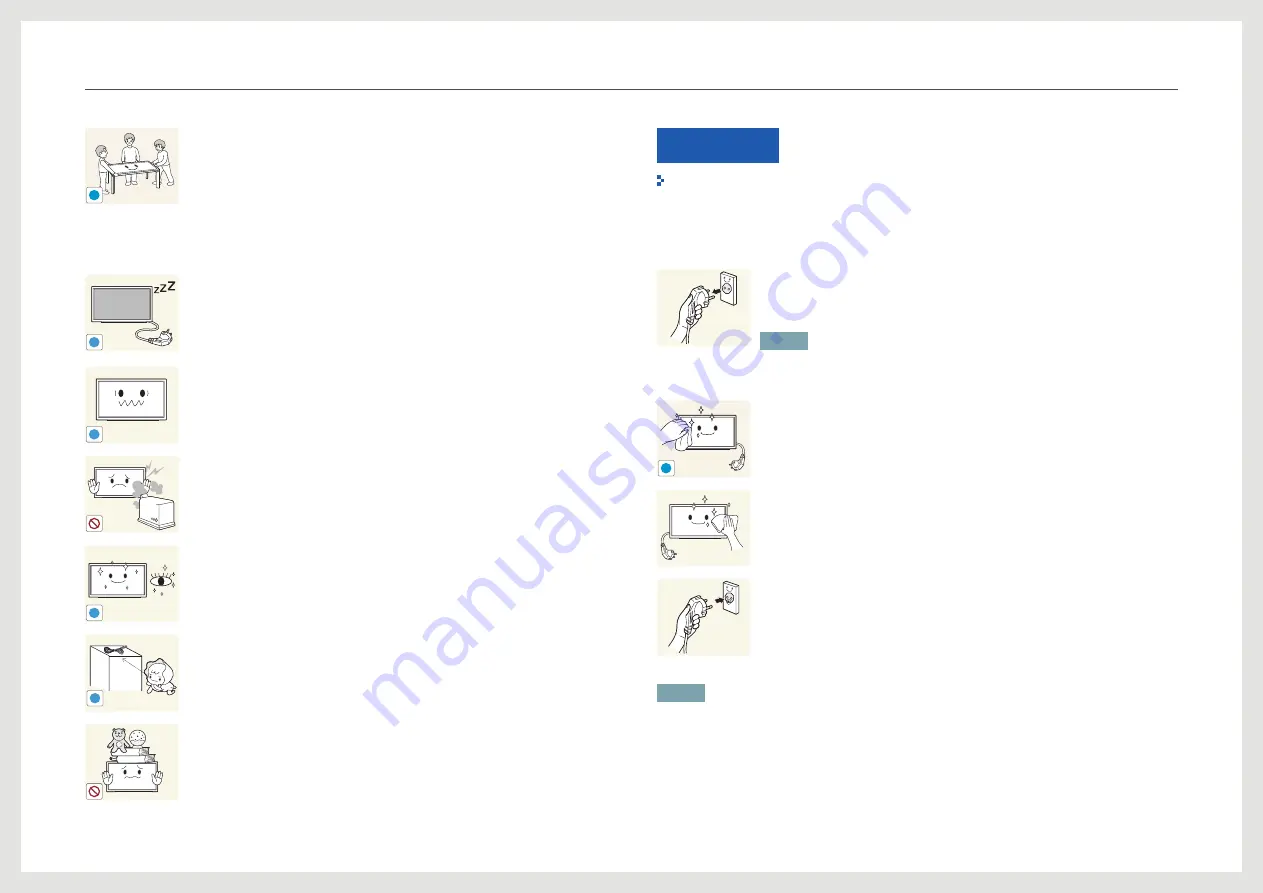
Ensure at least two persons help when moving the product as a safety 
precaution.


-

The product is heavy and may cause personal injury.

Caution

-_-

!

Disconnect the power cable from the power socket if you do not plan on 

using the product for an extended period of time (vacation, etc.).


-

Dust accumulation combined with heat can cause a fire, electric shock or 

electric leakage. 

!

Use the product at the recommended resolution and frequency.


- Your eyesight may deteriorate. 

Do not use humidifiers or stoves around the product.


-

A fire or electric shock may result.

!

Rest your eyes for more than 5 minutes for every 1 hour of product use.


-

Eye fatigue will be relieved.

!

Store small accessories out of the reach of children.

Do not place heavy objects on the product.


-

Product failure or personal injury may result.

Cleaning

The following images are for reference only. Real-life situations may differ from what is 
shown in the images. 

The panel and exterior of the cutting-edge LCD product scratch easily and require careful 

attention. Clean the product according to the following steps:

1.  Power off the product.

2. 

Remove the power cable from the product.

 NOTE 

Hold the power cable by the plug and do not touch the cable with wet 

hands. Otherwise, an electric shock may result.

!

3.   Wipe the product screen using a clean, soft and dry cloth.


- Do not use detergents that contain alcohol or solvent.


- Do not spray water or detergent directly on the product.

4.  To clean the exterior of the product, use a moist soft cloth and wring 

thoroughly before wiping the exterior.

5. 

After cleaning the product, connect the power cable to the product.

6.  Power on the product to use it.

 NOTE 

During use, the screen can be cleaned with a soft and dry cloth to remove finger prints or 

smudges.

Storage

Due to the characteristics of high-glossy products, using a ultrasonic humidifier nearby may 

create white-colored stains on the product.

Summary of Contents for SUR40

Page 1: ...al Samsung SUR40 for Microsoft Surface The color and the appearance may differ depending on the product and the specifications are subject to change without prior notice to improve the performance BN46 00030A 04 ...

Page 2: ...of Microsoft Corporation VESA DPM and DDC are registered trademarks of the Video Electronics Standards Association Ownership of all other trademarks is attributed to their due owner An administration fee may be charged if either a an engineer is called out at your request and there is no defect in the product i e where you have failed to read this user manual b you bring the unit to a repair cente...

Page 3: ... arrives 22 Installing the Wall Mount 22 Preparing before installing Wall Mount 22 Installing the Wall Mount Kit 22 Wall Mount Kit Specifications VESA Chapter 3 CONNECTING AND USING A SOURCE DEVICE 23 Checklist before Connecting to Source Devices 23 Pre connection Checkpoints 24 Before using the product 25 Connecting to an External Display 26 Connecting to a Source Device Chapter 4 USING THE PRODU...

Page 4: ...IFICATIONS 38 General 39 Power Consumption 39 Screen Water Ingress Conditions 40 Dimensions Chapter 8 APPENDIX 41 Contact SAMSUNG WORLDWIDE 44 Correct Disposal 45 Responsibility for the Pay Service Cost to Customers 46 Optimum Picture Quality and Afterimage Burn in Prevention 46 Optimum Picture Quality 46 Prevention of Afterimage Burn in ...

Page 5: ...ituations may differ from what is shown in the images Warning Do not use a damaged power cable or plug or a loose power socket An electric shock or fire may result Do not use multiple products with a single power socket Overheated power sockets may cause a fire Do not touch the power cable with wet hands Otherwise an electric shock may result Insert the power cable all the way in so it is not loos...

Page 6: ... reference only Real life situations may differ from what is shown in the images Warning DO NOT PLACE CANDLES INSECT REPELLANTS OR CIGARETTES ON TOP OF THE PRODUCT DO NOT INSTALL THE PRODUCT NEAR HEAT SOURCES A fire may result Have a technician install the wall mount hanger Installation by an unqualified person can result in an injury Ensure you use the wall mounts kit of specified VESA size Do no...

Page 7: ...roduct should operate continuously for an extended period of time may seriously affect its performance Be sure to consult Samsung Customer Service Center if you want to install the product at such a place Operation and Safety The following images are for reference only Real life situations may differ from what is shown in the images Warning There is a high voltage inside the product Never disassem...

Page 8: ...or an inflammable substance near the product An explosion or fire may result Ensure the vents are not blocked by tablecloths or curtains An increased internal temperature may cause a fire 100 Do not insert metallic objects chopsticks coins hairpins etc or objects that burn easily paper matches etc into the product via the vent or input output ports etc Be sure to power off the product and disconne...

Page 9: ... only Real life situations may differ from what is shown in the images The panel and exterior of the cutting edge LCD product scratch easily and require careful attention Clean the product according to the following steps 1 Power off the product 2 Remove the power cable from the product NOTE Hold the power cable by the plug and do not touch the cable with wet hands Otherwise an electric shock may ...

Page 10: ... of actual components may differ from the images shown 1 Remove the black locking device at the bottom of the box 3 2 2 Using the grooves in the box lift and remove the top of the box 3 Check the components and remove the styrofoam and plastic bag Preparation Chapter 2 ...

Page 11: ... your nearest retailer HDMI cable HDMI DVI cable RCA stereo cable Optical cable LAN cable Table legs VESA mount Parts Side View NOTE The color and shape of parts may differ from what is shown Specifications are subject to change without notice to improve quality The table legs are sold separately To locate the buttons and ports detach the jack cover from the product SD SD BUTTONS AND PORTS FUNCTIO...

Page 12: ... Connect to an audio output device to produce higher quality audio output optical HDMI IN Connects to a source device using a HDMI cable or HDMI DVI cable HDMI OUT Connect to another display using the HDMI or HDMI DVI cable LAN Connect to a network using the LAN cable USB Connect to a USB device keyboard mouse etc A Speakers Tidy up the Wires NOTE The table legs are sold separately Preparation LAN...

Page 13: ...ding where to unpack a SUR40 and what you need to have ready for the installation to proceed efficiently and successfully Checklist Before your unit arrives lists the information and preparations you should have ready when your SUR40 is delivered including choosing the unpacking and staged locations and creating the appropriate passwords For more information on the Samsung SUR40 for Microsoft Surf...

Page 14: ...should address the following questions Will the area accommodate the size of the SUR40 Will people be able to approach the unit from all four sides Will people be able to approach the unit from the front and stand side by side if vertically mounted Will people have enough space to interact with the unit from any point around the display without impeding nearby traffic flow when horizontally mounte...

Page 15: ... tool The SUR40 uses an amazing new technology called PixelSense to sense fingers and objects touching the screen This exciting capability is possible because it sees and reacts to light taking sixty pictures every second in a way that is similar to a movie camera or the human eye Those pictures are rapidly analyzed to provide the incredible interactions that are available on SUR40 Like anything o...

Page 16: ...R40 you may have to change or modify the light during the day or throughout the year For example natural or indirect light might darken during the evening requiring you to turn up fluorescent lighting that is installed specifically for the unit Evaluate changing lighting conditions over time to provide a better sense of how lighting levels may vary See Evaluating lighting conditions data for thres...

Page 17: ... will help improve accuracy 3 Make sure to correctly note the type of lighting you are measuring As noted earlier some lights are better than others Knowing the exact kind of light you are using will help you determine if the environment lighting conditions exceed the maximum safe lux values Evaluating lighting condition data When you have the readings it is important to know which lighting types ...

Page 18: ...e all the appropriate cables and connections available and conveniently located so that you can route all the cables efficiently and safely around the SUR40 device NOTE SUR40 includes a power cord but it does not include any other connection cables Electrical power SUR40 includes an AC power cord that is 300 cm 118 1 in Choose a location for your unit that is close enough for this cord to plug in ...

Page 19: ...irst time users Make sure you also consider the visibility and cleanliness of the SUR40 and what other attractions or noise might impact whether people are attracted to a SUR40 device Visibility A clearly defined area separates a SUR40 from its surroundings highlights it as a centerpiece and attracts people to come closer and interact with the unit But before people can approach a SUR40 they must ...

Page 20: ...ating to get closer to the SUR40 You should choose seats that have a firm front edge to enable this type of sitting and to make sure that people don t fall or tip off the seats You should choose seats that are lower than the height of the display when horizontal This height reduces how much people have to bend from the waist and provides a more comfortable experience If you provide seats you shoul...

Page 21: ...ed energy efficient compact fluorescent lights CFLs or cool white LEDs to light the surrounding area Measure and evaluate environmental lighting conditions Fine tune lighting with the Environment Lighting Optimizer after deploying SUR40 Administration Prepare an administrator account name and password to use when the technician sets up the SUR40 Prepare a machine name for each unit Connections Mak...

Page 22: ...tailed installation manual and all parts necessary for assembly are provided Do not use screws that do not comply with the VESA standard screw specifications Do not use screws that are longer than the standard length or do not comply with the VESA standard screw specifications Screws that are too long may cause damage to the inside of the product For wall mounts that do not comply with the VESA st...

Page 23: ...tion of the source device is Full HD 1080p Pre connection Checkpoints Check the available ports on the back of the source device Refer to the user manual for the source device when connecting it to the product The number and locations of ports can vary depending on the source device Do not connect the power cable until all connections are completed Connecting the power cable during connection may ...

Page 24: ...IN ON 1 Connect the power cable to the product and power outlet Next turn on the power switch Connecting USB Devices USB USB 1 Connect a USB device keyboard mouse etc to a USB port on the product NOTE USB 2 0 devices are supported Connecting and Using a Source Device ...

Page 25: ...s the button on the product Go to Input source on the on screen display menu Next select HDMI Connection Using an HDMI DVI Cable HDMI OUT DVI IN AUDIO IN 1 Connect the HDMI DVI cable to HDMI OUT on the product and DVI IN on the external display 2 Connect the RCA cable to AUDIO OUT on the product and AUDIO IN on the external display 3 Connect the power cable to the product and turn on the power swi...

Page 26: ...he product using a later version of HDMI If such a problem occurs ask the manufacturer of the source device for the HDMI version If it is an older version request an upgrade This product does not support the Ethernet function via HDMI This product supports HDMI version 1 3 Audio output will not be supported if the audio content is protected Connecting to an Amplifier DIGITAL AUDIO OUT OPTICAL OPTI...

Page 27: ... memory card into SD on the product NOTE The maximum external memory capacity may vary depending on the memory card Connection Using the LAN Cable HUB LAN 1 Connect the LAN cable to LAN on the product NOTE It is not supported when the network speed is below 10 Mbps Ensure you use the CAT 5 STP type cable Shielded Twist Pair Connecting and Using a Source Device ...

Page 28: ...cts using Surface tags 8 bit optical tags can trigger digital content and control an application experience Learn more about the unique features of Surface computing and this device at www samsunglfd com or www surface com Windows and Surface Mode NOTE In Surface mode the product can only be controlled by touch input Windows mode is the standard Windows 7 desktop which is used for product configur...

Page 29: ... back into Surface Mode from the Windows login screen Configuring the system Please follow the instructions provided in the Microsoft Surface 2 0 Administrators Guide which can be found on the CD that was included with this product via the Start Menu in Windows Mode or on www surface com Creating a Windows user account NOTE To use the product you must create a Windows user account during installat...

Page 30: ...st time after purchase Specify the OS language you want to install Then click Next 2 Configure the country time and keyboard settings Country or region Time and currency Keyboard layout Then click Next 3 Enter your user and computer names Then click Next 4 Enter your password and click Next 5 Proceed to the rest of the installation process following the on screen instructions A user account will b...

Page 31: ...ng sections Default Location The default location that is displayed on map searches as a star icon To change the default location type the location you are interested in click the search icon and then select the radio button that best reflects the location you are interested in Map Default Location Label This location is displayed when you click the star icon that shows your current location The f...

Page 32: ... objects When a tagged object that matches the series and value specified in the configuration tool is placed on the display a Search button will appear that will allow a user to search for the registered term without having to type it Both Image and Map searches can be done as predefined searches by entering a tag series tag value search type and search query as shown in the example below For ins...

Page 33: ...l System and Security Backup and Restore and click Recover system settings or your computer 2 Click Advanced recovery methods 3 Click Reinstall Windows 4 You will be prompted to confirm that you want to back up files as shown below Back up your important data After backup restart the system Re installation of Windows 7 will start NOTE You can also use recovery mode on the following method When boo...

Page 34: ...ais Deutsch Nederlands Dansk Italiano Norsk Español Svenska Version ㅤMCU M SU40MWWAC ㅤFPGA ㅤUSB 한국어 78 60 Exit Surface Mode Exit Reset Brightness You can adjust the general brightness of the picture Range 0 100 A higher value will make the picture appear brighter Volume Adjust the audio volume Input source Select an input source Reset Reset the menu properties to factory default value Exit Surface...

Page 35: ...x86 Microsoft Surface v2 0 SUR40CalibrationTool exe NOTE If a User Account Control window appears click Allow If the tool detects that the operating temperature is low less than 32 C you will receive a warning message To exit the tool without running calibration press Alt F4 3 Remove all items from on top of Samsung SUR40 for Microsoft Surface place the white side of the calibration board so that ...

Page 36: ...reen appears unstable and shaky Check that the resolution and frequency of the PC and graphics card are set within a range compatible with the product Then change the screen settings if required by referring to the Additional Information on the product menu There are shadows or ghost images left on the screen The screen is too bright The screen is too dark Adjust the Brightness in the OSD Audio is...

Page 37: ...operly Adjust the light intensity to be as dark as possible in the area where you are using the product In Windows mode use the Environmental Lighting Optimizer ELO tool to see if lighting is affecting product performance If necessary adjust lighting conditions Power the product off and on again ...

Page 38: ...0 60 Hz 576p 50 Hz 480p 50 60 Hz Interlace mode is not available PC Timing is not available The deep color feature is not available Only RGB444 mode is available YCbCr444 and YCbCr422 are not available HDMI Input Audio Format 2 channel L PCM Dimensions W x H x D Weight 1095 0 x 103 0 x 707 4 mm 36 8 Kg 43 11 x 4 06 x 27 85 inches 81 1 lbs Environmental conditions Operating Temperature 41 F 86 F 5 ...

Page 39: ...l area is likely to cause harmful interference in which case the user will be required to correct the interference at his own expense Recommendation EU Only Hereby Samsung Electronics declares that this Monitor is in compliance with the essential requirements and other relevant provisions of Directive 1999 5 EC The official Declaration of Conformity may be found at http www samsung com go to Suppo...

Page 40: ...2 mm 707 4 mm 103 0 mm NOTE All drawings are not necessarily to scale Some dimensions are subject to change without prior notice Refer to the dimensions prior to performing installation of your product Not responsible for typographical or printed errors ...

Page 41: ...msung com CHILE 800 SAMSUNG 726 7864 From mobile 02 482 82 00 http www samsung com COLOMBIA 01 8000112112 http www samsung com COSTA RICA 0 800 507 7267 http www samsung com DOMINICA 1 800 751 2676 http www samsung com ECUADOR 1 800 10 7267 http www samsung com EL SALVADOR 800 6225 http www samsung com GUATEMALA 1 800 299 0013 http www samsung com HONDURAS 800 27919267 http www samsung com JAMAICA...

Page 42: ...SAMSUNG 726 7864 http www samsung com ITALIA 800 SAMSUNG 726 7864 http www samsung com KOSOVO 381 0113216899 http www samsung com LUXEMBURG 261 03 710 http www samsung com MACEDONIA 023 207 777 http www samsung com MONTENEGRO 020 405 888 http www samsung com NETHERLANDS 0900 SAMSUNG 0900 7267864 0 10 Min http www samsung com NORWAY 815 56 480 http www samsung com POLAND 0 801 1SAMSUNG 172 678 48 2...

Page 43: ...msung com MOLDOVA 00 800 500 55 500 http www samsung com ASIA PACIFIC AUSTRALIA 1300 362 603 http www samsung com NEW ZEALAND 0800 SAMSUNG 0800 726 786 http www samsung com CHINA 400 810 5858 http www samsung com HONG KONG 852 3698 4698 http www samsung com hk http www samsung com hk_en INDIA 1800 1100 11 3030 8282 1800 3000 8282 1800 266 8282 http www samsung com INDONESIA 0800 112 8888 021 5699 ...

Page 44: ...uncontrolled waste disposal please separate these items from other types of waste and recycle them responsibly to promote the sustainable reuse of material resources Household users should contact either the retailer where they purchased this product or their local government office for details of where and how they can take these items for environmentally safe recycling Business users should cont...

Page 45: ...stomer requests software installation and setup for the product If a service technician removes cleans dusts or foreign materials inside of the product If customer requests an installation additionally after purchasing a product through home shopping or online A Product damage caused by customer s fault Product damage caused by customer s mishandling or wrong repair If a product damage is caused b...

Page 46: ...lution other than the specified resolution may degrade the picture quality To avoid this it is recommended that you select the optimum resolution specified for your monitor Light leakage could be on the edge of SIP panel caused by functionality of SIP Panel but it does not affect performance of the product SIP Sensor in Pixel It is likely to be seen at low contrast and black screen To minimize the...

Page 47: ...se bright colors of similar brightness Interval Change text color and background color every 30 minutes FLIGHT TIME OZ348 20 30 FLIGHT TIME OZ348 20 30 FLIGHT TIME OZ348 20 30 FLIGHT TIME OZ348 20 30 Move and change text every 30 minutes as shown below FLIGHT TIME OZ348 FLIGHT TIME OZ348 20 30 Step 1 Step 2 Step 3 20 30 Regularly display a moving image along with a logo Interval Display a moving i...

Page 48: ...ser account 29 I Items sold separately 11 Input source 34 M Memory card 27 O On Screen Display Menu 34 R Rear View 12 Re installing Windows 7 33 Reset menu properties 34 S Screen resolution 38 Size 38 Sound 36 Surface Mode 28 T Troubleshooting 36 Touch 37 V Volume 34 Index ...

Reviews: