background image

8

Familiarize yourself with these home maintenance tasks as proper use and care of your cleaner will ensure 
continued cleaning effectiveness.

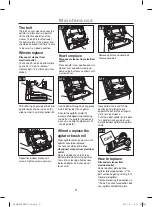
When to empty the Dirt Cup

The dirt cup needs to be emptied when the dirt reaches the "MAX" line on the side of the Cup.
If more dirt than this accumulates, your cleaner will not operate effectively.

Note: All new carpet has loose fibers which can fill the Dirt Cup quickly while vacuuming.

Emptying the Dirt Cup

Disconnect cleaner from electrical outlet.

Slide the Cyclone-lever to the

"Unlock" position.

grasp handle and pull the dirt 

Cup straight out to remove from 

Vacuum.

Empty dirt into garbage container.

Put the dirt Cup back in the 

vacuum and slide the lever to the 

"lock" position.

Cleaning The  Circular 
Filters

grasp the Filter Cup located at

the bottom of the dirt Cup and 

twist counterclockwise to unlock 

and remove.

3-2

3-3

Cleaning the Pre/Post-motor Filter

How to clean

Disconnect cleaner from 

electrical outlet.

The Pre-Motor Filter protects the

Motor from debris.

It is located underneath the dirt

Cup and Filter Cup in the

Center of the round part of the

Cyclone-lever.

Remove the small round Filter

and any debris on top of it. Rinse

well under warm water, then air

dry thoroughly before replacing.

3-6

grasp the Circular Filters and twist

to unlock Pull straight up to 

remove.

Separate the Outer foam and Inner 

pleated Circular Filters.

Wash each individually by hand

in warm water. Mild detergent may 

be used if desired.

Rinse well, then air dry Thoroughly 

dry before putting them back 

together and replacing in the Filter 

Cup The Filter Cup may be 

washed In warm water with a mild 

detergent. Make sure it is 

completely dry before 

reassembling with fliters.

Do not operate cleaner without

Either the Pre-Motor Filter or

Post-Motor Filter in place.

3-4

Pre-Motor 

Filter

3-1

Unlock

Position

lock
Position

MAX line

Maintenance

The Post-Motor Filter assists in the 

filtration process to return clean air 

to the room. It is located behind 

the door on the front of the 

Cleaner.
When the filter becomes dirty,

The Hepa-Filter : 

Open the door, remove the filter 

and replace.

The Hepa-Filter is not washable 

and must be replaced.

Replace the door by inserting the 

tabs on the left side and snapping 

the right side into place.

3-5

hepa-Filter

DJ68-00294R(0.0).indd   8

2011.4.1   2:17:54 PM

Summary of Contents for SU4341

Page 1: ...To receive a more complete service please register your product at www samsung com register Vacuum Cleaner user manual Before operating this unit please read the instructions carefully For indoor use only English SU 4340 SERIES DJ68 00294R 0 0 indd 1 2011 4 1 2 17 32 PM ...

Page 2: ...tents IMPORTANT SAFETY INSTRUCTIONS 3 Identifications of parts 4 Attaching the Handle 4 Attaching the Hose and Tools 5 Operation 5 Maintenance 8 Troubleshooting 11 DJ68 00294R 0 0 indd 2 2011 4 1 2 17 33 PM ...

Page 3: ...r fine wood fine wood sandings or use in areas where they may be present Store your vacuum cleaner indoors in a cool and dry area Avoid picking up hard sharp objects with the cleaner They may damage the cleaner Always turn off this appliance before connecting or disconnecting the hose removing the bottom plate for maintenance Use only on dry indoor surfaces never change the plug in any way Do not ...

Page 4: ...justment Dial 18 Hose Clip 19 Mini Turbo Brush WARNING OPERATE THE VACUUM CLEANER ONLY AT THE VOLTAGE SPECIFIED ON THE NAMEPLATE Step 1 Attaching the Handle Front Back 1 1 Assembling Parts Stand the vacuum upright and slide the base of the handle firmly into the grooves at the top of the vacuum body Insert the screw provided into the existing hole Tighten the screw securely with a screwdriver Befo...

Page 5: ... move your cleaner from room to room put the handle in upright position tilt the cleaner back on its rear wheels and push forward Step 2 Attaching the Hose and Tools Slide the extension wand and the crevice tool together into the storage clip Attach the Mini Turbo Brush by putting the rib at the bottom of Mini Turbo Brush on two hooks of Handle Snap Mini Turbo Brush into place as shown 1 6 1 7 Lin...

Page 6: ... brush to stop rotating option E Wooden Floor Brush Select Models Use for bare floors Swivel head turns to get into tight spaces and fits under cabinets Note The Wooden Floor Brush does not store on board Carrying handle The cleaner can also be moved by using the carrying handle 2 4 Cleaning Tool attachments Attachment tools can be used to clean furniture or drapes on stairs or in corners When usi...

Page 7: ...e vacuum does not remain flat and level this could result in damage to the flooring caution To reduce risk of injury and potential damage to floor surface do not use the vacuum on a staircase Always use vacuum from the bottom of the staircase and ensure that the vacuum remains securely flat on the floor surface Operation caution DJ68 00294R 0 0 indd 7 2011 4 1 2 17 52 PM ...

Page 8: ...lter Cup in the Center of the round part of the Cyclone Lever Remove the small round Filter and any debris on top of it Rinse well under warm water then air dry thoroughly before replacing 3 6 Grasp the Circular Filters and twist to unlock Pull straight up to remove Separate the Outer foam and Inner pleated Circular Filters Wash each individually by hand in warm water Mild detergent may be used if...

Page 9: ... card across bottom plate while turning agitator To maintain cleaning effectiveness replace agitator if brushes do not touch card Grasp agitator firmly and fit it into position by first sliding the end opposite the belt into the rectangular slot F on side of cleaner Pull other side of agitator G into place Turn agitator making sure belt is not pinched between agitator and agitator shield 3 10 With...

Page 10: ...e Brush bar Replacement Remove the tool from the hose and turn upside down Slide the switch to unlock position Remove bottom plate And remove brushbar and discard Inspect belt to ensure that it is in good condition If broken or cracked please replace See below for details With the curved ends facing down slide end plates of brushbar into slots on the tool To replace bottom plate insert the four ta...

Page 11: ... air flow passage Clear clogs clean filters as per manual instructions Possible Cause Possible Solution Dirt Cup improperly installed Re install the Dirt Cup Problem Dust escapes the Dirt Cup Possible Cause Possible Solution Strange sound like rushing air Check for clogs in hose nozzle area and or filters clear or claen any clogs or blockages as per manual instructions Problem Abnormal sound Possi...

Page 12: ...DJ68 00294R REV 0 0 DJ68 00294R 0 0 indd 12 2011 4 1 2 17 59 PM ...

Reviews: