background image

64_


web viewer

web viewer

Item

Description

SENSOR IN

Display the sensor input channel.

SENSOR OUT

Display the sensor output channel.

MIC

Specify the use of the microphone.


Log

Display the event log.

Display Pane

Display the video from the camera that is connected to the DVR.

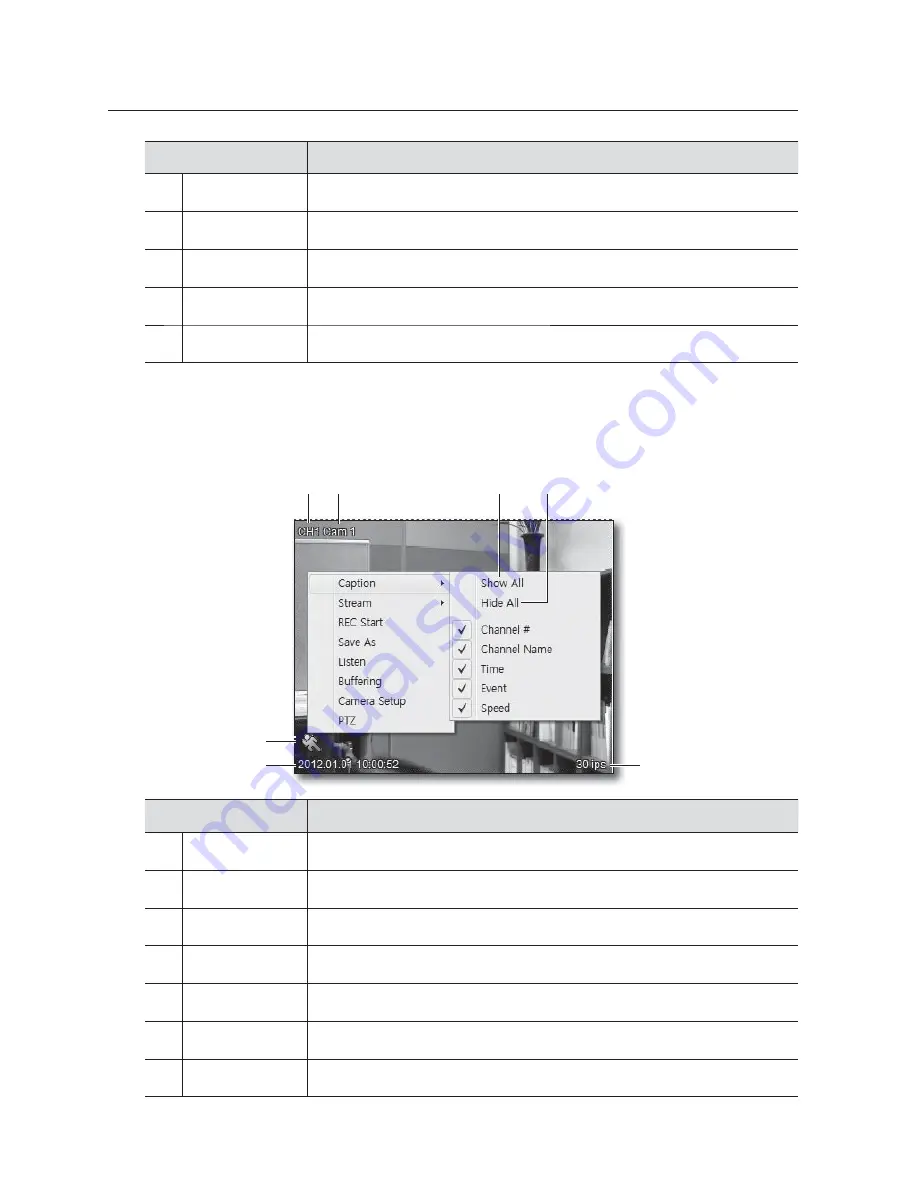
OSD Information

Place the cursor on the channel screen and right-click any area to display the context menu where you can 
select to display or hide the information on the OSD screen.

Item

Description

Channel #

Display the channel number.

b

Channel Name

Display the channel name.

c

Show All

Display all OSD information.

Hide All

Hide all OSD information.

Speed

Display the transfer rate of network streaming.

Time

Display the system time of the DVR.

Event

Display the icon applicable to the event that occurred.

b

Summary of Contents for SRD-480D

Page 1: ...4 CHANNEL HD SDI DVR User Manual SRD 480D ...

Page 2: ...msung Techwin Disclaimer Samsung Techwin makes the best to verify the integrity and correctness of the contents in this document but no formal guarantee shall be provided Use of this document and the subsequent results shall be entirely on the user s own responsibility Samsung Techwin reserves the right to change the contents of this document without prior notice Design and specifications are subj...

Page 3: ...ong The wide blade or the third prong are provided for your safety if the provided plug does not fit into your outlet consult an electrician for replacement of the obsolete outlet 10 Protect the power cord from being walked on or pinched particularly at plugs convenience receptacles and the point where they exit from the apparatus 11 Only use attachments accessories specified by the manufacturer 1...

Page 4: ...ive heat such as sunshine fire or the like Risk of Explosion if Battery is replaced by an Incorrect Type Dispose of Used Batteries According to the Instructions System Shutdown Turning off the power while the product is in operation or undertaking improper actions may cause damage or malfunction to the hard drive or the product For safety purpose press the Power button on the front panel of the DV...

Page 5: ...ation environment 15 Rack Installation 15 HDD Addition CONNECTING WITH OTHER DEVICE 18 18 Wiring diagram for external devices 18 Connecting the camera monitor and audio 19 Connecting to an external storage device 20 Using the I O ports 24 Network Connection LIVE 27 27 Getting Started 29 Using the Live menu 31 Event monitoring MENU SETUP 32 32 Quick Setup 33 Display Setup 34 Record Setup 38 Event S...

Page 6: ...Web Viewer 62 Connecting to the web viewer 63 Using the Live Viewer 69 Using the Search Viewer SMARTVIEWER 72 72 Setup Viewer 72 System Setup 79 Device Setup 81 Event Setup 85 Record APPENDIX 86 86 Product Specification 89 Product Overview 90 Troubleshooting 93 Open Source License Report on the Product ...

Page 7: ...gh quality HD SDI live video Multi angle Monitoring Screen Modes Single 4 split Auto Sequence Various monitor output signals supported output resolution 1920x1080 HDMI x1 VGA x1 Pan Tilt Digital Zoom Voice Recording Real time voice input and recording Simultaneous recording of 4CH sound signals in real time Input 4 rear RCA x4 Output x1 rear Recording enabled during playback Record It can save a h...

Page 8: ...SVS 5R sold separately as a dedicated device Network The product supports various network environments including LAN and xDSL where you can use the PC viewer to operate and manage the product in a remote site E mail transfer using TCP IP and DHCP when an event occurs Play the live video from a remote site full screen or 4 split mode selectable Play save or search on the PC and control the DVR via ...

Page 9: ...e in which case the user will be required to correct the interference at his own expense Package Contents Please unwrap the product and place the product on a flat place or in the place to be installed Check if the main unit and all the following accessories are included in the product package REC MULTI MENU AUTO PTZ ZOOM SEARCH COPY FUNC COPY 1 1 REC HDD EVENT PLAY NETWORK PAUSE ENTER FWD REW STO...

Page 10: ... Used to navigate or make selection in the menu or to change the backward play speed in play mode FWD Used to navigate or make selection in the menu or to change the forward play speed in play mode PAUSE Used to navigate or make selection in the menu or to stop playing the live video temporarily STOP Stop playing in play mode PLAY ENTER Access the play mode or select a menu item ESC Used to exit t...

Page 11: ...ate or deactivate the user sequence SEARCH Access the search mode PTZ Start or end the PTZ operations COPY Access the copy mode ZOOM Enter the digital zoom mode from the single screen mode FUNC Access the function mode Channel Select a channel in Live video or play screen USB1 USB2 Communication ports for external devices mouse USB memory English _11 ...

Page 12: ...evices such as PTZ camera or remote keyboard GND Earth grounding for the DVR unit and external devices NETWORK Network connection port RJ 45 eSATA Connection port for an eSATA external HDD HDMI HDMI port for monitor output signal VGA Out Connection port for VGA monitor m RS 232C Connection port for the POS device eSATA HDMI VGA COM1 SERIAL AUDIO IN CH 1 CH 2 CH 3 CH 4 AUDIO OUT External l O Termin...

Page 13: ...es with that of the DVR remote device For details refer to Communication Remote page 46 STATUS Show the system configuration information MULTI Change the split mode ID 1 2 3 4 5 6 7 8 0 10 FN1 FN2 9 MULTI AUTO MENU ESC P T LOAD PRESET AUX ON SEARCH COPY DISP PTZ STATUS ZOOM MON PIP FUNC Channel Button Select a channel MON Not used ID Select a remote control ID Decrease the play speed or play backw...

Page 14: ...fit a filter at the inlet to screen dust or foreign substances 6 Please maintain the temperature inside the rack or surrounding areas between 0 C 40 C 32 F 104 F as shown in the figure 1 Rack Mount Instructions The following or similar rack mount instructions are included with the installation instructions A Elevated Operating Ambient If installed in a closed or multi unit rack assembly the operat...

Page 15: ...the HDD is free from such shock We are not liable for any damage to the HDD incurred by user s carelessness or miss use Cases might cause damage to HDD or recorded data To minimize the risk of data loss from a damaged HDD please copy data as often as possible Data may be lost due to external impacts during disassembly or installation of the DVR HDD may be damaged if the DVR is suddenly stopped by ...

Page 16: ... installation Installing the HDD 1 Loosen the bracket screws on the man unit 2 Pull out the main unit slightly backward to remove the bracket 3 Insert and mount the HDD bracket and tighten the left and right HDD screws ...

Page 17: ...on the bottom right is IntA the bottom left is IntB the top right is IntC and the top left is IntD M The SATA cable is already connected inside by default English _17 eSATA NETW ORK HDMI VGA COM1 SERIA L GND CH 3 CH 4 CH 1 CH 2 HD SD I AUDIO IN CH 1 CH 2 CH 3 CH 4 AUDIO OUT AC 100 240 IN D C B A Term ination On Off 1 2 G ALARM IN 1 2 3 4 G COM COM COM COM G _ _ COM2 COM1 RS485 ALAR M OUT Exter nal...

Page 18: ...ed monitors can be used simultaneously for video output if either monitor supports both resolutions of 1080p and 1920x1080p RB Power Connection When the DVR is connected to the power source it will be applied with power and start booting automatically With DVR turned on press and hold the Power button for 3 seconds to display the dialog Click YES to turn off the power If you want to turn it back o...

Page 19: ...nsity foaming insulation The dual or triple shield cable is recommended For recommended cable specifications refer to KSC 3617 domestic standard 5C FBT and RG 6 U DC LOOP resistance of 31 3Ω km or lower is recommended When extending coaxial cable and attaching connector make sure to use parts of 75Ω impedance Pay attention to cables when working to avoid cable deformation by pressure When cabling ...

Page 20: ... the retailer Registering an formatting the HDD When the HDD is installed completely turn on the DVR to start booting The Disk Manager will get started automatically on the monitor screen Page 50 If the Disk Manager does not get started check if you have made the connection correctly USING THE I O PORTS How to handle the wiring cables The wires used on the terminal block should be handled as follo...

Page 21: ...width of input pulse Min 200ms Output current Typical DC 12mA If using the alarm input port See the picture below for connecting the alarm inputs ALARM IN 1 4 The picture below provides an example of the connection of alarms featuring dry contacts For inserting or removing the wire refer to How to handle the wiring cables page 20 English _21 G _ _ COM2 COM3 RS485 G COM COM COM COM On Off G _ AUD I...

Page 22: ... between R1 R4 refer to the figure below This is an example of connecting the warning light For inserting or removing the wire refer to How to handle the wiring cables page 20 G COM COM COM COM On Off G _ AUD IO IN _ COM 2 COM 3 RS485 ALA RM OUT eSA TA HDMI VGA COM 1 SER IAL CH 1 CH 2 CH 3 CH 4 CH 3 CH 4 CH 1 CH 2 AUD IO OUT External l O Termination GND NETWORK 1 2 3 4 1 2 HD S DI G ALA RM IN 1 2 ...

Page 23: ...w and the wiring diagram For inserting or removing the wire refer to How to handle the wiring cables page 20 Wiring diagram for serial communications Tx Rx GND CD COM1 Text Transparent Keyboard RXD TXD DTR DSR RTS CTS RI GND 1 2 3 4 5 6 7 8 9 Wiring diagram for COM1 RS 232 Text Keyboard COM2 COM3 GND Transparent Wiring diagram for COM2 COM3 RS 485 Keyboard PTZ English _23 G COM COM COM COM On Off ...

Page 24: ...itoring using the PC as if you were in the scene Network connection via Ethernet 10 100BaseT Set the type to Ethernet and enter the IP Net Mask Gateway and DNS Select a desired position and use the front button or use the mouse wheel to set the position 1 Turn off the power 2 Connect the Ethernet cable to both DVR and hub 3 Turn back on the power G COM COM COM COM On Off G _ AUDIO IN _ COM 2 COM 3...

Page 25: ...I VGA COM1 SER IAL CH 1 CH 2 CH 3 CH 4 CH 3 CH 4 CH 1 CH 2 AUD IO OUT External l O Termination GND NETWORK 1 2 3 4 1 2 HD SDI G ALARM IN 1 2 3 4 AC 100 240 IN Network xDSL Modem Switch Windows Network Viewer RJ 45 Ethernet Cable Direct Cable Phone ADSL Line G COM COM COM COM On Off G _ AUD IO IN _ COM 2 COM 3 RS485 ALARM OUT eSATA HDMI VGA COM1 SER IAL CH 1 CH 2 CH 3 CH 4 CH 3 CH 4 CH 1 CH 2 AUD I...

Page 26: ...n 1 minute and enter the DDNS server IP and the user ID that you registered To prevent damage to the DVR you must connect the Ethernet cable before applying power Insert the Ethernet cable to the end for secure connection Turn on the DVR and check if you have made connection correctly M Refer to DDNS Setting Page 44 ...

Page 27: ...e password in the password dialog System Shutdown You can shut down the system only if you are logged in to the DVR Other user accounts than admin can shut down the system only if granted the Power Off permission 1 Press the Power button on the front panel for more than 3 seconds 2 If you are prompted to confirm the shutdown select YES live English _27 01 01 2012 01 10 25 Cam 1 54 44 ID All OOOO C...

Page 28: ... control Sequence Perform the sequence in the order specified in Sequence This is the same as the AUTO button on the remote control D Zoom Display the digital zoom menu This is the same as the ZOOM button on the remote control PTZ Display the PTZ control menu on the screen This is the same as the PTZ button on the remote control Search Move to the search menu screen This is the same as the SEARCH ...

Page 29: ...ress the front AUTO button or click the button in the Function menu bar Press the button again or select the Auto Sequence item in the Function bar to stop the sequencing M The dwell time will be displayed according to the channel and time specified in Display Setup Monitor page 34 Switching to the single screen mode Move the cursor to a desired channel in the split mode and double click it to swi...

Page 30: ...ing the function The selected channel will be boxed in blue PTZ control in a split mode In a split mode press the PTZ button in the front panel or click F from the Function menu to enter the PTZ control mode Select a channel and press the P T button You will see the symbol in the center of the selected channel Note that if you control the Pan Tilt operations for channel 2 you are doing that in the...

Page 31: ... control or use the mouse wheel to select a preset number 3 When the preset is determined select Save and press ENTER or just click it Menu Used to access the console menu of the connected PTZ device You can use the on the front panel or ENTER button to select a console menu When done press ESC or PTZ on the front panel to exit the console menu EVENT MONITORING You can set to display the popup vid...

Page 32: ...details can differ depending on the option M For more information about event recording refer to Event Setting page 38 Language Select a preferred OSD language M For more information refer to System Setting page 48 Time It sets the time applied to the system M If you change the time during recording you may have redundant data For time settings refer to To specify the time page 49 Audio Recording ...

Page 33: ...ake recoding or network monitoring set it to Off Using the virtual keyboard 1 If you want to change the camera title DVR name or user ID password use the virtual keyboard 2 Use the front direction buttons to select a character and press ENTER Or you can simply click a desired character one by one 3 When done use the front direction buttons to move to the Enter button and press ENTER Or simply clic...

Page 34: ...ote control ID and text For a recording video you can select to display the time command channel name event or text RECORD SETUP Record Settings MENU ENTER ENTER Record Mode Select record mode Manual Event Select this if you want to make manual recording Schedule Event Select this if you want to make recording schedule in advance M The manual recording will be enabled only if you set the record mo...

Page 35: ... gain sync video channel and audio mix For more information about audio settings refer to To configure the audio settings page 37 To make scheduled recoding The DVR will start recoding as scheduled and programmed 1 Set Record Mode to Schedule Event and press ENTER 2 Use the arrow button to move to Schedule and press ENTER You will see the schedule setup screen Specify a program for each day or tim...

Page 36: ...ngs J If you make a duplicate setting in the same time the duplicate items will be marked in the table If you configure the time line settings the existing ones cannot be included To make event recoding You can set to make recoding of an event if it occurs To make event recording specify the resolution frame rate and quality to include in the program 1 Set Record Mode to Manual Event and press ENT...

Page 37: ...udio Mix Select an audio signal to use in live video If you set Mix On all incoming audio signals will be mixed before being output So if you select a specific audio it will be output regardless of the channel that you selected Program Setting You can adjust the frame rate and the video quality for a recording program that will be used for Manual Event and Schedule Event Select a program according...

Page 38: ...is because even if you set the frame rate to 0fps at least 2 3fps will be reserved for a reason such as network transfer Therefore if you want to use the remaining 30fps for other channel you must set the channel to Disable in the channel setup EVENT SETUP Event Setting Specify the event application time and dwell time MENU ENTER ENTER Event Detection Specify the application method for event recod...

Page 39: ...ource As system event source you can set some or whole of HDD Fail HDD Almost Full Fan Fail Password Fail DDNS Reg Fail and Abnormal Recording Stop To synchronize the event via email There are three ways to transfer via email non authentication SMTP authentication and TLS authentication 1 Select E mail for event synchronization 2 Specify the duration The email will be transferred at a specified in...

Page 40: ...if you specify the sender receiver of the email and other necessary settings properly To synchronize the event via FTP 1 Select FTP for event synchronization 2 Specify whether to upload via FTP The image will be sent every moment the event is active 3 Select FTP Setup and provide each item Server URL Provide the FTP server address User ID Provide the ID for connecting to the FTP server Password Pr...

Page 41: ...n Event Setup of the OSD menu Sync Text With Select a channel to synchronize with the text Seek Header If the information Manual VSI Pro VSI Pro Hydra from external devices contains other than the protocol this option will check how and what each item of the information consists of The header is a start item of each distinctive piece of information that will be inserted for your reference Set Seek...

Page 42: ...sired area and press ENTER The specified motion area will be boxed in grey 5 When done press ESC or right click to return to the previous menu Preset Setting You can control the preset specified in the PTZ function to react according to the event input MENU ENTER ENTER 1 Specify a preset to use as a PTZ operation for each channel 2 From the preset menu select a channel and specify the event to tri...

Page 43: ...mmunications Gateway This is a required field for communications DNS You must enter the DNS if you want to register DVR with DDNS M For information about Net Mask gateway and DNS1 contact the network administrator Port Enter the port number that you use to register the DVR with DDNS or try to access Smart Viewer or Web Viewer J The default port number is 4000 You should be careful when entering th...

Page 44: ...te that the DVR can produce You don t need to specify the limit manually because this is specified by the network admin Network Stream Specify the quality of video that is transferred from the DVR via the network DDNS Setting Select the DDNS server and specify the transfer interval MENU ENTER ENTER Interval Specify the registration frequency for continuous registration The dynamic IP information w...

Page 45: ...r and register the DVR Log in to the DDNS server and click Register Device to provide the domain information that you entered To register with Samsung DDNS 1 Register yourself at iPOLiS homepage www samsungipolis com 2 From the top menu bar select DDNS SERVICE MY DDNS 3 Click PRODUCT REGISTRATION 4 Enter the product ID You must perform the duplicate check for the ID that you entered 5 Select a CLA...

Page 46: ...Provide the IP of the DVR whose IP or NTP mode of the NTP server in the local network is set to Server Interval Specify the interval for time synchronization J If the NTP mode is set to Client NTP application should be set to On However if NTP application is set to On you cannot set the Time page 48 If you set to enable NTP the time of all recording data will be changed according to the applicatio...

Page 47: ...rt You can use a total of 3 serial ports for your settings One for RS 232C COM1 and two for RS 232C COM2 3 Text Since only COM1 port RS 232 supports text select COM1 in the serial port menu Interface Fixed to RS 232 Baud Rate Parity Bit Stop Bit Data Bit Configure the same settings with those of each device J For the input text no keyword search is available Keyboard If you want to use the keyboar...

Page 48: ... of DVR in the USB memory S W Upgrade Perform the software upgrade using the upgradable files in the USB memory DVR Alias Use the virtual keyboard to enter the DVR alias System Log If you change the menu settings for each user power on off change the time settings with time use the system event or HDD or make a copy all of them will be listed in the system log Time Specify the time and date that w...

Page 49: ...r the mouse to select it and press ENTER or simply click it Time Zone Use the front or mouse wheel to select a time zone Each time you press the arrow button the time zone will switch To return to the previous menu press the front ESC button or simply right click it This method is the same in all OSD menus Daylight Saving This will be in sync with your time zone setting Namely If you select an are...

Page 50: ...ply Date Time button Disk Check This will check the internal and external HDDs and enable you to add remove or format one as you want MENU ENTER ENTER DISK MANAGER You can use the disk manager to manage both internal external HDDs and external storage devices You can specify the HDD status error block size and use of HDD Type Display the disk location and type IntA internal HDD A IntB internal HDD...

Page 51: ...efore you can use it on the current device Security Security setting The DVR accounts are classified in two user and admin The admin account can access all features of the DVR without restriction You can add up to 10 users each of whom can use or access the DVR only within the permissions granted MENU ENTER ENTER Check From the Authority Settings menu If you set all items in the Check option to X ...

Page 52: ...e button 4 If you are prompted to confirm the change click YES EXIT Exit You can return to the Live screen with saving or without saving the settings in other menus MENU ENTER Save Select this if you want to save the settings in other menus If prompted to confirm your selection click YES Do not save Select this if you don t want to save the settings in other menus ...

Page 53: ... x32 x64 x1 2 x1 x2 x4 in this order If you press N in Live mode the video one minute before now Live mode time will be played You can press N in the Function menu bar to change the speed Pause Stop playing the video temporarily If using the mouse click M in the Function menu bar Play Play the video at x1 speed If using the mouse click L in the Function menu bar If you press in Live mode this will...

Page 54: ...tion menu bar press FUNC on the front panel or exit the Search menu and simply right click any area Time Search Specify the time and date for your search and press Search and you will move to the video on that specific date and time Start REC Time Display the time and date of the first recording End REC Time Display the last recorded time and date Search Time Select a time and date for your search...

Page 55: ...lect an item to change and turn the wheel to set your setting Start REC Time Display the time and date of the first recording End REC Time Display the last recorded time and date Search Start Time Specify the start time and date for your search Use the arrow buttons to move to a desired item and press ENTER While holding the button use the button to change the setting If using the mouse simply cli...

Page 56: ...n or mouse wheel to change the setting View Video Press Search to display up to 16 recording videos from the start time To return to the search window press the FUNC button or use the mouse wheel Select Video Click a thumbnail video item to start playing the videos from the selected timeline Press ENTER or click the item to play the video COPY You can copy a recording video Options available inclu...

Page 57: ...ze This function approximates the size of the data to be copied It calculates the size by unit of 1MB for footages of less than 1 hour long and uses unit of 256MB for longer than 1 hour EXE You can use the USB memory for copy You can use the mini player to play the file Select a channel position and press ENTER or use the mouse wheel to select it J The USB type of HDD is not supported Type Select ...

Page 58: ... data to be copied It calculates the size by unit of 1MB for footages of less than 1 hour long and uses unit of 256MB for longer than 1 hour MiniPlayer The mini player is a dedicated tool that will be copied along with the CD DVD or EXE copy You can change the spit mode of Miniplayer to your preference in Windows mode Double click a split screen to switch to Single mode The Filter function include...

Page 59: ...ed FWD Step Move forward by one step Image Save Save the image Image Print Print out the image File Open Open a selected file Audio On Off Listen to stop playing audio Show Previous Group Move to the previous split mode or single mode Show Next Group Move to the next split mode or single mode Audio Volume Control the audio volume Copy Time Display the copy time English _59 ...

Page 60: ...cify the copy duration Copy from the start time to as specified Use the button or the mouse wheel to change the setting Select Disk Select a medium to use for the copying Move to a desired disk and press ENTER or simply click it Start Start copying Press ENTER or just click it to start copying FAT32 Format Format the USB memory or eSATA HDD if not formatted in FAT32 before proceeding Press ENTER o...

Page 61: ...onal Windows Vista Home Basic Premium Windows 7 DirectX 9 0 or later Web Browser Internet Explorer 6 0 or higher CPU Core 2Duo 2 66GHz RAM 2GB or higher VGA Memory 512MB HDD 200GB or more M In the following cases you will see a message of Insufficient resource Then you can view the monitoring video only in a lower frame rate until the web viewer is connected back again If the web viewer is not gua...

Page 62: ...f the DVR The DVR settings will take priority over all other settings J The default password can be exposed to a hacking thread so it is recommended to change the password after installing the product Note that the security and other related issues caused by the unchanged password shall be responsible for the user 3 Download the zip file in the bottom of the login dialog Unzip it 4 Select a suitab...

Page 63: ...Viewer at a Glance If you open the web viewer the Live Viewer will be displayed in the start screen If you want to open a different viewer click LIVE in the top right corner Item Description Connection Information The model name of the DVR that is connected through the IP address will be displayed b Select Viewer Select one viewer from LIVE SEARCH and ABOUT c Screen Mode Switch to a split mode or ...

Page 64: ...Place the cursor on the channel screen and right click any area to display the context menu where you can select to display or hide the information on the OSD screen Item Description Channel Display the channel number b Channel Name Display the channel name c Show All Display all OSD information Hide All Hide all OSD information Speed Display the transfer rate of network streaming Time Display the...

Page 65: ...s original resolution on the screen If the stream s resolution is bigger than that of the monitor it fits to the screen resolution of full screen mode Click The 4 split mode will display the videos from the cameras connected to the DVR Click The video from the camera connected to the DVR will be displayed in Full Screen mode Full Screen To return to the previous mode right click to select Restore ...

Page 66: ... be played M If you click the button of a connected channel the current video will be disconnected and the screen will turn black Sensor Input This icon will be displayed if a sensor event occurs from the DVR If a sensor event occurs the sensor icon will turn red and the sensor number will be displayed on the screen If no sensor event occurs the icon stays in blue Sensor Output You can turn on or ...

Page 67: ...layed at a lower frame rate than requested Insufficient bandwidth low performance computer 3 or more concurrent users or the server is in operating for playback backup To make recording 1 On the current monitoring screen select a channel to record and right click it 2 In the context menu select REC Start You can make recoding for a max of 10 minutes For quick recording the recoding time will be di...

Page 68: ...nel 1 To play the audio select a channel and right click it 2 From the context menu select Listen Buffering Selecting the Buffering function will smooth the video as it displays the video at the same frame rate as the original Buffering will smooth the video and minimize the video delay However if the frame rate is below 15 it does not make much difference in smoothness Also buffering will increas...

Page 69: ...address will be displayed b Select Viewer Select one viewer from LIVE SEARCH and ABOUT c Screen Mode Switch to a split mode or full screen Connection Status The IP address and model name of the connected DVR will be displayed Save Image Capture or print out the current video Calendar Search for a date which can be marked if it contains any recording data Time Specify the time for your search and m...

Page 70: ...he Print Image dialog appears 3 Enter a memo if necessary and click OK The video image will be printed out containing the printing date channel name recording date event and memo M If the User Access Control UAC is turned on Web Viewer cannot access the printer If UAC is turned on and attempted to print captured scene by pressing the PRINT button a message of User Access Control is detected To use...

Page 71: ...date Watermark Not Tampered This indicates that the video is original Tampered This indicates that the original video is tampered with by someone Using the play button bar Item Description Fast Backward Play the video backward b Move one frame back Play reversely one frame by one c Reverse Play the video reversely Freeze Stop playing the current video temporarily Play Play the video at normal spee...

Page 72: ... information of the DVR For the items in blue you can double click one to change the settings When done click Apply to apply your changes SmartViewer This will display the DVR menu items If you click a menu item you will move to the setup page of the item If you change the setting in the setup page the Apply button on the bottom will be active Press the button to apply your changes Once you made c...

Page 73: ... you must register the DVRs with the Smart Viewer To export the configuration If you click Save you will see a window where you can specify the saving path of the configuration Name the exported file at your preference To import the configuration Click Load to open the Import Wizard Select a file in cci format from the file list Then the information of the selected file such as the product type ha...

Page 74: ...DVR the system time and date and network settings will not be affected Date Time Date Time Timezone Daylight Saving Time This menu is in sync with your time zone settings Namely If you select an area where DST is applied in the Time Zone menu DST will be automatically set to On Otherwise it will be set to Off Select Custom DST if you want to configure your own DST settings regardless of the standa...

Page 75: ... is the basis of providing the time In Client mode the time will be propagated from the time server In Both mode the DVR plays both of server and client Interval Specify the interval of receiving the time information if the NTP mode is set to Client 1 3 6 12 24 hr IP Type Select Public IP if the DVR obtains the time information from a public NTP server on the Internet Select Local IP if the DVR ob...

Page 76: ...ged Change Select a user password that you want to change J The default password can be exposed to a hacking thread so it is recommended to change the password after installing the product Note that the security and other related issues caused by the unchanged password shall be responsible for the user Authority You can set permissions for each user so that the user can use the menus as allowed IP...

Page 77: ...net network environment The user account and password are provided from the xDSL ISP service provider Even if the network line is of xDSL type you must set the network environment to Ethernet if a modem is used DDNS If the DVR is connected to the network using a dynamic IP the user cannot find out the IP assigned to the DVR If this is the case register the DVR with the DDNS service The DVR will ad...

Page 78: ...inate the connection with the client The default is 3 minutes 0 3600 sec Bandwidth Limit If you check this option the traffic of data transfer to the smart viewer or web viewer will be limited to a specific value M If you change the network settings the DVR will regain connection automatically Network Stream Resolution You can select a video resolution that will be used in data transfer via the ne...

Page 79: ...ts where the tab number corresponds to the COM port number Selecting a device to connect to the serial port Device types that can be connected to the serial port include PTZ Keyboard and Text PTZ Select this if you want to connect a PTZ device Select this option to display the setup details on the bottom Select an appropriate PTZ device If you jump to the PTZ setup page click Go Keyboard Select th...

Page 80: ...t Setting Press the Preset button to open the preset setup window Record remove Preset Select a preset to record from the list and move to a desired point of the video Provide the preset name and press Set Select a preset in the list and press Clear button The preset will be deleted M If you want to control the PTZ operations open the context menu and select PTZ With the PTZ item active place the ...

Page 81: ...ed volume Audio Recording Whether to save the audio settings or not EVENT SETUP Source Motion Select whether to activate the motion detection function for each channel You can select a sensitivity level of motion detection in the MD Sensitivity item If you set it to None any motion from that channel will not be detected The higher the level is the more sensitive the motion detection becomes Sensor...

Page 82: ... event The DVR provides 4 relays buzzer e mail and FTP transfer by default And you can operate the DVR in sync with events such as sensor input or motion detection Normal Event You can set the normal event source to one of 4 sensors 4 MDs 4 video losses and text System Event As system event source you can set some or whole of disk error HDD full fan error authentication failed and DDNS registratio...

Page 83: ...an event occurs will include the event image at the event occurrence time If you uncheck this option the email will be sent if an event occurs but with no image attached SMTP Auth TLS SMTP authentication uses the SMTP based email address or account to authenticate the email transfer E Mail Address Provide the email address at which you want to receive messages Sender Address Provide a valid curren...

Page 84: ...Directory Check this option if you want to create a sub directory under the directory that you have specified in the server in which you will save the transferred images Use characters or numeric figures for the directory name Event Application Specify the time to apply the event recording Three options are available Always Off Schedule Always recognizes incoming events all the time Schedule will ...

Page 85: ...t Recording will start by your pressing the REC button on the front panel You can specify program A through I together with the Pre Event Duration and Post Event Duration settings Pre Event Duration You can assign up to 15 seconds Post Event Duration You can assign up to 60 seconds Program In this page you can apply the resolution frame rate and quality for each channel to program A I Input Res Sh...

Page 86: ...1280x720p 120fps Mode 1920x1080p 60fps Manual Event or Schedule Event Overwrite modes Continuous Pre alarm Up to 15 sec 1 2 3 4 5 10 15 Sec Post Alarm Up to 60 sec 1 2 3 4 5 6 7 8 9 10 15 20 25 30 35 40 45 50 55 60 Sec Search Playback Search mode Date Time Calendar Event Search Thumbnail Search Playback function Forward x2 x4 x8 x16 x32 x64 I frame only Forward x1 x1 2 All frame Backward x1 2 x1 x...

Page 87: ...asic 1TB Up to 2TB x 4EA External HDD SVS 5R Only Storage Support Total 12TB internal external DVD Writer Copy YES DVD R CD R Support USB Copy USB 2 0 Max 32GB File Format Copy AVI EXE Include Player VFS4 CD DVD copy Security Password Protection 1 admin 10 user user can be assigned authority for function Data Authentication Watermark Interface Monitors VGA 1920x1080p resolution HDMI 1920x1080p res...

Page 88: ...lectrical Input Voltage Current 100 to 240 VAC 10 50 60 Hz Autoranging Power consumption Max 85W Environmental Operating Temperature Humidity 0 C to 40 C 32 F to 104 F 20 RH to 85 RH Mechanical Dimension W x H x D H leg not included W445 X H88 X D412 mm W17 51 X H3 46 X D16 22 Weight With hard disks Approx 7 3 kg Rack mount kit 2 EA Lauguage Korean Japanese Chinese English French German Spanish It...

Page 89: ... APPENDIX PRODUCT OVERVIEW unit mm inches English _89 412 16 22 445 17 51 88 3 46 ...

Page 90: ...rmat using the video converter Check if the converted format by the converter of the HD SDI input video is compliant with the output format of the DVR If I press the REC button on the front panel the REC indicator does not flash nor the player start recording Check if there is a free space on the HDD for the recording Check if the record mode is set to ON in the record mode setting The screen disp...

Page 91: ...HDD on the DVR but it does not recognize the HDD See the compatibilty list to check if the additional HDD is supported by the DVR For the compatibility list contact the retailer where you purchased the DVR I have connected an external storage device USB memory eSATA HDD to the DVR but the DVR seems not to recognize it See the compatibility list of external storage devices to check if the connected...

Page 92: ...tart recording If event recording fails to record check the detection settings The image quality of the recording data is not good For 720p recordings replace the camera with one that supports 1080p If the video quality of a channel is set to a lower one change it to Q7 for a 1080p camera connected channel or change it to Q5 for a 720p camera connected channel Changing to a higher image resolution...

Page 93: ...at is true depends on what the Program does 1 You may copy and distribute verbatim copies of the Program s source code as you receive it in any medium provided that you conspicuously and appropriately publish on each copy an appropriate copyright notice and disclaimer of warranty keep intact all the notices that refer to this License and to the absence of any warranty and give any other recipients...

Page 94: ...f this section to induce you to infringe any patents or other property right claims or to contest validity of any such claims this section has the sole purpose of protecting the integrity of the free software distribution system which is implemented by public license practices Many people have made generous contributions to the wide range of software distributed through that system in reliance on ...

Page 95: ...rms and conditions for copying distribution and modification follow TERMS AND CONDITIONS 0 Definitions This License refers to version 3 of the GNU General Public License Copyright also means copyright like laws that apply to other kinds of works such as semiconductor masks The Program refers to any copyrightable work licensed under this License Each licensee is addressed as you Licensees and recip...

Page 96: ...ivalent access to the Corresponding Source in the same way through the same place at no further charge You need not require recipients to copy the Corresponding Source along with the object code If the place to copy the object code is a network server the Corresponding Source may be on a different server operated by you or a third party that supports equivalent copying facilities provided you main...

Page 97: ...d be infringed only as a consequence of further modification of the contributor version For purposes of this definition control includes the right to grant patent sublicenses in a manner consistent with the requirements of this License Each contributor grants you a non exclusive worldwide royalty free patent license under the contributor s essential patent claims to make use sell offer for sale im...

Page 98: ...html GNU LESSER GENERAL PUBLIC LICENSE Version 2 1 February 1999 Copyright C 1991 1999 Free Software Foundation Inc 51 Franklin Street Fifth Floor Boston MA 02110 1301 USA Everyone is permitted to copy and distribute verbatim copies of this license document but changing it is not allowed This is the first released version of the Lesser GPL It also counts as the successor of the GNU Library Public ...

Page 99: ...ich is a work based on the Library the distribution of the whole must be on the terms of this License whose permissions for other licensees extend to the entire whole and thus to each and every part regardless of who wrote it Thus it is not the intent of this section to claim rights or contest your rights to work written entirely by you rather the intent is to exercise the right to control the dis...

Page 100: ... It is not the purpose of this section to induce you to infringe any patents or other property right claims or to contest validity of any such claims this section has the sole purpose of protecting the integrity of the free software distribution system which is implemented by public license practices Many people have made generous contributions to the wide range of software distributed through tha...

Page 101: ...m or counterclaim in a lawsuit alleging that the Work or a Contribution incorporated within the Work constitutes direct or contributory patent infringement then any patent licenses granted to You under this License for that Work shall terminate as of the date such litigation is filed 4 Redistribution You may reproduce and distribute copies of the Work or Derivative Works thereof in any medium with...

Page 102: ... MERCHANTABILITY AND FITNESS FOR A PARTICULAR PURPOSE ARE DISCLAIMED IN NO EVENT SHALL THE COPYRIGHT OWNER OR CONTRIBUTORS BE LIABLE FOR ANY DIRECT INDIRECT INCIDENTAL SPECIAL EXEMPLARY OR CONSEQUENTIAL DAMAGES INCLUDING BUT NOT LIMITED TO PROCUREMENT OF SUBSTITUTE GOODS OR SERVICES LOSS OF USE DATA OR PROFITS OR BUSINESS INTERRUPTION HOWEVER CAUSED AND ON ANY THEORY OF LIABILITY WHETHER IN CONTRA...

Page 103: ... conditions The above copyright notice and this permission notice shall be included in all copies or substantial portions of the Software THE SOFTWARE IS PROVIDED AS IS WITHOUT WARRANTY OF ANY KIND EXPRESS OR IMPLIED INCLUDING BUT NOT LIMITED TO THE WARRANTIES OF MERCHANTABILITY FITNESS FOR A PARTICULAR PURPOSE AND NONINFRINGEMENT IN NO EVENT SHALL THE AUTHORS OR COPYRIGHT HOLDERS BE LIABLE FOR AN...

Page 104: ...be used studied modified and redistributed freely as long as they are not sold by themselves The fonts including any derivative works can be bundled embedded redistributed and or sold with any software provided that any reserved names are not used by derivative works The fonts and derivatives however cannot be released under any other type of license The requirement for fonts to remain under this ...

Page 105: ...environmentally safe recycling Business users should contact their supplier and check the terms and conditions of the purchase contract This product and its electronic accessories should not be mixed with other commercial wastes for disposal Correct disposal of batteries in this product Applicable in the European Union and other European countries with separate battery return systems This marking ...

Page 106: ...N AMERICA Inc 100 Challenger Rd Suite 700 Ridgefield Park NJ 07660 Toll Free 1 877 213 1222 Direct 1 201 325 6920 Fax 1 201 373 0124 www samsungcctvusa com SAMSUNG TECHWIN EUROPE LTD Samsung House 1000 Hillswood Drive Hillswood Business Park Chertsey Surrey UNITED KINGDOM KT16 OPS TEL 44 1932 45 5300 FAX 44 1932 45 5325 www samsungtechwin com www samsungsecurity com www samsungipolis com ...

Reviews: