background image

assembling 

_19

02

 ASSEMBLING

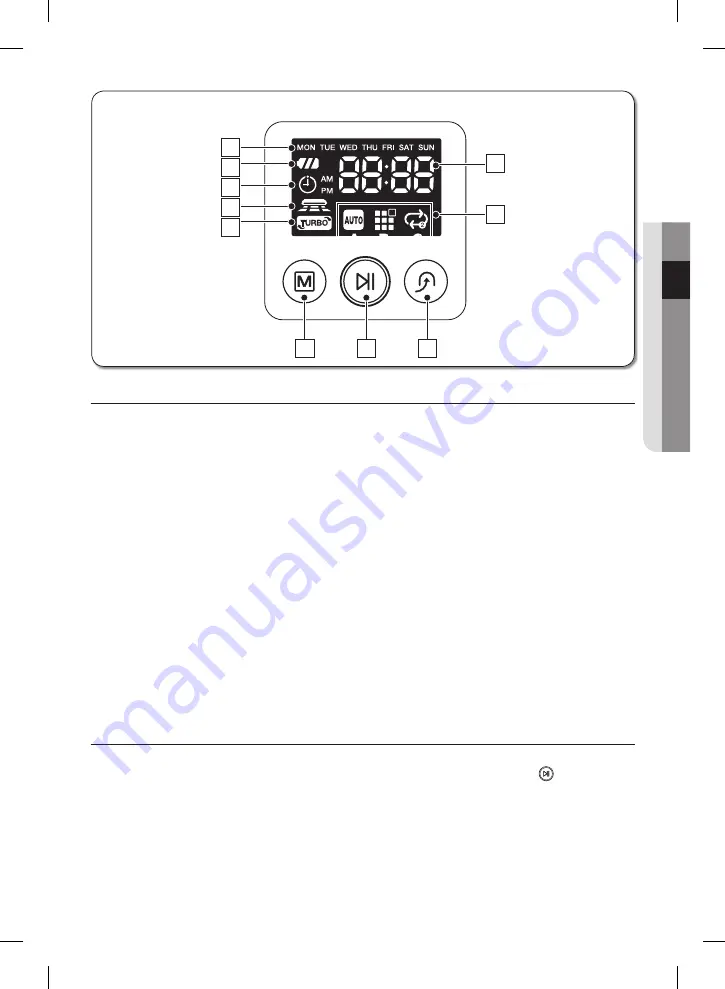
DISPLAY PART

1.  Number Display


- Shows the timer display, progress status, and error codes using numbers, letters and graphics.

2.  Weekly Reservation


- When you set a weekly reservation to start cleaning from the specified time on the specified day 

of the week, the icon for the selected day of the week is turned on.

3.  Battery Level Indicator


- Charging : Shows the charging progress in 3 steps.


- In Use : Shows the battery charge level. The battery charge level is reduced by each level from 

FULL while operating. (When the battery is fully discharged, one level will flash to display “Lo”.)

4.  Timer


- When cleaning is scheduled, the Timer icon is lit.

5.  Dust Sensor Mode


- This icon turns on when Dust Sensor mode is enabled.

6.  Turbo Mode


- This icon turns on when Turbo mode is enabled.

7.  Cleaning Mode Display


- Each time the Cleaning Mode button is pressed, the corresponding cleaning mode is displayed.

(A) Auto Mode :

 This icon turns on when Auto cleaning mode is selected.

(B) Spot Mode :

 This icon turns on when Spot cleaning mode is selected.

(C) Max Mode :

 This icon turns on when Max cleaning mode is selected.

BUTTON PART

8.  Cleaning Mode


- Press to select a cleaning mode. After selecting a cleaning mode, press the ( 

 ) button to 

start cleaning.

9.  Start/Stop


- Press to start/stop cleaning.

10. Recharging


- When this button is pressed, The cleaning robot will return to the charger station to charge its 

battery.


Display panel

2

1

7

3
4
5
6

8

9

10

A

B

C

DJ68-00633G-04.indd   19

14. 6. 18.   �� 1:38

Summary of Contents for SR895 Series

Page 1: ...m Cleaning Robot user manual imagine the possibilities Thank you for purchasing a Samsung product Before operating this unit please read the instructions carefully For indoor use only DJ68 00633G 04 i...

Page 2: ...models the characteristics of your vacuum cleaner may differ slightly from those described in this manual CAUTION WARNING SYMBOLS USED WARNING Indicates that a danger of death or serious injury exist...

Page 3: ...use of the appliance by a person responsible for their safety Children should be supervised to ensure that they do not play with the appliance BATTERY CHARGER Do not modify the polarized plug to fit...

Page 4: ...not pick up anything that is burning or smoke such as cigarettes matches or hot ashes Do not use to pick up flammable or combustible liquids such as gasoline nor use on areas where they may be present...

Page 5: ...aning 28 Recharging 29 Auto Cleaning 30 Spot Cleaning 31 Max Cleaning 32 Manual Cleaning 33 Timer Reservation 34 Weekly Reservation 36 Additional Functions 36 Using additional functions MAINTAIN TOOLS...

Page 6: ...t in a malfunction or electric shock WARNING Do not pull the power plug by the cord or touch the plug with wet hands This may result in fire or electric shock WARNING Do not use multiple plugs in a si...

Page 7: ...al damage abnormal operation and breakage may occur when used in these locations CAUTION Open all doors to clean all rooms When a door is closed the vacuum cleaning robot will not be able to enter tha...

Page 8: ...tep or sit on the vacuum cleaning robot Children may fall and injure themselves or critical damage may occur to the product CAUTION When a child or pet is left alone make sure to turn off the Power Sw...

Page 9: ...with metal objects such as chopsticks screwdrivers and etc This will result in critical damage to the charger WARNING Make sure that there is no trace of liquids on the charger station Failing to do s...

Page 10: ...ng furniture etc while operating For a quicker and cleaner performance place the chairs on top of the table CAUTION Do not place any objects on top of the vacuum cleaning robot This may result in malf...

Page 11: ...y NOTE Dust clusters may remain after cleaning when the vacuum cleaning robot fails to pick up dust clusters that were formed while cleaning In this case sweep up the dust with another cleaning tool C...

Page 12: ...e brush Power brush WARNING If the power cord is damaged have it replaced by a qualified service engineer from the customer care center Failing to do so may result in fire or electric shock WARNING Be...

Page 13: ...m 2 3 4 5 6 7 MonTue Wed Thu Fri Sat Sun 8 1 Auto Mode Cleans all rooms automatically 2 Spot Mode Cleans a localized area intensely It can be used to clean bread or cookie crumbs 3 Max Mode Runs until...

Page 14: ...ing robot may not be able to pass a 1cm doorsill depending on the shape of the doorsill AVOIDING OBSTACLES When the vacuum cleaning robot encounters an obstacle while cleaning the obstacle sensor allo...

Page 15: ...AAA Type Batteries User Manual 2 Battery VIRTUAL GUARD Spare filter Cleaning Brush Quick Start Guide Mesh and Sponge filters are not included in spare filters assembling the cleaner Main Body Charger...

Page 16: ...Dustbin Eject Button Dust bin Driving Wheel Power Switch Power Brush Power Brush Cover Battery Cover Driving Wheel Remote Control Sensor Obstacle Sensor Bumper Sensor Remote Control Sensor Rotating Si...

Page 17: ...Lift the cover of the VIRTUAL GUARD while pressing the locking tab Install the batteries into the VIRTUAL GUARD as shown by the figure below If the batteries are installed with the incorrect polarity...

Page 18: ...nstall the batteries into the remote control as shown by the figure below If the batteries are installed with the wrong polarity the remote control will not work After inserting the tip of the cover i...

Page 19: ...the Timer icon is lit 5 Dust Sensor Mode This icon turns on when Dust Sensor mode is enabled 6 Turbo Mode This icon turns on when Turbo mode is enabled 7 Cleaning Mode Display Each time the Cleaning M...

Page 20: ...m cleaning robot you must turn the Power Switch on If you turn off the Power switch all settings except for the current time and the Weekly reservations are reset If no key is pressed for approximatel...

Page 21: ...wall 5 When the floor is made of wood install the charger in the same direction as the grain of the wood NOTE Always keep the power cord of the charger plugged into the power outlet If no power is sup...

Page 22: ...the display panel Flash Flash When the battery level display flashes while cleaning the vacuum cleaning robot stops vacuuming and automatically charges itself at the charger If the vacuum cleaning ro...

Page 23: ...powered by an environment friendly Lithuim ion Li ion rechargeable battery and an over charge prevention function guarantees an extended life time The battery warranty period is 6 months from the date...

Page 24: ...e or button to set the day of the week Blinks Decrease Increase 3 Press the Clock button Press the or button to set the hour Blinks Decrease Increase 4 Press the Clock button Press the or button to se...

Page 25: ...ovement status of the robot Forming a Fence virtual wall VIRTUAL GUARD creates an invisible barrier that the vacuum cleaning robot cannot cross E g in front of pots furniture the front door and so on...

Page 26: ...ARD or run against an obstacle because the remote control signal has a higher priority than the VIRTUAL GUARD signal When using the vacuum cleaning robot in a small location or at a close distance it...

Page 27: ...r approximately 1 minute after turning the power on the power is automatically cut to prevent the battery discharging To turn the power on again press and hold the power Start Stop button on the main...

Page 28: ...he charger Troubleshooting when the vacuum cleaning robot does not return to the charger Check the installation of the charger When the charger is in a location where the charger cannot guide the vacu...

Page 29: ...resumed Once Main unit button Remote control button Configuration Sequence Silence Mode Turbo Mode Dust Sensor Mode Cleaning Complete 1time 1 Set the mode 2 Cancel the mode About the Resume Cleaning f...

Page 30: ...nd a width of 1 5m When cleaning is completed the vacuum cleaning robot will display End Stop and Stand by When the vacuum cleaning robot is docked with the charger station spot cleaning is not suppor...

Page 31: ...n Configuration Sequence Silence Mode Turbo Mode Dust Sensor Mode 3time 2 times in charging mode 1 Set the mode 2 Cancel the mode About the Resume Cleaning function If the vacuum cleaning robot judges...

Page 32: ...mode 2 Cancel the mode When the vacuum cleaning robot is docked with the charger station manual cleaning is not supported If there is no input for about 1 minute to switch to standby mode Each time yo...

Page 33: ...hedule button The time increases decreases by 5 minutes Press the or button to set the minutes Blinks Blinks Decrease Increase 3 Press the Schedule button Press the or button to set the cleaning mode...

Page 34: ...for more than 3 seconds Press the or buttons to set the day of the week If there is no reservation set previously the current day of the week is displayed If there is no scheduled time is displayed B...

Page 35: ...ttings are completed the day of week you have set blinks At this time you can move to step 2 and add another day of the week Canceling the Settings If you press the Start Stop button while you are mak...

Page 36: ...st Sensor Mode On In Auto cleaning mode when the vacuum cleaner senses that dust has entered a specific area the cleaner rotates and changes direction to clean that area and then after cleaning that a...

Page 37: ...t the bottom of the main unit before cleaning the vacuum cleaning robot The vacuum cleaning robot could operate suddenly and cause an injury Cleaning the Sensor Window and the Camera You must turn off...

Page 38: ...ate the mesh filter from filter and remove the sponge filter 4 Clean dust from dust bin filter sponge and mesh filters You can clean it with water After cleaning it with water 1 Dustbin Wipe the water...

Page 39: ...bin may come out separate the dust bin first before cleaning the power brush 1 After checking whether there are any foreign substances press the hook that is fixing the brush cover to separate it 2 L...

Page 40: ...til it clicks into place To prevent the vacuum cleaning robot from becoming clogged be careful not to vacuum tooth picks or cotton swabs When removing foreign substances becomes difficult contact a cu...

Page 41: ...ting brush repeat the procedures in Step 2 4 If hair or string is wrapped between the main unit and the side rotating brush undo the screw of the side rotating brush using a driver to remove it When r...

Page 42: ...aning robot suddenly starts to zigzag there may be foreign substances stuck on the driving wheel 1 When cleaning the driving wheel place a soft cloth on the floor and flip the main unit placing it dow...

Page 43: ...splay panel Lift up the vacuum cleaning robot manually dock the robot onto the charger to charge it Has the vacuum cleaning robot become hooked on wires on the floor Turn off the Power Switch and remo...

Page 44: ...AL GUARD on The battery usage time of the VIRTUAL GUARD is too short Check the batteries whether they are run down or not Replace the batteries with new batteries 2 type D LR20 batteries The vacuum cl...

Page 45: ...the right driving wheel Check the Bumper sensor Turn off the at the bottom and then remove the obstacle from the front of the vacuum cleaning robot or move it to a different location A foreign substan...

Page 46: ...0 240V 50 60Hz Charge power consumption 40 W Main unit power consumption 40 W Battery specifications 14 4V 2200 mAh 31 68Wh Cleaning Specifications Charging type Auto Charging Manual Charging Cleaning...

Page 47: ...l damages including but not limited to procurement of substitute goods or services loss of use data or profits or business interruption however caused and on any theory of liability whether in contrac...

Page 48: ...customer care center Country Customer Care Center Web Site AUSTRALIA 1300 362 603 www samsung com HONG KONG 852 3698 4698 www samsung com hk www samsung com hk_en MALAYSIA 1800 88 9999 www samsung com...

Reviews: