background image

English - 53

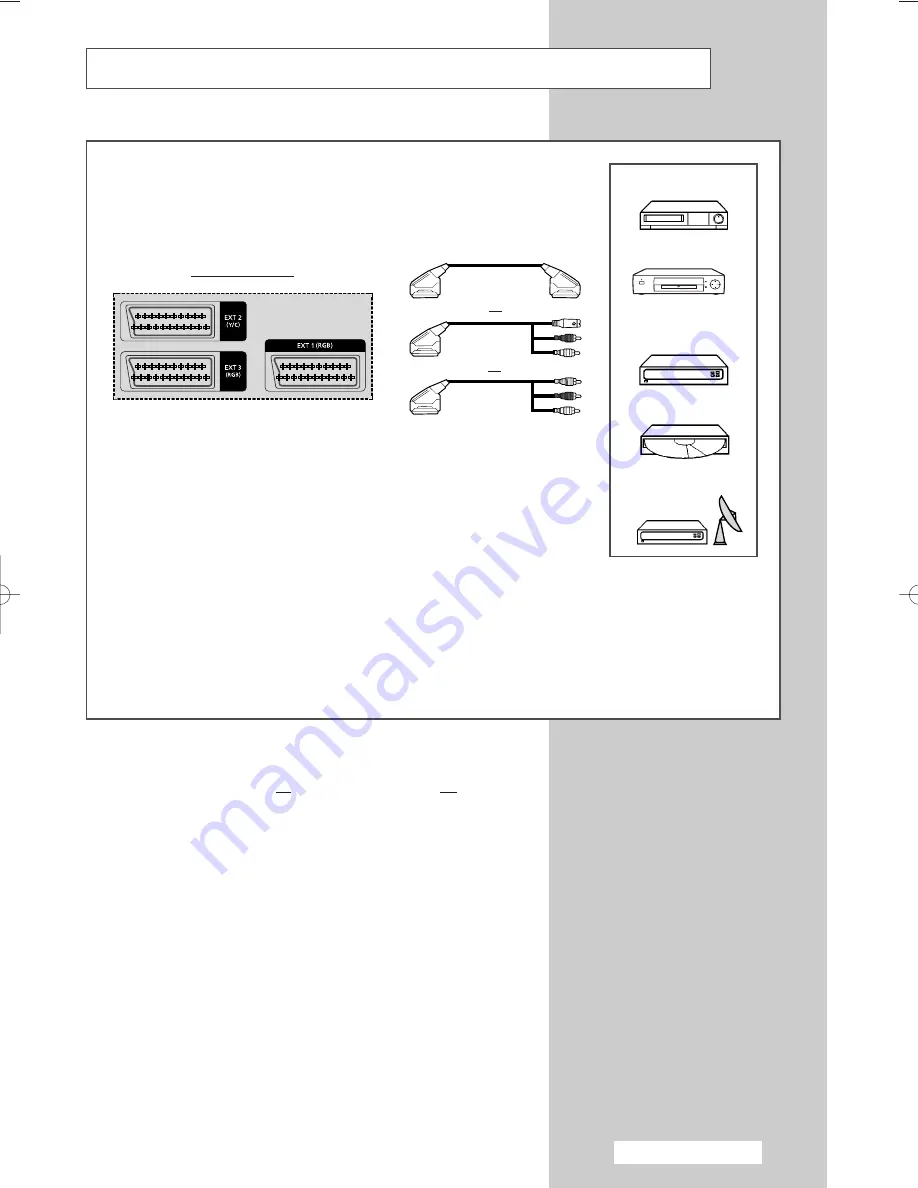
Connecting to the External Input/Outputs

EXT 1

is used for the equipment with an RGB output, such as video game

devices or video disc players.

Rear of the TV

VCR

Decoder /

Video game device

Video disc player

Satellite receiver

This end can be fitted with:

A SCART connector

An S-Video connector and two audio RCA connectors (L+R); 

EXT 2

Three RCA connectors (VIDEO + AUDIO-L and R)

If you have a second VCR and wish to copy cassette tape, connect the
source VCR to 

EXT 1

and the target VCR to 

EXT 2

so that you can redirect

the signal from 

EXT 1

to 

EXT 2

.

If you have a decoder, connect the decoder to the VCR and the VCR to the
television.

When you wish to record a programme, connect the receiver to 

EXT 1

and

the VCR to 

EXT 2

so that you can redirect the signal from 

EXT 1

to 

EXT 2

.

or

or

DVD

Whenever you connect an audio or video system to your
television, ensure that all elements are switched off.

Refer to the documentation supplied with your equipment
for detailed connection instructions and associated safety
precautions.

BP68-00457A-03(J60B_Euro_ENG)  7/12/05  5:00 PM  Page 53

Summary of Contents for SP4202

Page 1: ...SP42Q2 SP43Q5 47Q5 SP43R1 54R1 Owner s Instructions Before operating the unit please read this manual thoroughly and retain it for future reference ON SCREEN MENUS TELETEXT SELF FOCUS Register your product at www samsung com global register ...

Page 2: ......

Page 3: ...cs and images on screen such as the dark side bars on non expanded standard format television video and programming should be limited to no more than 15 of the total television viewing per week Additionally viewing other stationary images and text such as stock market reports video game displays station logos web sites or computer graphics and patterns should be limited as described above for all ...

Page 4: ...ng Your Language 18 Adjusting the Screen Automatically Self Focus 19 Deactivating the Automatic Execution of the Self Focus 20 Removing the Self Focus from the Display 21 SETTING THE CHANNELS Storing Channels Automatically 22 Sorting the Stored Channels 23 Storing Channels Manually 24 25 Skipping Unwanted Channels 26 Assigning Names to Channels 27 Locking the Channel 28 Fine Tuning Channel Recepti...

Page 5: ...9 Selecting Display Options 50 Selecting a Teletext Page 51 Storing Teletext Pages depending on the model 52 ADDITIONAL INFORMATION ON CONNECTIONS Connecting to the External Input Outputs 53 Connecting to the Audio Output 54 Connecting to the RCA Input 55 Connecting to the S Video Input 56 Connecting to the Component Input 57 Redirecting an Input to the External Output 58 RECOMMENDATIONS FOR USE P...

Page 6: ...the model The and C P buttons have the same function as the œ buttons on the remote control If the remote control no longer works or your have lost it you can use controls on the panel of the TV a Input Source Selection b Menu Display c Accessing to the Selected Option on the Menu System d Volume Adjustment e Channel Selection f Remote Control Sensor g Standby Timer Indicator h Power On Off SP43W6...

Page 7: ...ay be different depending on your model on TV a Input Source Selection b Menu Display c Accessing to the Selected Option on the Menu System d Volume Adjustment e Channel Selection f Remote Control Sensor g Standby Timer Indicator h Power On Off i Picture On Off SP42Q2 SP43Q5 SP47Q5 SP43R1 SP54R1 ...

Page 8: ... For further details about connection refer to pages 53 57 Whenever you connect an audio or video system to your television ensure that all elements are switched off Refer to the documentation supplied with your equipment for detailed connection instructions and associated safety precautions Audio Output 75Ω Coaxial Connector for Aerial or Cable Network SCART Audio Video Input Output Component Inp...

Page 9: ... Find that the remote control is no longer operating correctly 1 Remove the cover on the rear of the remote control by pressing the symbol downwards and then pulling firmly to remove it 2 Insert two R03 UM4 AAA 1 5V or equivalent batteries taking care to respect the polarities on the battery against on the remote control on the battery against on the remote control 3 Replace the cover by aligning ...

Page 10: ...EATEDLY BETWEEN THE LAST TWO CHANNELS DISPLAYED CONFIRM YOUR CHOICE STORE OR ENTER NEXT CHANNEL TELETEXT NEXT PAGE PICTURE EFFECT SELECTION IF YOUR REMOTE CONTROL IS NOT FUNCTIONING PROPERLY TAKE OUT THE BATTERIES AND PRESS THE RESET BUTTON FOR ABOUT 2 3 SECONDS RE INSERT THE BATTERIES AND TRY USING THE REMOTE CONTROL AGAIN SOUND MODE SELECTION PREVIOUS CHANNEL TELETEXT PREVIOUS PAGE MAKE THE REMO...

Page 11: ...ial or network input cable to the 75Ω coaxial socket on the rear of the television 2 If you are using an indoor aerial you may need to turn it when tuning your television until you obtain a picture that is both sharp and clear For further details refer to Storing Channels Automatically on page 22 Storing Channels Manually on page 24 Connecting to an Aerial or Cable Television Network Rear of the T...

Page 12: ...a SCART cable Connect the receiver or decoder SCART cable to one of the SCART connectors on the rear of the television Using a coaxial cable Connect a coaxial cable to the Receiver or Decoder output socket Television aerial input socket If you wish to connect both a satellite receiver or decoder and a VCR you should connect the Receiver or Decoder to the VCR VCR to the television Otherwise connect...

Page 13: ...Result The Standby indicator on the front of the television lights up 3 Press the POWER button on the remote control to switch the television on Result The programme that you were watching last is re selected automatically If you have not yet stored any channels No clear picture appears Refer to Storing Channels Automatically on page 22 or Storing Channels Manually on page 24 4 To switch your tele...

Page 14: ...esult The screen is turned off and the Standby indicator on the front of the television lights up in red 2 To switch the television back on simply press the POWER button again You can also switch on by pressing the TV or P button Do not leave your television in Standby mode for long periods of time when you are away on holiday for example Turn your television off by pressing the I button On Off on...

Page 15: ... the two digit channel number PRE CH Press the PRE CH button The TV will switch to the last channel viewed To quickly switch between two channels that are far apart tune to one channel then use the numeric buttons to select second channel Then use the PRE CH button to quickly alternate between them Used to increase the volume Used to decrease the volume MUTE Used to switch the sound off temporaril...

Page 16: ...n the Setup group are displayed with Language is selected 3 Select the appropriate language by pressing the or button Press the ENTER button to confirm the language Result The message Check antenna input is displayed 4 Make sure that the antenna is connected to the TV and then press the ENTER button Result The Auto Store menu is displayed with Country is selected 5 Select your country by pressing ...

Page 17: ...option is selected Press the ENTER button Result This feature starts with the message Start Plug Play is displayed 5 For further details on how to set refer to the opposite page Plug and Play Feature continued TV Setup Time Plug Play Language English Self Focus Blue Screen Off More Move Enter Return You can view the channel information and setting status you select by pressing the INFO button on t...

Page 18: ...isplayed 3 Press the ENTER button 4 Press the or button until the Language is selected Press the ENTER button Result The languages available are listed 5 Select the appropriate language by pressing the or button Press the ENTER button to confirm your choice TV Setup Time Plug Play Language English Self Focus Blue Screen Off More Move Enter Return TV Setup Time Plug Play Language English Self Focus...

Page 19: ...ns of the picture may occur At this time the colors may diffuse and a searching action will appear on the edges of the screen This is a normal part of the adjustment When it is finished all of things will disappear and the optimum picture quality can be enjoyed You can also set these options simply by pressing the SELF FOCUS button Changing channels and any other signal changes will pause the self...

Page 20: ...ailable in the Setup group are displayed 3 Press the ENTER button 4 Press the or button until the Self Focus is selected Press the ENTER button Result The options available in the Self Focus group are displayed 5 Press the or button until the Auto is selected Press the ENTER button 6 To turn off the automatic execution of the self focus feature select Off by pressing the or button Press the ENTER ...

Page 21: ...ailable in the Self Focus group are displayed 5 Press the or button until the Message Display is selected Press the ENTER button 6 To remove the message Self Focus and horizontal bar on the screen during the self focus process select Off by pressing the or button Press the ENTER button to confirm Removing the Self Focus from the Display TV Setup Time Plug Play Language English Self Focus Blue Scre...

Page 22: ...nels are sorted and stored in an order which reflects their position in the frequency range with lowest first and highest last The programme originally selected is then displayed To stop the search before it has finished or return to normal viewing press the MENU button 9 When searching and storing are complete the Sort menu is displayed To sort the stored channels into the desired numerical order...

Page 23: ...by pressing the œ or button repeatedly 6 Press the or button until the To is selected Select the new channel number which you wish to identify by pressing the œ or button repeatedly 7 Press the or button until the Store is selected Select OK to confirm the exchange of channel numbers by pressing the ENTER button Result The selected channel is exchanged with the one previously stored to the chosen ...

Page 24: ...olour System is selected Press the ENTER button Indicate the broadcasting standard required by pressing the or button Result The colour standards are displayed in the following order AUTO PAL SECAM NT4 43 7 Press the ENTER button to confirm 8 Press the or button until the Sound System is selected Press the ENTER button Select the sound standard required by pressing the or button Result The sound s...

Page 25: ...o 12 for each channel to be stored Channel mode P Programme mode When completing tuning the broadcasting stations in your area have been assigned to position numbers from P00 to max P99 You can select a channel by entering the position number in this mode C Real channel mode You can select a channel by entering the assigned number to each air broadcasting station in this mode S Cable channel mode ...

Page 26: ...s the or button until the Add Delete is selected Press the ENTER button Result The Add Delete menu is displayed with the current channel selected 5 Press the or button to delete or add the required channel Press the ENTER button 6 Select Deleted or Added by pressing the or button Press the ENTER button to confirm 7 Repeat Step 5 for each channel to be erased or added Skipping Unwanted Channels TV ...

Page 27: ...on until the Channel is selected Result The options available in the Channel group are displayed 3 Press the ENTER button 4 Press the or button until the Name is selected Press the ENTER button Result The Name menu is displayed with the current channel selected 5 If necessary select the channel to be assigned a new name by pressing the or button Press the ENTER button 6 Press the or button to sele...

Page 28: ...ss the ENTER button 4 Press the or button until the Child Lock is selected Press the ENTER button Result The Child Lock menu is displayed and the current channel is shown as selected 5 Press the or button to select the channel to be locked 6 Press the ENTER button To lock the channel select Locked by pressing the or button to unlock the channel select Unlocked Press the ENTER button to confirm Loc...

Page 29: ...ress the ENTER button 4 Press the or button until the Fine Tune is selected Press the ENTER button Result The horizontal bar is displayed 5 To obtain a sharp and clear picture and good sound quality press the œ or button until you reach the setting 6 To store the fine tuning setting in the TV s memory press the ENTER button 7 To reset the fine tuning to 0 select Reset by pressing the or button the...

Page 30: ...orking only in a weak signal condition and that is memorized on relevant channel s additional information 1 Press the MENU button Result The main menu is displayed 2 Press the or button until the Channel is selected Result The options available in the Channel group are displayed 3 Press the ENTER button 4 Press the or button until the LNA is selected Press the ENTER button 5 Select Off or On by pr...

Page 31: ...he Mode is selected 4 Press the ENTER button again Result The options available are listed 5 Select the required option by pressing the or button Result The following modes are available Dynamic Standard Movie Custom 6 Press the ENTER button to confirm You can also set these options simply by pressing the P MODE Picture Mode button Changing the Picture Standard TV Picture Mode Off Custom Colour To...

Page 32: ...R button Result The horizontal bar is displayed Move the horizontal bar s cursor left or right by pressing the œ or button 6 Press the MENU button to return the Picture menu Press the or button until the Colour Tone is selected Press the ENTER button 7 Select the required colour tone Warm 1 Warm 10 Normal Cool 1 Cool 10 by pressing the œ or button Customizing the Picture Settings TV Picture Mode D...

Page 33: ... the ENTER button 4 Press the or button until the Size is selected Press the ENTER button Result The Size menu is displayed 5 Select the required mode by pressing the or button Press the ENTER button Result The following modes are available Normal Adjusts the picture to fit into a 4 3 normal aspect ratio Prolonged use in 4 3 mode may cause the lifespan of the CRT to be reduced Zoom1 Vertically enl...

Page 34: ...pear natural Zoom1 Vertically enlarges the picture approximately 130 Zoom2 Vertically enlarges the picture about approximately 150 4 3 Adjusts the picture to fit into a 4 3 normal aspect ratio Prolonged use in 4 3 mode may cause the lifespan of the CRT to be reduced Cinema1 To maintain optimum screen display the picture is vertically enlarged and the letterboxed black margin area is filled with gr...

Page 35: ...tinued 4 3 Signal Auto Wide 16 9 Panorama Zoom1 Zoom2 4 3 Cinema1 Cinema2 16 9 Signal Auto Wide 16 9 Panorama Zoom1 Zoom2 4 3 Cinema1 Cinema2 Zoom1 Panorama 16 9 Auto Wide Cinema2 Cinema1 4 3 Zoom2 Zoom1 Panorama 16 9 Auto Wide Cinema2 Cinema1 4 3 Zoom2 ...

Page 36: ...ice such as DVDs or digital devices automatically switching to the appropriate display mode Natural Natural Scan uses each image in digital memory to estimate motion and create new frames which are inserted where the repeated field is in 100Hz Natural Scan is especially good when watching TV soap dramas or movies because it yield stable pictures with no flicker it brings naturally clear images and...

Page 37: ...le in the Picture group are displayed 3 Press the ENTER button 4 Press the or button until the Digital NR is selected Press the ENTER button 5 Select Off or On by pressing the or button Press the ENTER button to confirm Using the Digital NR Digital Noise Reduction Feature TV Picture Mode Dynamic Custom Colour Tone Normal Size Normal Scan Mode Auto Digital NR Off Move Enter Return TV Picture Mode D...

Page 38: ...e displayed 3 Press the ENTER button 4 Press the or button until the Blue Screen is selected Press the ENTER button 5 Select Off or On by pressing the or button Press the ENTER button to confirm Setting the Blue Screen Mode TV Setup Time Plug Play Language English Self Focus Blue Screen Off More Move Enter Return TV Setup Time Plug Play Language English Self Focus Blue Screen Off More Move Enter R...

Page 39: ...ess the ENTER button Result The Mode is selected 4 Press the ENTER button again 5 Select the required option by pressing the or button Result The following modes are available Standard Music Movie Speech Custom 6 Press the ENTER button to confirm You can also set these options simply by pressing the S MODE Sound Mode button Changing the Sound Standard TV Sound Mode Off Equalizer Auto Volume Normal...

Page 40: ...on until the Equalizer is selected Press the ENTER button Result The Equalizer menu is displayed with the current option 5 Select the option to be adjusted by pressing the œ or button Press the or button to reach the required setting If you make any changes to these settings the sound standard is automatically switched to Custom Adjusting the Sound Settings 100 300 1K 3K 10K TV Equalizer Move Adju...

Page 41: ...cts such as Standard Music Movie and Speech 1 Press the MENU button Result The main menu is displayed 2 Press the or button until the Sound is selected Result The options available in the Sound group are displayed 3 Press the ENTER button 4 Select the required option Auto Volume or Dolby Virtual by pressing the or button 5 Press the ENTER button 6 To activate each feature select On by pressing the...

Page 42: ...esult The options available in the Setup group are displayed 3 Press the ENTER button 4 Press the or button until the Melody is selected Press the ENTER button 5 Select the required option Off or On by pressing the or button 6 Press the ENTER button to confirm Setting the Melody Sound TV Setup More Melody On AV Setup Move Enter Return TV Setup More Melody On AV Setup Move Enter Return Off On ...

Page 43: ...no When receiving a mono sound in the AV mode connect to the AUDIO L input connector on the panel front or side If the mono sound comes out only from left speaker press the DUAL I II button Selecting the Sound Mode depending on the model Type of broadcast Regular broadcast Standard audio Regular NICAM Mono NICAM Stereo NICAM Dual I II Regular broadcast Standard audio Bilingual or Dual I II Stereo ...

Page 44: ...ult The options available in the Setup group are displayed 3 Press the ENTER button 4 Press the or button until the Time is selected Press the ENTER button Result The options available in the Time group are displayed with Clock is selected 5 Press the ENTER button 6 Press the œ or button to move to the Hour or Minute Set these by pressing the or button Setting and Displaying the Current Time TV Se...

Page 45: ...leep Timer is selected Press the ENTER button 6 Select the preset time interval Off 30 60 90 120 150 180 for staying on by pressing the or button Press the ENTER button to confirm You can also set these options simply by pressing the SLEEP button If the sleep timer is not yet set Off is displayed If the sleep timer is already set the remaining time before which the television switches to Standby m...

Page 46: ...r button 7 To activate the On Timer with the settings satisfied select Activation to by pressing the œ or button then select Yes by pressing the or button 8 Press the MENU button Result The options available in the Time group are displayed again 9 Press the or button until the Off Timer is selected Press the ENTER button Result The Off Timer menu is displayed 10 Set the Off Timer as methods for On...

Page 47: ...tton 5 Press the MENU button Result The options available in the Input group are displayed again 6 Press the or button until the Edit Name is selected Press the ENTER button 7 Press the or button to select the external source to be edited Press the ENTER button Result The device names available are listed VCR DVD Cable STB HD STB Sat STB AV Receiver DVD Receiver Game Camcorder DVD Combo DHR DVD HD...

Page 48: ...ivided into numbered pages see diagram Part Contents A Selected page number B Broadcasting channel identity C Current page number or search indications D Date and time E Text F Status information FASTEXT information Teletext information is often divided between several pages displayed in sequence which can be accessed by Entering the page number Selecting a title in a list Selecting a coloured hea...

Page 49: ...n to activate the teletext mode Result The contents page is displayed It can be redisplayed at any time by pressing the index button 3 Press the TTX MIX button again Result The screen will be split into two This Double Teletext feature lets you view the actual broadcast and teletext information separately on the screen 4 If you wish to display the actual broadcast at the same time as the teletext ...

Page 50: ...quiz games for example The normal screen reveal again A secondary page sub page The broadcast when searching for a page cancel The next page page up The previous page page down Double size letters in the size Upper half of the screen Once Lower half of the screen Twice Normal screen Three times To return to the normal display after using the reveal or size feature press the TV button ...

Page 51: ...asting company the different topics covered on a Teletext page are colour coded and can be selected by pressing the coloured buttons on the remote control Press the coloured button corresponding to the topic that you wish to select the available topics are given on the status line Result The page is displayed with other coloured information that can be selected in the same way 3 To display the pre...

Page 52: ...e button is used to switch between the LIST and FLOF modes 2 Press the coloured button corresponding to the page that will be replaced 3 Enter the new page number using the numeric buttons 4 Repeat steps 2 and 3 for each page to be stored using a different coloured button each time 5 Press the store button until the corresponding blocks blink Storing Teletext Pages depending on the model ...

Page 53: ...wish to copy cassette tape connect the source VCR to EXT 1 and the target VCR to EXT 2 so that you can redirect the signal from EXT 1 to EXT 2 If you have a decoder connect the decoder to the VCR and the VCR to the television When you wish to record a programme connect the receiver to EXT 1 and the VCR to EXT 2 so that you can redirect the signal from EXT 1 to EXT 2 or or DVD Whenever you connect ...

Page 54: ...English 54 Connecting to the Audio Output The RCA AUDIO L and R connectors are used for equipment such as an audio system to take full advantage of the Surround sound effect Rear of the TV Audio system ...

Page 55: ...he RCA Input The RCA VIDEO AUDIO L and R connectors are used for the equipment such as camcorders video disc players and some video game devices Side of the TV depending on the model Camcorder Video game device Video disc player ...

Page 56: ...DEO INPUT and RCA AUDIO L and R connectors are used for equipment with an S Video output such as a camcorder or VCR Camcorder VCR To play pictures and sound both the S VIDEO or S VIDEO INPUT and RCA connectors must be used and Side of the TV depending on the model ...

Page 57: ...English 57 Connecting to the Component Input The COMPONENT IN connectors are used for equipment with a DVD or DTV receiver output 480i 480p 576i 576p 1080i DVD Rear of the TV DTV receiver ...

Page 58: ...ss the or button to select AV Setup Press the ENTER button Result The AV Setup menu is displayed with the Ext 3 is selected 5 Press the ENTER button Select the source to be directed to the output of Ext 3 by pressing the or button Ext 1 Default TV Ext 2 Default Monitor Out Ext 3 Variable TV Ext 1 Ext 2 or AV 6 Press the ENTER button to confirm your choice TV Setup More Melody On AV Setup Move Ente...

Page 59: ... 4 Enter 3 digits of the VCR Cable box or DVD code listed on next page for your VCR Cable box or DVD Example To enter the code 6 press 0 0 and 6 To enter the code 76 press 0 7 and 6 5 Press the POWER button Your VCR Cable box or DVD should turn on If it turns on your remote control is now set correctly If it does not turn on repeat steps above but try one of the other codes listed for the brand of...

Page 60: ...English 60 Programming the Remote Control for Other Components VCR Remote Control Codes Cable Box CATV Remote Control Codes DVD Remote Control Codes ...

Page 61: ... has been pressed Adjust the colour settings Check that the broadcast system selected is correct Try to identify the electrical appliance that is affecting the television then move it further away Plug your television into a different mains socket Check the direction location and connections of your aerial This interference is often occurs to the use of an indoor aerial Replace the remote control ...

Page 62: ...English 62 Memo ...

Page 63: ...English 63 Memo ...

Page 64: ...h other household wastes at the end of its working life To prevent possible harm to the environment or human health from uncontrolled waste disposal please separate this from other types of wastes and recycle it responsibly to promote the sustainable reuse of material resources Household users should contact either the retailer where they purchased this product or their local government office for...

Reviews: