Smart
Door Lock
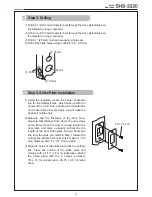
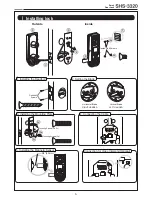
1. Installing the Deadbolt
1) Insert the deadbolt from the side of the
door.
2) Fix the deadbolt using two FH+T4 x 25
screws. (T4x25/T4x19: for wooden door,
U3-16 x 9.5: for steel door)
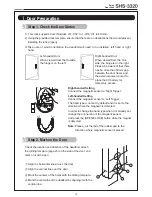
2. Setting the Blade
(Ensure the Exterior Unit is aligned with the
center hole of the deadbolt.)
While the deadbolt is in the open position,
insert the blade of the exterior unit.
In the case of right-handed door, insert
the blade horizontally. In the case of left-
handed door, insert the blade vertically.
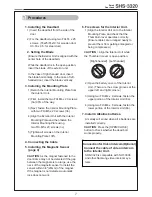
3. Installing the Mounting Plate
1) Detach the Interior Mounting Plate from
the Interior Unit.
2) First, install the two FH+M4 x 20 screws
(3a) 90% of the way.
3) Next, fasten the Interior Mounting Plate
with two FH+M5 x 20 screws (3b).
4) Align the Exterior Unit with the Interior
Mounting Plate and then fasten the
Interior Mounting Plate using
two FH+M5 x 20 screws (3c).
5) Tighten all screws on the Interior
Mounting Plate 100%.
4. Connecting the Cable
5. Installing the Magnetic Sensor
(page 4)
CAUTION
: As the magnet fastened to the
door-frame may not be detected if the gap
between the magnets is too large, use the
neck of the magnetic sensor to install the
sensor within 3/4″(20mm) of the magnet.
If the magnet is not detected, automatic
lock does not work.
6. Fix screws for the Interior Unit.
1) Align the Interior Unit on to the Interior
Mounting Plate, and check that the
Thumbturn lever operates correctly.
(
Ensure cables are arranged neatly to
prevent them from getting entangled or
being compressed.)
CAUTION
:
Align the Interior Unit while
the Thumbturn Lever is open position.
[Right-handed] [Left-handed]
2) Open the battery cover of the Interior
Unit. (There are the screw grooves at the
upper left and right corners.)
3) Using two FH+M4 x 8 screws, fasten the
upper portion of the Interior Unit (6a).
4) Using two FH+M4 x 8 screws, fasten the
lower portion of the Interior Unit (6b).
7. Install 4 Alkaline batteries.
A melody will sound when all 4 batteries are
installed correctly.
CAUTION
: Press the [OPEN/CLOSE]
button to check whether the dead bolt
works properly.
Connect the cable of video intercom
to the Interior Unit.
SHS-3320 is compatible with SHT-3006
and other Samsung video intercom sys-
tems.
Procedures
Connection for Video Intercom(Optional)


