


Smart
Door Lock
|
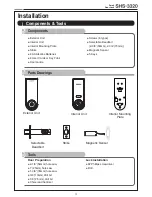
Door Preparation
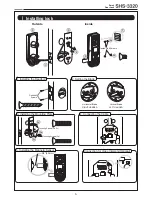
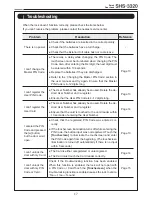
Step 1. Check the Door Status
1)
This lock supports door thickness of 1-7/32˝ to 1-9/16˝ (31 to 40 mm).
2) Using the provided lock template, ensure that there are no obstructions that would prevent
installing the lock properly.
3) Take note of which orientation the deadbolt will need to be installed, left hand or right
hand.
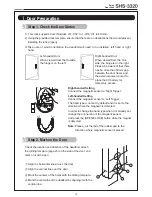
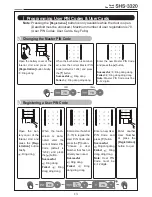
Check the location and direction of the deadbolt, attach
the drilling template (page 23) on the side of the door, and
mark on it with a pen.
①
Align the horizontal line across the door.
②
Align the vertical line over the door.
③
Mark the centers of the holes with the drilling template.
④
Mark the centerline of the deadbolt by aligning it with the
vertical line.
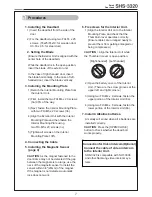
Right-handed Door
When viewed from the Out-
side, the hinge is on the right.
Please, be aware of that there
has be more than 50mm gap
between the door frame and
the external power contact to
place the 9V battery for
temporary access.
Left-handed Door
When viewed from the Outside,
the hinge is on the left.
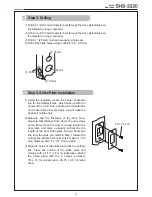
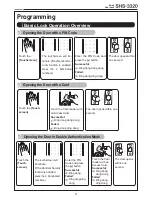
Step 2. Mark on the Door
Right-handed Setting
Connect the magnetic sensor to ‘Right Trigger’.
Left-handed Setting
Connect the magnetic sensor to ‘Left Trigger’.
The hand type is not set by default and it is set to the
direction where the magnetic is detected.
In order to change the hand type when it is already set,
change the connection of the magnetic sensor.
And press the [OPEN/CLOSE] button while the magnet
is detected.
Note:
Please, cut the tail of the rubber pad to the
direction where magnetic sensor is placed.
R
ig
ht T
rig
ge
r
Left Trigger