1
.8
Installation
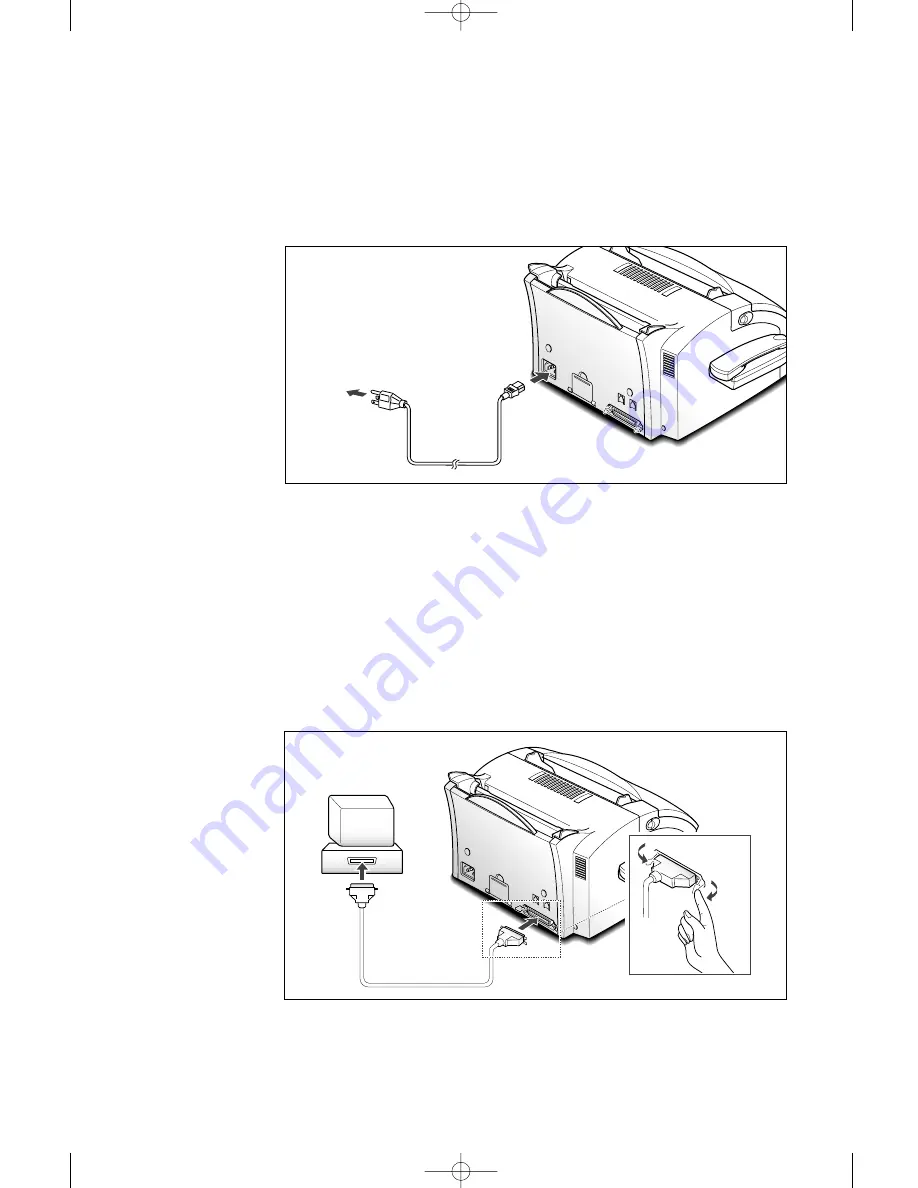
3. Connect the other end of the cable to the parallel interface port on
your computer. See your computer documentation if you need help.
Note: There is a parallel port on SF-5100, but it does not work.
00000000
000000
00000
00000
00000
0 0 0000
0 0 0 00000000
0 0 0 0000
0 0 0 00
0 0 0 0
0 0 0 0
0
Printer cable (SF-5100P only)
Your SF-5100P has a parallel interface port, which allows you to use it
with IBM PC and compatible computers.
To connect the printer to the computer, follow the steps below:
1. Make sure that both the SF-5100P and the computer are turned off.
2. Plug the cable into the connector on the back of the SF-5100P. Push
the metal clips down to fit inside the notches on the cable plug.
Power cord
Plug one end of the cord into the back of the machine and the other
end into a standard AC power outlet.
The machine will turn on and the display will show ‘SYSTEM INITIAL’.
If there is no cartridge installed or no paper, the display will show
‘JAM/NO CARTRIDGE’ or ‘NO PAPER’.
00000000
000000
000000
00000
00000
0 0 0000
0 0 0 00000000
0 0 0 00000
0 0 0 00
0 0 0 0
0 0 0 0
0
To AC
outlet
If you want to turn it off, unplug the power cord.
02-Installation 12/10/99 6:28 AM Page 10
Summary of Contents for SF 5100
Page 1: ...Laser Facsimile User s Guide SF 5100 SF 5100P 00 Cover 12 10 99 5 16 AM Page 1 ...
Page 9: ...Installation 1 02 Installation 12 10 99 6 27 AM Page 2 ...
Page 24: ...Getting started 2 03 Getting Started 12 10 99 6 19 AM Page 1 ...
Page 33: ...Basic operation 3 04 Basic 12 10 99 6 09 AM Page 2 ...
Page 55: ...Advanced fax 4 05 Advanced 12 10 99 5 59 AM Page 2 ...
Page 63: ...Additional features 5 06 Additional 12 10 99 5 51 AM Page 2 ...
Page 73: ...Troubleshooting 6 07 Troubleshooting 12 10 99 5 41 AM Page 2 ...
Page 90: ...6 17 Troubleshooting MEMO 08 Maintenance 12 10 99 5 32 AM Page 9 ...
Page 91: ...Appendix 09 Appendix 12 10 99 5 24 AM Page 2 ...


