C
ARE
AND
M
AINTENANC
E
7.3
C
ARE
AND
M
AINTENANCE
C
ARE
AND
M
AINTENANCE
C
ARE
AND
M
AINTENANCE
C
ARE
AND
M
AINTENANCE
C
ARE
AND
M
AINTENANCE
C
ARE
AND
M
AINTENANCE
C
ARE
AND
M
AINTENANCE
Replacing the print cartridge
When you notice that the print becomes light or
Ink Low. Install new ink cartridge
appears in the
display, replace the print cartridge. You should replace the cartridge with the same one which was provided with
the machine.
The part number for replacement cartridges are:
• mono: INK-M40, colour: INK-C40 (available only for SF-331P)
1
Prepare a cartridge.
• Take out a cartridge from its packaging and carefully remove the tape covering the printhead.
• Hold the cartridge by the colored top or black areas only. Do not touch the copper area.
2
Press
Cartridge
.
The Cartridge Carrier moves to the install position.
3
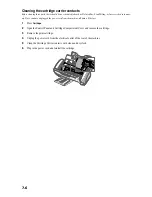
Open the Control Panel and Cartridge Compartment cover.
4
Push down the cartridge, and remove it.
5
To load the cartridge insert the cartridge below the metal clip and pointing down at the front. When the
cartridge is pushed to the back of the cartridge carrier lift the front of the cartridge up until it clicks into
place.
• If the cartridge moves loosely in the Carrier, it has not clicked into place. Repeat this step.
6
Replace the Cartridge Compartment Cover and Control Panel.
7
Press
Start/Enter
.
8
Press 1 for new cartridge, or 2 for the old one.
• In case you selected the
1:New
, the alignment form will print.
• When you put in a new cartridge, you must choose
1:New
.
• When you put in a used cartridge, choose
2:Used
. This helps you to check the correct amount of ink you have left.
• If you mix up several used cartridges, it is not possible to check the correct amount of remaining ink. Once you have
put in a new cartridge, use it until it is completely exhausted.
9
Enter the number which represents the straightest line, and press
Start/Enter
.
Summary of Contents for SF-330 Series
Page 13: ...CHAPTER 2 PROGRAMMING AND DIALLING ...
Page 17: ...CHAPTER 3 THE FAX MACHINE ...
Page 28: ...4 6 ...
Page 33: ...CHAPTER 6 SPECIAL FEATURES ...
Page 41: ...CHAPTER 7 CARE AND MAINTENANCE ...
Page 52: ...7 12 ...
Page 53: ...CHAPTER 8 APPENDIX ...
Page 58: ...8 6 ...
Page 59: ...A PPENDIX 8 7 A PPENDIX A PPENDIX A PPENDIX A PPENDIX A PPENDIX A PPENDIX A PPENDIX ...
Page 60: ...8 8 ...


