background image

COLOR ZOOM CAMERA

User Guide

10

COLOR ZOOM CAMERA

User Guide

11

3


Key Buttons 

  Following buttons control zoom, focus, and auto focus functions. 

WIDE button  : To widen the view. (ZOOM OUT) 

TELE button 

: To close in on a far object. (ZOOM IN) 

F-NEAR button  : To see a near object clearly. 

F-FAR button  : To see a far object clearly. 

Pressing the 'SET' button locks the zoom control function of these buttons and 

prompts the main setup menu.

  Main setup menu can be navigated using these buttons. 

SET : To access the main setup menu. 

UP (TELE button) 

: To move the arrow indicator to up. 

DOWN (WIDE button)  : To move the arrow indicator to down. 

LEFT (F-NEAR button)  : To move the arrow indicator to left. 

RIGHT (F-FAR button)  : To move the arrow indicator to right.

Overview

4


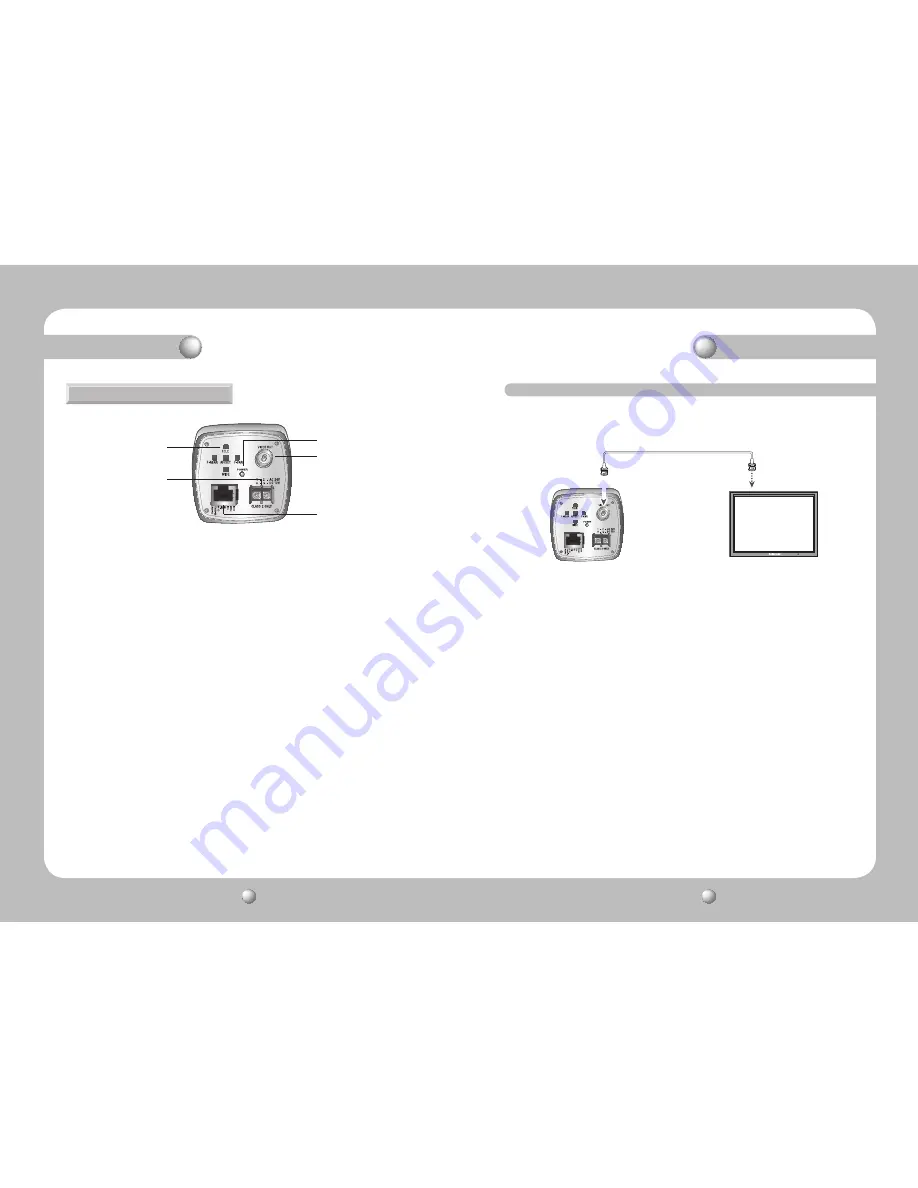
Power Input Terminal 

Power supply terminal  

DC Type : DC12V

±

10% DUAL Type : DC12

±

10%/AC24V

±

10%

5


Power LED 

Illuminates when power is supplied.

6


Video Output Jack 

Used to connect an external video monitor in jack.

7


RJ-45 JACK 

Terminals, such as RS-485 communications, MD OUT, ZOOM, and FOCUS, EX_DN 

are areincluded.

Connection

Connecting to Monitor

Connect Video Out Jack to the monitor's Video In jack as shown below.

•  Connection methods may vary depending on the video equipment. Please refer 

to the model specific instruction manual.

• Connect cables with the unit powered down.

CCD Camera

Monitor

Bottom View

3

4

6

5

7

Summary of Contents for SCZ-2370

Page 1: ...High Resolution 37X Zoom Color Camera SCZ 2370 User Guide Before installing and operating this product please read this manual thoroughly ENGLISH ...

Page 2: ...ant operating and maintenance servicing instructions in the literature accompanying the appliance INFORMATION This equipment has been tested and found to comply with limits for a Class A digital device pursuant to part 15 of the FCC Rules These limits are designed to provide reasonable protection against harmful interference when the equipment is operated in a commercial environment This equipment...

Page 3: ...d RS 485 Communications SAMSUNG T SAMSUNG E Pelco P Pelco D Vicon Panasonic Bosch Honeywell AD Coaxial Communications Pelco Coaxitron OSD The camera s OSD is complimented by 18 foreign languages NTSC Korean English French Spanish Japanese Portuguese Taiwanese PAL English French German Spanish Italian Chinese Russian Czech Polish Portuguese Romanian Serbian Swedish Danish Turkish Features 5 Warning...

Page 4: ...fore we can t compensate for material loss and orpersonalinjuriesbyrobbery fire naturaldisasterorsomethinglikethistype Ignoring this information may result in material loss and or serious personal injuries including death Indicates Never Allowed Ignoring this information may result in material loss and or a slight injuries Indicates No Disassembling Warning Attention Special Mark Messages Precauti...

Page 5: ...minerals that are corrosive to electronic components Do not expose the camera to radioactivity Top Bottom 1 37x Zoom Color Camera SCZ 2370 2 Instruction Manual 3 8 PIN CABLEASSY 1 2 3 1 Tripod Mounting Bracket Screw Hole Used to fix tripod mounting bracket on top of the camera 2 Tripod Mounting Hole Used to install the camera on an optional tripod The tripod must be equipped with screws with speci...

Page 6: ...button To move the arrow indicator to down LEFT F NEAR button To move the arrow indicator to left RIGHT F FAR button To move the arrow indicator to right Overview 4 Power Input Terminal Power supply terminal DCType DC12V 10 DUALType DC12 10 AC24V 10 5 Power LED Illuminates when power is supplied 6 Video Output Jack Used to connect an external video monitor in jack 7 RJ 45 JACK Terminals such as RS...

Page 7: ... Do not input voltage NIGHT mode D N terminal must be connected to the ground I There is motion USER Vcc There is no motion 0V 5 0 5sec COM 6V 12V COM 6V 12V COM 6V 12V COM 6V 12V COM 8P Control Terminal Configuration Connecting to 8P Control Terminal Connecting to Power Power InputTerminal DUALType DC 12V 500mA AC24V 500mA Number Name Cable color Description Number Name Cable color Description 1 ...

Page 8: ...ature using the LEFT or RIGHT button 4 When completed move the arrow indicator to EXIT and press the SET button Features marked with a have an accessible submenu Access the submenu by pressing the SET button Notes Select feature using the UP or DOWN button Change the status using the LEFT or RIGHT button MAIN SETUP SSDR ON WHITE BAL ATW BACKLIGHT OFF MOTION DET OFF FOCUS EXPOSURE SPECIAL RESET EXI...

Page 9: ...vironment changes readjust it OUTDOOR Select this when the color temperature is between 1 700 K and 11 000 K sodium light inclusion INDOOR Select this when the color temperature is between 4 500 K and 8 500 K White Balance may not work properly under the following conditions In this case select the AWC mode When the color temperature of the environment surrounding the subject is out of the control...

Page 10: ...C may cause the camera to repeat the Auto Focus operation depending on lighting conditions It is recommended that you use the Focus Setup menu in One Push or Manual mode Smart Zoom and BLC cannot be used in conjunction with each other Setting up Smart Zoom and then BLC automatically cancels Smart Zoom Notes 3 Select a desired mode using the Left and Right button and press the SET button HLC Enable...

Page 11: ...al time to operate This system does not guarantee prevention of fire or theft The manufacturer shall not be held responsible for any accident or damage incurred Notes FOCUS MAIN SETUP SSDR ON WHITE BAL ATW BACKLIGHT OFF MOTION DET OFF FOCUS EXPOSURE ZOOM POS SETUP TELE WIDE AUTO Select AUTO and press the SET button to confirm Increase or decrease optical zoom ZOOM or digital zoom D ZOOM positions ...

Page 12: ...g or adjusting the status of the focus TRACK The camera moves the focus track which is established OFF Only the zoom lens moves ZOOMTRACK Select ON for the SMART ZOOM item in the MOTION DETECTION menu and press SET button to change the settings for the SMART ZOOM function FOCUS SETUP MODE AUTO ZOOM TRACK AUTO TRACK ZOOM SPEED FAST ZOOM FOCUS POS SETUP TELE WIDE NEAR FAR FOCUS SETUP MODE AUTO ZOOM ...

Page 13: ... zoom magnification level is set to the previous level that was set before the power went off MANUAL The zoom magnification level can be set from 1x to 37X The zoom postion is saved after 5 seconds when you set zoom function Notes PRESET NO Up to 128 preset configuratons are supported SAVE Save configured preset CLEAR Clear configured preset RETURN Revert to the FOCUS SETUP menu ZOOM POS SETUP TEL...

Page 14: ...nation MANUAL Manual iris configuration Set IRIS to MANUAL using the LEFT or RIGHT button and then press the SET button Increase or decrease iris level using the LEFT or RIGHT button while verifying the changes on screen IRIS MANUAL SETUP IRIS F No F1 6 RETURN SHUTTER MANUAL SETUP SHUTTER VAL 1 50 RETURN SHUTTER Control image brightness by adjusting shutter speed Position the indicator over SHUTTE...

Page 15: ...t SSNR to the desired mode using the LEFT or RIGHT button LOW Low noise reduction MEDIUM Medium noise reduction HIGH High noise reduction OFF Disabled EXPOSURE SETUP BRIGHTNESS 50 IRIS AUTO SHUTTER AGC HIGH SSNR3 ON Changing the AGC setting from LOW to HIGH results in greater sensitivity as well as on screen noise Setting AGC to OFF locks SSNR3 configuration Notes SENS UP This feature ensures clea...

Page 16: ... RIGHT 54 RETURN SPECIAL SETUP PRIVACY OFF DAY NIGHT AUTO DIS OFF DAY NIGHT You can display pictures in color or black and white When the SETUP menu screen is displayed select DAY NIGHT using the UP or DOWN button so that the arrow indicates DAY NIGHT Select a desired mode using the LEFT or RIGHT button according to the picture display you want AUTO The mode is switched to Color in a normal enviro...

Page 17: ... out signal to the external SYNC signal SPECIAL SETUP PRIVACY OFF DAY NIGHT COLOR DIS OFF SYNC INT COMM ADJ COMMADJ CommunicationAdjustment This function sets up the camera communication status when controlling the camera through an external controlled device When the SPECIAL menu screen is displayed using the UP or DOWN button so that the arrow indicates COMM ADJ Set up the mode moving the 4 dire...

Page 18: ... vertically on the screen SHARPNESS As you increase this value the picture outline becomes stronger and clearer IMAGE SETUP H REV OFF V REV OFF SHARPNESS ON RETURN SHARPNESS SETUP LEVEL 16 RETURN LCD Please select this menu item when using an LCD monitor LCD MONITOR SETUP GAMMA 0 45 PED LEVEL 17 COLOR LEVEL 50 RETURN CRT Please select this menu item when using a CRT monitor CRT MONITOR SETUP PED L...

Page 19: ...try field moves to the next position d Repeat steps a through c until the desired name has been entered Enter a title move the cursor to POS and press the SET button The entered title appears on the screen Select the position to display the title on the screen by moving the 4 direction buttons and press the SET button When the position is determined select Correcting Mistakes Move the cursor th CL...

Page 20: ...era position The image on the screen is dark Adjust the contrast feature of the monitor If you have an intermediate device set the 75Ω Hi z properly The camera is not working properly and the surface of the camera is hot Check that you have properly connected the camera to an appropriate power source The SENS UP function does not work Check thatAGC of EXPOSURE SETUP menu is OFF Check that SHUTTER ...

Page 21: ... Manual Lens Initialize Built In Camera Title OFF ON Displayed 15 characters Camera ID 256 ID Selectable Day Night Auto COLOR B W EXT Gain Control LOW MEDIUM HIGH MANUAL OFF Specifications White Balance ATW AWC MANUAL INDOOR OUTDOOR 1 700k 11 000K Back Light Compensation SSDR BLC HLC OFF SHUTTER ESC FLK MANUAL 1 60 PAL 1 50 1 120K sec x2 x512 sec O S D Korean English Japanese Spanish French Portug...

Page 22: ...0h 00h AFh CHECK SUM Return Packet A0h CAM ID HOSTADDR 0200h 00h 00h 00h 00h AFh CHECK SUM ZoomWide Function Move zoom lens to wide direction Command Packet A0h CAM ID HOSTADDR 0040h 00h 00h 00h 00h AFh CHECK SUM Return Packet A0h CAM ID HOSTADDR 0040h 00h 00h 00h 00h AFh CHECK SUM ZoomTele Function Command Packet A0h CAM ID HOSTADDR 0020h 00h 00h 00h 00h AFh CHECK SUM Return Packet A0h CAM ID HOS...

Page 23: ... Packet A0h CAM ID HOSTADDR 0007h P1 00h 00h 00h Afh CHECK SUM Parameter P1 00h USER PRESET 1 80h USER PRES ET 128 User Preset Clear Function Clear selected user preset Command Packet A0h CAM ID HOSTADDR 0005h P1 00h 00h 00h Afh CHECK SUM Return Packet A0h CAM ID HOSTADDR 0005h P1 00h 00h 00h Afh CHECK SUM Parameter P1 00h USER PRESET 1 80h USER PRES ET 128 OSD Menu On Off Function Display OSD men...

Page 24: ...HOSTADDR 0004h 00h 00h 00h 00h AFh CHECK SUM Return Packet A0h CAM ID HOSTADDR 0004h 00h 00h 00h 00h AFh CHECK SUM OSD Menu Right Function Move OSD arrow to right Command Packet A0h CAM ID HOSTADDR 0002h 00h 00h 00h 00h AFh CHECK SUM Return Packet A0h CAM ID HOSTADDR 0002h 00h 00h 00h 00h AFh CHECK SUM OSD Menu Set Function Move to inside menu Command Packet A0h CAM ID HOSTADDR 0100h 00h 00h 00h 0...

Page 25: ...e European Representative Address Equipment Type Environment CCTV Camera Model Name SCZ 2370P Beginning Serial NO C54N6V3Z300001X Year of Manufacture 2010 03 24 Conformance to EN 55022 2006 EN 50130 4 2003 We the undersigned hereby declare that the equipment specified above conforms to the above Directive s Manufacturer SAMSUNGTECHWIN CO LTD LegalRepresentativeinEurope Signature Signature Full Nam...

Page 26: ...COLOR ZOOM CAMERA User Guide 50 COLOR ZOOM CAMERA User Guide 51 MEMO MEMO ...

Page 27: ...orea 463 400 TEL 82 70 7147 8740 60 FAX 82 31 8018 3745 SAMSUNG TECHWIN EUROPE LTD Samsung House 1000 Hillswood Drive Hillswood Business Park Chertsey Surrey UNITED KINGDOM KT16 OPS TEL 44 1932 45 5300 FAX 44 1932 45 5325 SAMSUNG TECHWIN AMERICA Inc 1480 Charles Willard St Carson CA 90746 UNITED STATES Tol Free 1 877 213 1222 FAX 1 310 632 2195 www samsungcctvusa com SALES NETWORK ...

Reviews: