background image

1-3

1-4

DIGITAL VIDEO RECORDER

3

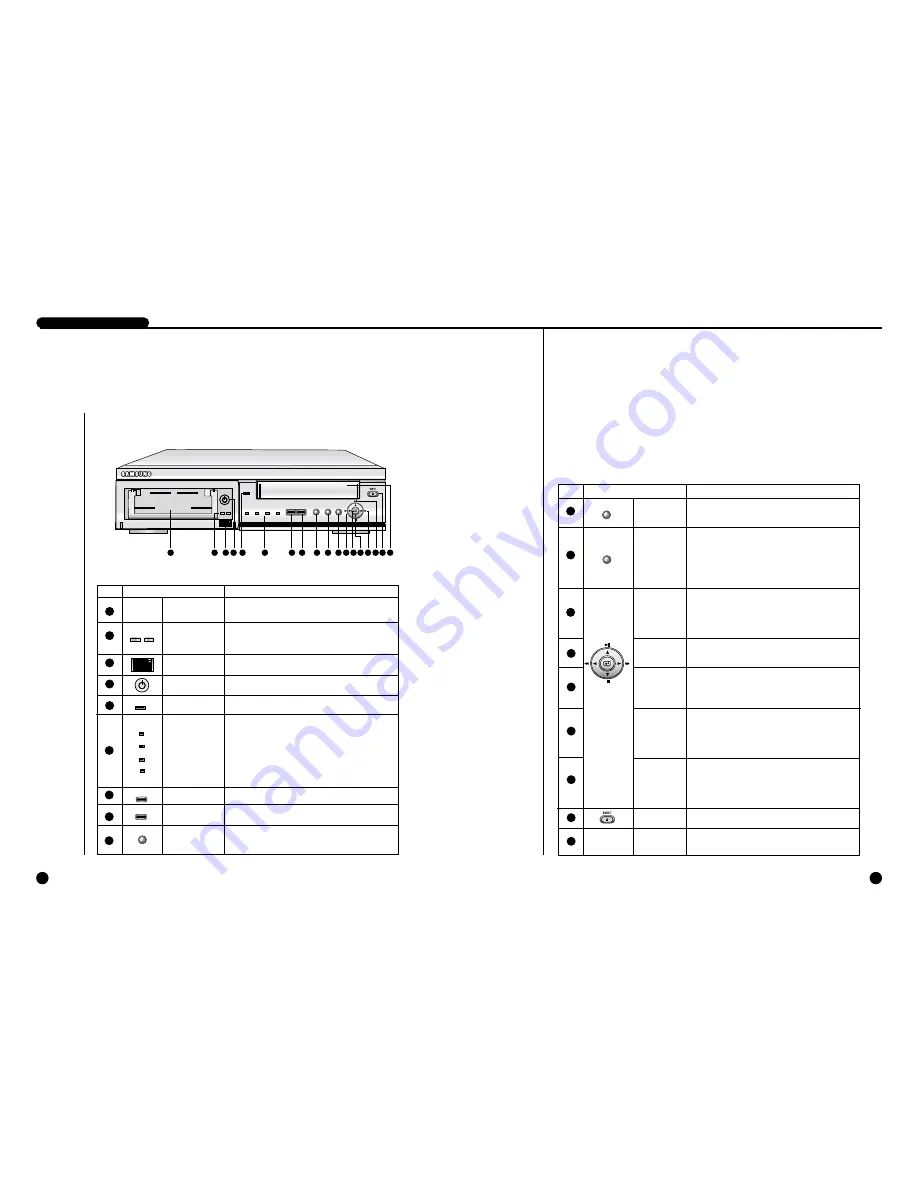
Name and Function of Each Part

Front View

 POWER

ALARM

LAN

CHECK

REC

VCR

SEARCH

MENU

REC LOCK

ARCHIVE

1

2

3

4

8

5

9

7

10

11 12 13  14  15  16  17  18 

6

No                  Name     

Function

SEARCH

MENU

LEFT/REW

ENTER

DOWN/STOP

RIGHT/FF

UP/PLAY/

STILL

EJECT

VIDEO DECK

Displays a list of recorded data and allows you to easily
search through the recorded data.

Displays the menu items. Use this also to exit the
submenu and return to the menu at the next highest
level. If the VCR LED is off, the DVR MAIN
MENU will be displayed and if it is on, the VCR
MAIN MENU will be displayed.

The LEFT arrow button moves the cursor to the left.
This button also works as the REW button during play-
back. While in Pause mode, pressing this button will
make the video reverse one frame at a time.

Use this to accept the selected menu item or to accept
the changed value. 

The DOWN arrow button moves the cursor down one
position or lowers a value. This button also works as the
STOP button during playback or recording.

The RIGHT arrow button moves the cursor to the right.
This button also works as the FF button during play-
back. While in Pause mode, pressing this button will
make the video advance one frame at a time.

The UP arrow button moves the cursor up one position
or raises a value. This button also works as the PLAY
button and the button to pause playback or view still
images.

Push this button to eject the video tape.

The cassette holder into which a video tape could be
inserted.

10

11

12

13

14

15

16

17

18

No                  Name     

Function

STATUS LED

RECORD

POWER LED

Hard Drive

Rack

HDD LED

Remote Control

Sensor

Hard Drive
Rack Lock

REC LOCK

VCR

The removable hard drive rack into which your hard
drive could be installed.

The hard drive status indicating LED. It indicates
power status and access to the hard drive.

Receives signals from the remote control unit.

Allows you to lock the hard drive rack in place.

Indicates that power is on.

Indicates system status.

ALARM : Indicates alarm status.

● 

LAN : Indicates when the system is connected to a   

PC via LAN.

CHECK : Indicates any abnormal occurrence 

dur   ing the system operation.

ARCHIVE : Indicates the video tape backup.

Records live images.

Locks all keys during recording to prevent accidental
operation of the unit.

If the VCR LED is on, the system is in VCR mode

and if it is off, the system is in DVR mode.

5

6

7

8

9

1

2

3

4

 POWER

ALARM

LAN

CHECK

ARCHIVE

REC

REC LOCK

VCR

SEARCH

MENU

Summary of Contents for SCR-3000P

Page 1: ...DIGITAL VIDEO RECORDER DVR COMBO User s Manual CLASS A For Business To use this product safely have to read Important Safety Introductions and then be well aware of the contents ...

Page 2: ...his apparatus When a cart is used use caution when moving the cart apparatus combination to avoid injury from tip over 14 Refer all servicing to qualified service personnel Servicing is required when the apparatus has been damaged in any way such as power supply cord or plug is damaged liquid has been spilled or objects have fallen into the apparatus the apparatus has been exposed to rain or moist...

Page 3: ...en 3 Record Setup 4 Alarm Record Setup 5 Reservation Timer Setup 6 System Setup 7 Communication Setup V Viewing the VCR Menu 1 VCR Menus 2 Manual Archive 3 Timer Archive 4 Archive Setup 5 Archive Check VI Record 1 Basic Record 2 Record Lock 3 Alarm Record 4 Reservation Record VII Retrieval and Playback 1 Search Menus 2 Retrieval by Date and Time 3 Recorded Data List View 4 Alarm Record Retrieval 6...

Page 4: ...1 I Summary ...

Page 5: ... when motion is detected It can be used in conjunction with a multiplexer SAMSUNG SDM 160 P 090 P Multiplexer SOM 080 N P SMO 150 210 TRN TRP It offers various playback speeds 1 5 1 2 1 2 5 10 20 baud rate forward backward It has convenient search functions Date Time Search Record Event Search Alarm Event Search and Motion Event Search VISS Search The Remote Control allows for convenient operation...

Page 6: ...ng play back While in Pause mode pressing this button will make the video advance one frame at a time The UP arrow button moves the cursor up one position or raises a value This button also works as the PLAY button and the button to pause playback or view still images Push this button to eject the video tape The cassette holder into which a video tape could be inserted 10 11 12 13 14 15 16 17 18 N...

Page 7: ...ND If DISK END MODE in the RECORD MODE SETUPmenu is set to STOP a low 0V signal will be output for about 1 second when the hard drive becomes full during recording 9 10 11 P 0 W E R IN OUT 1 2 3 4 8 5 9 7 10 11 6 P 0 W E R No Name Function POWER AC IN FAN MODE RS485 PORT RS232 PORT Video In Out Connectors Power On Off switch The inlet for connecting the power cord NTSC AC 110 240V 60 Hz PAL AC 220...

Page 8: ...ording Displays menu items Use this also to exit the submenu and return to the menu at the next highest level Selects VCR mode and DVR mode directional keys Turns OFF only the events that currently producing buzzer output Takes you to VCR SPEED for selecting a VCR recording speed Plays the tape at 2x speed p 5 13 p 4 7 p 7 13 p 7 13 p 5 11 Use to remove the video tape Adjusts the VCR s playback sc...

Page 9: ...drive rack be sure to set the HDD as Master mode Otherwise the system will not recognize the HDD For instructions on how to set the HDD as Master mode please refer to the HDD s manual For example for a Samsung Spinpoint V80 HDD set the mode as follows H D D Lift up 5 Lift up the rack s front handle and push the rack into the main unit Once the hard drive rack is fully inserted into the main unit l...

Page 10: ...II Connection with Other Devices 2 ...

Page 11: ...gger output jack TRIGGER OUT Connect both GND terminals together For details on the functions of SDM 160 please refer to the user s guide of SDM 160 Caution Caution Be sure to connect the trigger output terminal TRIGGER OUT of this unit to the Multiplexer Otherwise a normal recording cannot be made For the connection method please refer to the user s guide for the Multiplexer you want to use Set u...

Page 12: ... the numbers may be different for external devices For external devices if the alarm input ALARM INPUT and alarm cancel ALARM CANCEL are not available you can leave them unconnected GND TRIGGER IN ALARM IN ALARM CANCEL ALARM OUT 1 1 2 3 4 5 6 7 8 9 1 2 3 4 5 2 3 4 5 6 7 8 9 1 2 3 4 5 Connection with RS 232C A Communication Method Data Code ASCII Code Protocol 8 bit Data 1 Stop bit None Parity Tran...

Page 13: ...e 4 Byte 5 Byte 6 7 8 Byte 9 Response Byte 5 RECORD 0xA0 Src Addr Dest Addr 0x1A 0x0B 0xFF Check Sum Byte 5 REC LOCK 0xA0 Src Addr Dest Addr 0x1A 0x0A 0xFF Check Sum Byte 5 VCR 0xA0 Src Addr Dest Addr 0x1A 0x3D 0xFF Check Sum Byte 5 SEARCH 0xA0 Src Addr Dest Addr 0x1A 0x02 0xFF Check Sum Byte 5 MENU 0xA0 Src Addr Dest Addr 0x1A 0x01 0xFF Check Sum Byte 5 ENTER 0xA0 Src Addr Dest Addr 0x1A 0x35 0xF...

Page 14: ...III Basic Method to use 3 ...

Page 15: ...the system s input When this occurs power down the system and connect an NTSC signal to the input The system then initializes to NTSC signals on power up On the other hand the SCR 3000P system only recognizes PAL signal inputs Please connect the video signals appropriate for each model If no HDD is installed or if the system is turned on while the hard drive rack is unlocked the system will boot u...

Page 16: ...will mark the position in the bottom left and right corner Select LEFT or RIGHT in TIME MARK POSITION of the RECORD MODE SET UP menu Please refer to Page 4 8 for the details 2003 06 25 04 30 00 2003 06 24 00 23 44 X2 3 4 3 3 DIGITAL VIDEO RECORDER 2Basic Screen Viewing If system is in the recording state icon will blink However it does not blink in the Live Screen state If the system is in the rec...

Page 17: ...ally blinks If the system is in the recording state due to Motion Detection icon appears In this state icon continually blinks If the system is in the recording state due to the timer icon appears If the system in the recording lock state icon appears It occurs when the system is connected to remote viewer program through the LAN Indicates whether a HDD is installed or whether the hard drive rack ...

Page 18: ... it changes to this icon In addition stored data can be played back at various speeds when played in the forward direction at speeds other than the normal speed the speed is shown on the right side of the icon and if it is played in the reverse direction at speeds other than the normal speed icon appears and the right side of this icon shows the speed Possible speeds in the system for forward and ...

Page 19: ...IV DVR Menus 4 ...

Page 20: ...to select the menu item you want A highlighted cur sor should appear over the selected item Next press the ENTER button to accept the choice Settings will be displayed on the left and their values will be displayed on the right 1Menu View Note Note Make sure that the VCR LED is off before pressing the MENU button If the VCR button had been pressed the VCR MAIN MENU will be displayed You can go int...

Page 21: ... Then if pressing the RIGHT button the cursor is changed so minute may be changed CLOCK DISPLAY MODE SETUP DATE 2003 06 01 SUN TIME 12 00 00 DATE DISPLAY TYPE YYYY MM DD DATE TIME DISPLAY ON DATE TIME POSITION RIGHT STATUS DISPLAY ON STATUS POSITION LEFT MOVE SELECT EXIT MENU CLOCK DISPLAY MODE SETUP DATE 2003 06 01 SUN TIME 12 00 00 DATE DISPLAY TYPE YYYY MM DD DATE TIME DISPLAY ON DATE TIME POSI...

Page 22: ...NICATION SETUP Each menu item Caution Caution Upon shipment from the factory the values of the menu are set as follows CLOCK DISPLAY MODE SETUP DATE 2003 06 01 SUN TIME 12 00 00 DATE DISPLAY TYPE YYYY MM DD DATE TIME DISPLAY ON DATE TIME POSITION RIGHT STATUS DISPLAY ON STATUS POSITION LEFT MOVE SELECT EXIT MENU RECORD MODE SETUP DVR INPUT VIDEO IN AUDIO RECORD ON PICTURE QUALITY HIGH PICTURE RATE...

Page 23: ... MODE OVERWRITE DISK END BUZZER ON RECORD TIME MARK ON TIME MARK POSITION RIGHT MOVE SELECT EXIT MENU DISK END MODE If you select STOP recording will stop when you consume the full HDD space Setting this to OVERWRITE will continue to record the current data by overwriting the previous data The relative positions where the recorded data are being stored in the HDD will be indicated on the screen in...

Page 24: ... is to be performed when a motion is detected in the input video or when alarm occurs The value can be set from 0 seconds to 5 minutes when you set to OFF If you set to AUTO the alarm recording is performed only during when the alarm signal is Active 5MINUTE 4MINUTE 3MINUTE 2MINUTE 1MINUTE 30SECOND 20SECOND 10SECOND AUTO OFF Note Note The following table shows how long it would take to fill up an ...

Page 25: ...ARM TIME LIMIT The pre alarm recording is an important function which enables you to find out about the situation immediately before a motion is detected in the input video or before alarm occurs Set how much video data you want to record before the motion is detected or alarm is triggered About 2 seconds to 10 seconds of video data are stored in the system s SDRAM at all times When a motion is de...

Page 26: ...o 12 00 and END is set to 11 00 the record ing will start at 12 on Monday and end at 11 on Tuesday When you turn on the system or if you have replaced the HDD the timer recording will be performed again if the current time falls within the scheduled time To force stop the recording press and hold the STOP button for 3 seconds Then the recording will pause for 5 seconds If no action is performed by...

Page 27: ... FRANÇAIS ESPAÑOL ITALIANO IR REMOCON If IR REMOCON to ON signals from the remote control will be received and if it is set to OFF signals from the remote control will not be received The option will be turned off by factory default reset For instructions on how to use the remote control please refer to 4 Introduction to the Remote Control on page 1 7 ON OFF MULTIPLEXER If MULTIPLEXER is set to WI...

Page 28: ... ID and password entered match the ones set in the NETWORK USER ID and NETWORK USER PWD you can connect to the system otherwise you cannot gain access Both are 4 digit numbers and the initial set values are 0000 PAN TILT TYPE Remote Control of Camera You can control the Pan Tilt Zoom function of a camera with the remote monitoring program installed in the remote PC through LAN Then you shall selec...

Page 29: ... the upper menu and exiting the current menu are the same as in the DVR menus Menu Items MANUAL ARCHIVE TIMER ARCHIVE ARCHIVE SETUP ARCHIVE CHECK MANUAL ARCHIVE FROM RECORD EVENT LIST FROM ALARM EVENT LIST FROM MOTION EVENT LIST TIME RANGE DIRECT ARCHIVE PICTURE SAMPLING RATE 1 1 MOVE SELECT EXIT MENU TIMER ARCHIVE TIMER ARCHIVE OFF SELECT EVENT RECORD X ALARM X MOTION X DAY SUN FROM 12 00 00 TO 1...

Page 30: ...003 07 10 23 51 12 X 07 RECORD 2003 07 10 13 37 48 X MOVE START REC EXIT MENU Use the LEFT RIGHT UP and DOWN buttons to select the event you want to back up A highlighted cursor should appear over the selected item Press the ENTER button to accept the choice The selected event will be indicated by O Repeat this procedure for each event you want to back up and then press the RECORD button to start ...

Page 31: ...s triggered by motion detection onto a video tape The following illustration shows the FROM MOTION EVENT LIST screen in detail The EVENT MOTION DATE and TIME indicate when the event was recorded on the hard drive To exit this screen and return to the MANUALARCHIVE menu press the MENU button Use the UP and DOWN buttons to select the event you want to back up A highlight ed cursor should appear over...

Page 32: ...f events set these two types of events to O Next enter the backup start and end times and then press the RECORD button The RECORD and MOTION events within the specified time inter val will be backed up earliest to most recent Even if ALARM events are found within the sec tion you have specified they will be ignored because you did not select that event type Note Note If MULTIPLEXER in the SYSTEM S...

Page 33: ...l the TIMER ARCHIVE enter the menu within 5 seconds and set the TIMER ARCHIVE to OFF Because TIMER ARCHIVE is an automatic backup for the data that will be recorded any data that has already been recorded will not be backed up The following illustrates the timeline of TIMER ARCHIVE The TIMER ARCHIVE time is a future time rather than the current time If the time you set is earlier than the current ...

Page 34: ...the ARCHIVE SETUP menu Note Note Recording Time to Recording Mode 1 TAPE REC IF HDD TROUBLE 1 EMG Set whether to allow the VCR to continue the recording if the hard drive fails for some rea son If there is a problem in HDD it will automatically execute VCR BACKUP If you replace the failed hard drive with a new one VCR backup will be cancelled and the system will to the previous state before the fa...

Page 35: ... possible after archiving has stopped To perform ARCHIVE CHECK in VCR mode place the cursor at the ARCHIVE CHECK of ARCHIVE MENU and press the ENTER button or press the ARC CHECK but ton on the remote control The ARCHIVE CHECK will start and the following screen will appear In the above screen signals from the DVR are being recorded on the VCR for about 5 sec onds After about 5 seconds icon will a...

Page 36: ...VI Record 6 ...

Page 37: ...the system is in the Live screen mode the video that is currently being input separate from the screen currently being played will be recorded when the system is in the playback mode While the user is in the menu pressing the RECORD button will not start the recording To start the recording first exit the menu RECORD STOP Press the STOP button to stop recording Then the light will go off in the RE...

Page 38: ...put terminal of an external device such as Multiplexer For detailed information on connections please refer to 3 System Connection for Alarm Recording on p 2 3 Next set the ALARM SIGNAL DETEC TION of the ALARM RECORD SETUP menu to ON to begin recording whenever alarm is triggered Also set the MOTION DETECTION of the ALARM RECORD SETUP menu to ON to begin the alarm recording whenever a motion is de...

Page 39: ...ng setup time is elapsed and resumes the record ing it not To completely stop the recording go into the menu within 5 seconds to set the TIMER item of the corresponding line to OFF Caution Caution To stop the recording when you are recording by pressing the RECORD button shortly press the STOP button However if you want to stop the record ing which isthe alarm or motion recording or timer recordin...

Page 40: ...nu Items DATE TIME SEARCH RECORD EVENT SEARCH ALARM EVENT SEARCH MOTION EVENT SEARCH PB CHANNEL SETUP SYSTEM INDICATON Caution Caution No list will be displayed when you go into the RECORD EVENT SEARCH or ALARM EVENT SEARCH MOTION EVENT SEARCH menu or the POWER EVENT LIST screen because no data is recorded on the hard drive when it is first shipped from the factory SEARCH MENU DATE TIME SEARCH REC...

Page 41: ...tem will create a new list during recording after 30 minutes has elapsed from the previous event The system begins the recording when the RECORD button is pressed or when a motion is detected or alarm is triggered or when the timer recording time is up here the list of the data recorded by motion detection or alarm occurrenceis not displayed Place the cursor at one of the items on the list of the ...

Page 42: ...w the list in pages Press the LEFT button to move to the previous page or press the RIGHT button to move to the next page In DVR MENU if MULTIPLEXER of SYSTEM SETUP is set to WITH MOTION EVENT SEARCH of SEARCH MENU will be disabled 5Searching Motion Detection Recordings Of those data recorded on the HDD the ones recorded by motion detection will be listed in order of recording start time Other inf...

Page 43: ...T EXIT SEARCH SYSTEM INDICATION POWER EVENT LIST SYSTEM INFORMATION SYSTEM STATUS MOVE SELECT EXIT SEARCH 1 POWER EVENT LIST The dates and times when the system was turned on and off will be displayed in chronologi cal order POWER EVENT LIST 01 08 ID EVENT DATE TIME 01 POWER ON 2003 09 24 00 00 52 02 POWER OFF 2003 09 24 00 07 38 03 POWER ON 2003 09 24 00 11 56 04 POWER OFF 2003 09 24 00 23 24 05 ...

Page 44: ...llows OK Normal HDD NOT IN The hard drive rack is empty or the hard drive rack lock is unlocked 2 HDD REMAIN This shows the remaining hard drive space However if DISK END MODE in the RECORD MODE SETUP menu is set to OVERWRITE OVERWRITE will be displayed The percentage of remaining space will be displayed only if DISK END MODE is set to STOP 3 VCR SYSTEM This shows the status of the VCR If the VCR ...

Page 45: ...ton will not start the playback To start the playback first exit the menu Press PLAY STILL II button during playback The following screen will appear and the system will pause temporarily Use the RIGHT or LEFT button to view a frame at a time in forward or backward direction To play back again press the PLAY STILL II button Note Note Menu screen will not be displayed even if the MENU button is pre...

Page 46: ...F RIGHT button to forward even faster Sound will mute while for warding Pressing the FF RIGHT button while not playing will only fast forward without playing it To rewind the video press Rewind LEFT button just as the fast forward function works Press double speed play button on the remote controller X2 to fast forward in double speed However screen shaking or noise can occur in the double speed m...

Page 47: ... to play back repeatedly At this time blinks on the upper left part Press the REPEAT button again at the end point of the section you want to play back repeat edly The specified section will be played back 5 times will appear at the top left of the screen To cancel the A B Repeat press the PLAY STILL II button twice Please note that A B Repeat Playback will work only if the DVR s playback speed is...

Page 48: ...VIII Others 8 ...

Page 49: ...600Ω Video Compression Method Motion JPEG Audio Compression Method G 723 6 3 Kbps 2 835 MB h Video Resolution 720 x 240 NTSC 720 x 288 PAL Picture Quality Very High High Normal Low Recording Field Rate 60 0 50 Fields sec NTSC 50 0 50 Fields sec PAL Alarm Record Time 10 20 30 sec 1 2 3 4 5 min Remote Control RS232 RS485 LAN Operation Temperature 0 C 40 C Storage Temperature 20 C 60 C Operating Humi...

Page 50: ...Appendix 9 ...

Page 51: ...e DISK END MODE in the RECORD MODE SETUP menu to OVERWRITE and press the RECORD button To start recording while the DISK END MODE is set to STOP you should set the HDD ERASE in SYS TEM SETUP menu to ON and terminate the menu Then all the current data will be deleted Now you should press the RECORD button to start recording However as the deleted data can not be recovered by all means you should ch...

Page 52: ... supply of normal input image signal Press the STOP button for 3 seconds Then recording will be paused for 5 seconds and you shall enter the menu to change the recording setup in the meantime If you want to stop the alarm recording you shall set the ALARM SIGNAL DETECTION of the ALARM RECORD SETUP menu to OFF If you want to stop the reserved recording you shall set the TIMER of the TIMER RECORD SE...

Reviews: