background image

34

_ English

French _

34

Ne forcez pas lorsque vous insérez une cassette ou fermez le compartiment 
à cassette ; cela risquerait en effet d'entraîner un dysfonctionnement.
Utilisez uniquement des cassettes DV.

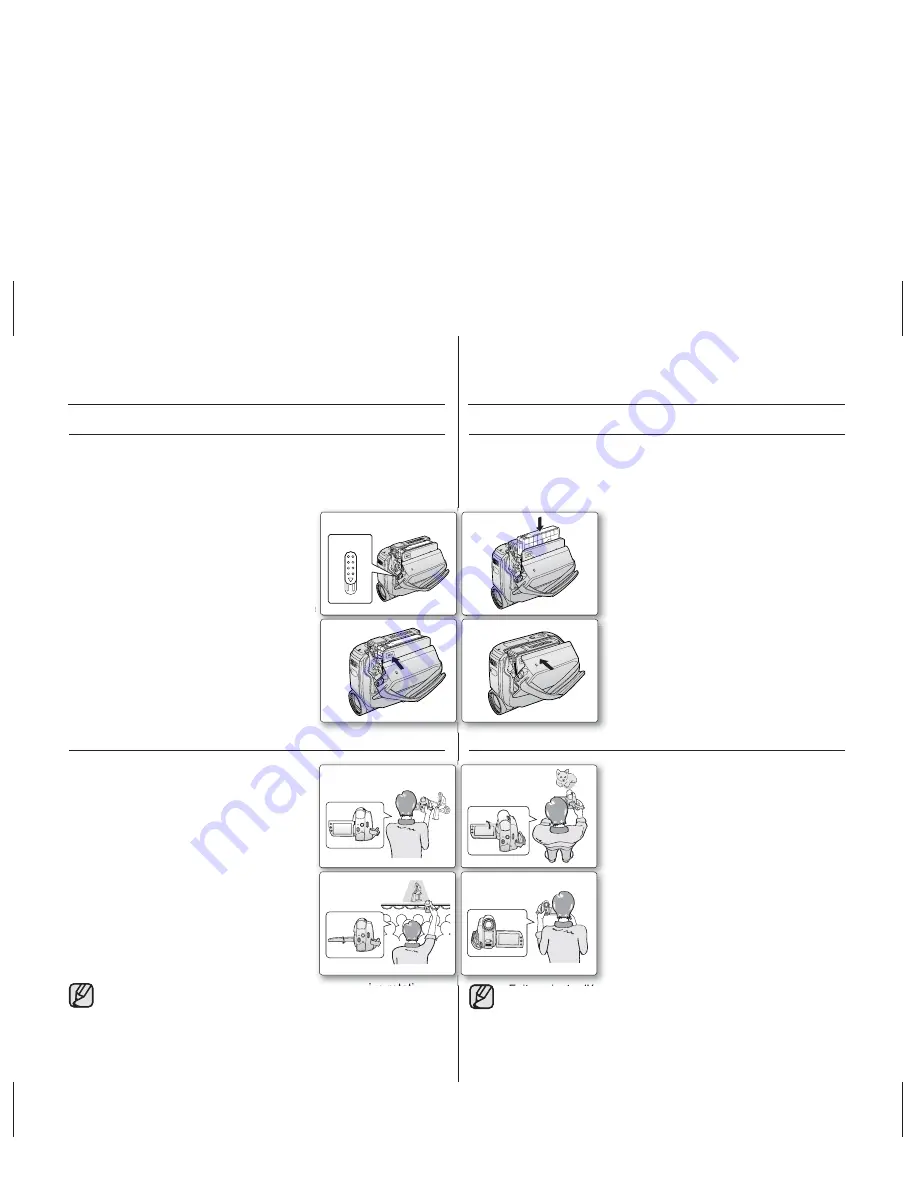
1.

  Raccordez votre appareil  une source 

d'alimentation et faites glisser l'interrupteur

 OPEN

.

Le couvercle du compartiment à 
cassette s'ouvre automatiquement.

2.


Insertion d'une cassette :

 insérez une 

cassette dans le compartiment, la fenêtre de la 
cassette devant être orientée vers l'extérieur 
et le volet de protection vers le haut. 

Éjection d’une cassette :

 la cassette est 

automatiquement éjectée dès que vous 
exercez une pression vers l'extérieur.

3.

  Appuyez sur le couvercle du compartiment 

à cassette marquée 

PUSH

 jusqu'à ce que 

vous entendiez un déclic.

La cassette est chargée automatiquement.

4.

  Fermez le couvercle du compartiment à cassette.

INSERTION/ÉJECTION D'UNE CASSETTE 

enregistrement de base

TECHNIQUES D'ENREGISTREMENT 

Il est possible que la technique d'enregistrement 
doive être adaptée à la situation.

1.

 Enregistrement classique

2.

 Enregistrement descendant.

Réalisez une prise de vue en contrôlant la 
scène sur l'écran LCD orienté vers le haut.

3.

  Enregistrement en hauteur

Réalisez une prise de vue en contrôlant la 
scène sur l'écran LCD orienté vers le bas.

4.

 Enregistrement automatique

Enregistrez-vous en contrôlant la scène 
sur l'écran LCD orienté vers l'avant.

Faites pivoter l'écran LCD avec délicatesse car une rotation 
excessive peut endommager l'intérieur de la charnière qui relie 
l'écran LCD au caméscope.

When inserting a tape or closing the cassette compartment, do not 
apply excessive force, as it may cause a malfunction.  
Do not use any tape other than DV cassettes.

1.

  Connect a power source and slide the 

OPEN 

switch.

The cassette compartment cover opens 
automatically. 

2.


Inserting


a


Cassette:

 Insert a tape into 

the cassette compartment with the tape 
window facing outward and the protection 
tab toward the top. 

Ejecting


a


Cassette:

 Remove the cassette 

tape, which is automatically ejected by 
pulling the cassette out. 

3.

  Press the area marked 

PUSH

 on the cassette 

compartment cover until it clicks into place.

The cassette is loaded automatically.

4.

  Close the cassette compartment cover.

INSERTING / EJECTING A CASSETTE

basic recording

VARIOUS RECORDING TECHNIQUES

In some situations different recording 
techniques may be required.

1.

 General recording.

2.

 Downward recording.

Making a recording with a top view of 
the LCD screen.

3.

 Upward recording.

Making a recording viewing the LCD 
screen from below.

4.

 Self recording.

Making a recording viewing the LCD 
screen from the front.

Please rotate the LCD screen carefully as excessive rotation 
may cause damage to the inside of the hinge that connects 
the LCD screen to the camcorder.

OPEN

Summary of Contents for SC-D385

Page 1: ...e produit Samsung Pour bénéficier d un service plus complet veuillez enregistrer votre produit à cette adresse www samsung com global register Digital Video Camcorder user manual imagine the possibilities Thank you for purchasing this Samsung product To receive more complete service please register your product at www samsung com global register ...

Page 2: ...nregistrement d un film permet de stocker un enregistrement vidéo sur une carte mémoire Fente de la carte MMC SD modèles SC D383 D385 uniquement Cette fente permet d insérer des cartes MMC Multi Media Cards et SD CARACTÉRISTIQUES DE VOTRE NOUVEAU CAMÉSCOPE MINI DV key features of your miniDV camcorder Digital Data Transfer Function with IEEE1394 By incorporating the IEEE 1394 i LINK i LINK is a se...

Page 3: ...xiste un risque d explosion si la pile n a pas été remise en place correctement Assurez vous de remplacer la pile usagée par une pile neuve identique ou du même type Utilisez un adaptateur approprié si l alimentation est du type 240 V CA safety warnings What the icons and signs in this user manual mean WARNING Means that death or serious personal injury is a risk CAUTION Means that there is a pote...

Page 4: ...écision Il se peut toutefois que de petits points rouges bleus ou verts apparaissent sur celui ci Ce phénomène est parfaitement normal et n affecte aucunement la photo enregistrée Ne saisissez jamais le caméscope par l écran LCD ou la batterie NOTES REGARDING THE VIDEO HEAD CLEANING To ensure normal recording and a clear picture clean the video heads regularly If a square block shape distorts play...

Page 5: ...the video heads may be dirty If this happens clean the video heads with a dry type cleaning cassette French _v v_ English RÉPARATION ET PIÈCES DE RECHANGE N essayez pas de réparer vous même ce caméscope En ouvrant ou en retirant les capots vous risquez entre autre de vous électrocuter Con ez toute réparation à un technicien quali é Lorsque des pièces doivent être remplacées assurez vous que le rép...

Page 6: ...2 D385 uniquement 26 Réglage du signal sonore Beep Sound Signal Sonore 27 Réglage du son de l obturateur Son Shutter Sound Son Obturateur 28 Choix de la langue d affichage à l écran Language Langue 29 Visualisation de la démonstration Demonstration Démonstration contents GETTING TO KNOW YOUR MINIDV CAMCORDER 06 PREPARATION 12 INITIAL SETTING SYSTEM MENU SETTING 24 06 What is included with your min...

Page 7: ...Cut Plus Coupe Vent 46 Sélection de la fonction Real Stereo Stéréo 47 Réglage de la fonction Prog AE Program AE 49 Réglage de la balance des blancs White Balance Bal Blancs 51 Application d effets visuels Visual effect Effets visuels 53 Réglage du 16 9 wide Mode 16 9 54 Utilisation de la télé macro Macro INITIAL SETTING DISPLAY MENU SETTING BASIC RECORDING 34 ADVANCED RECORDING 44 30 Setting the g...

Page 8: ...n contre la suppression accidentelle protect Protéger 79 Suppression de photos et de films Delete Supprimer 81 Formatage d une carte mémoire Format LECTURE 62 BRANCHEMENTS 68 APPAREIL PHOTO NUMÉRIQUE SC D383 D385 uniquement 72 sommaire 55 Setting the digital image stabilizer DIS 56 Using back light compensation mode BLC 57 Zooming in and out with digital zoom Digital Zoom 58 Using the color nite C...

Page 9: ...5 106 PICTBRIDGE modèles SC D383 D385 uniquement TRANSFERT DE DONNÉES IEEE 1394 INTERFACE USB modèles SC D383 D385 uniquement 92 ENTRETIEN 98 DÉPANNAGE CARACTÉRISTIQUES GARANTIE POUR LE CANADA 82 Recording moving images MPEG on a memory card 84 Playing the moving images MPEG on a memory card M Play select 85 Recording an image from a tape as a photo image 86 Copying a photo image from a tape to a ...

Page 10: ...modèles SC D383 D385 uniquement 6 Manuel d utilisation 7 Pile de type bouton pour la télécommande Type CR2025 modèles SC D382 D385 uniquement 8 Télécommande modèles SC D382 D385 uniquement 9 Couvre objectif 10 Cordon du couvre objectif WHAT IS INCLUDED WITH YOUR MINIDV CAMCORDER Your new Digital Video camcorder comes with the following accessories If any of these items is missing from your box cal...

Page 11: ...ichage 7 Écran LCD TFT 8 Microphone interne Veillez à ne pas recouvrir le microphone interne et l objectif lors de l enregistrement ATTENTION FRONT LEFT VIEW 1 Lens 2 Remote sensor SC D382 D385 only 3 Light SC D382 D383 D385 only 4 OPEN switch 5 EASY Q button page 36 6 Display button 7 TFT LCD screen 8 Internal microphone Be careful not to cover the internal microphone and lens during recording CA...

Page 12: ...rupteur de sélection CARD TAPE SC D383 D385 uniquement 7 Bloc batterie 8 Interrupteur de déverrouillage de la batterie BATT LEFT SIDE VIEW getting to know your miniDV camcorder When you close LCD panel with the LCD screen facing out Joystick S T W X function works reversely 1 MENU button 2 Joystick S T W X Select W T page 23 3 Recording start stop button 4 Jack cover AV DV jack 5 Built in speaker ...

Page 13: ...teur POWER 5 Couvercle de prise prise DC IN USB SC D383 D385 uniquement 6 Couvercle du compartiment à cassette 7 Dragonne RIGHT TOP VIEW 1 Zoom W T Volume VOL lever 2 PHOTO button page 60 76 3 Recording start stop button 4 POWER switch 5 Jack cover DC IN USB SC D383 D385 only jack 6 Cassette compartment cover 7 Hand strap MODE AV DV POWER CHG V O L ...

Page 14: ...arge CHG 7 Prise USB modèles SC D383 D385 uniquement 8 Fente de la carte mémoire modèles SC D383 D385 uniquement 9 Emplacement pour trépied getting to know your miniDV camcorder REAR BOTTOM VIEW Jacks SC D383 D385 AV DV DC IN USB SC D381 D382 AV DV DC IN Usable Memory Cards 2GB Max SC D383 D385 only MMC SD 1 AV jack 2 MODE button 3 Mode indicator Camera Player mode 4 DC IN Jack 5 DV IEEE1394 jack ...

Page 15: ...ton PAUSE 17 Bouton ARRÊT 18 Bouton F ADV page 64 Les boutons présents sur la télécommande fonctionnent comme ceux du caméscope mini DV USING THE REMOTE CONTROL SC D382 D385 ONLY 1 PHOTO button page 60 76 2 REC button 3 SELF TIMER button page 39 4 ZERO MEMORY button page 38 5 PHOTO SEARCH button page 61 6 A DUB button page 65 7 FF button 8 REW button 9 PLAY button 10 Direction button page 64 11 Di...

Page 16: ...e Mini DV par exemple comment utiliser les accessoires fournis comment charger la batterie comment démarrer l utilisation et configurer les symboles à l écran pour chaque mode It is very important to ensure that the hand strap has been correctly adjusted before you begin your recording The hand strap enables you to Hold the camcorder in a stable comfortable position Put your hand in a position whe...

Page 17: ...e d explosion Conservez la pile hors de la portée des enfants En cas d ingestion de la pile appelez immédiatement un médecin AVERTISSEMENT INSTALLING THE BUTTON TYPE BATTERY Button type battery installation for the remote control SC D382 D385 only 1 Pull out the button type battery holder toward the direction of the arrow 2 Position the button type battery in the button type battery holder with th...

Page 18: ...d autres fabricants Dans le cas contraire il existe un risque de surchauffe d incendie ou d explosion Samsung ne saurait être tenu responsable en cas de problème lié à l utilisation de batteries non agréées Use the IA BP80W battery pack only The battery pack may be charged a little at the time of purchase Be sure to charge the battery pack before you start using your miniDV camcorder Inserting Eje...

Page 19: ...t orange Si une erreur s est produite pendant la charge de la batterie ce témoin est orange et clignote Durée de charge Durée d enregistrement IA BP80W Environ 1 h 20 Environ 1 h 20 Batterie Heure Charging Recording Times with a fully charged battery pack with no zoom operation LCD open etc Measured times shown in the table are based on model SC D385 Times for SC D381 D382 D383 D385 are almost the...

Page 20: ...tc Par conséquent nous vous recommandons d avoir à disposition plusieurs batteries Pour vérifier l état de charge de la batterie appuyez sur le bouton Affichage et maintenez le enfoncé page 21 La durée de charge varie en fonction du niveau de charge de la batterie restant preparation The amount of continuous recording time available depends on The type and capacity of the battery pack you are usin...

Page 21: ... l adaptateur secteur AC sur une prise murale Le type de la fiche et de la prise murale peut être différent en fonction du pays dans lequel vous résidez 4 Faites glisser l interrupteur POWER vers le bas pour allumer l appareil et appuyez sur le bouton MODE pour définir le mode Camera Cam ou Player Lecteur Notes regarding the Battery Pack Please refer to the table on page 15 for approximate continu...

Page 22: ...que pour les modèles SC D383 D385 uniquement Nom du mode Bouton MODE Interrupteur de sélection modèles SC D383 D385 uniquement Mode Cam Camera tvkl hwl jhyk Mode Player Lecteur tvkl hwl jhyk Mode M Cam tvkl hw l hwl jhyk Mode M Player tvkl hw l hwl jhyk BASIC MINIDV CAMCORDER OPERATION Turning the miniDV camcorder on and off You can turn the camcorder on or off by sliding the POWER switch downward...

Page 23: ...ES 1 Battery Level page 16 2 Tele Macro page 54 3 Tape photo recording page 60 Self timer page 39 SC D382 D385 only 4 Operating Mode 5 Record Speed Mode page 44 6 Zero Memory page 38 SC D382 D385 only 7 Time counter movie recording time 8 Tape Indicator 9 Remaining Tape measured in minutes 10 Audio Mode page 44 11 Light page 59 SC D382 D383 D385 only 12 BLC Back Light Compensation page 56 13 WindC...

Page 24: ...dicator 2 Image Counter Total number of recordable photo images 3 CARD Memory Card Indicator 4 Light page 59 SC D382 D383 D385 only preparation OSD indicators shown here are based on model SC D385 The above screen is an example it is different from the actual display The OSD indicators are based on memory capacity of 2GB SC D383 D385 only For enhanced performance the display indications and the or...

Page 25: ...de la charge est donné à titre indicatif et constitue une estimation Il peut varier en fonction de la capacité de la batterie et de la température USING THE DISPLAY BUTTON You can switch between the on screen information display modes Press the Display button Switching the information display mode You can switch between the on screen information display modes Press the Display button The full and ...

Page 26: ...s les menus et les menus rapides varient selon le mode de fonctionnement que vous avez sélectionné USING THE JOYSTICK Used for playback pausing fast forwarding and rewinding Also used as directional buttons up down left right and to make a selection when selecting movie photo images or menus 1 Move the Joystick up or down 2 Move the Joystick W X left or right Confirm your selection by pressing Joy...

Page 27: ...T RAP AV RAP LECT AV RAP STOP RET RAP AV RAP LECT RET RAP STOP RET RAP AV RAP LECT MODE M Player photos Supprimer Vignette Fich précéd Fich prochain Diaporama Status Input Quick Menu In M Cam M Player modes SC D383 D385 only Quick Menu In Camera Player modes HANDLING QUICK MENUS WITH THE JOYSTICK Joystick W X OK Camera Mode Exposure Focus Shutter Fade Return Selection Exit the menu Player Mode STO...

Page 28: ...n figurant dans ce manuel peuvent différer légèrement des éléments réellement affichés sur votre caméscope Clock setup works in Camera Player M Cam M Player modes page 18 Set the date and time when using this camcorder for the first time 1 Set the Select switch to CARD or TAPE SC D383 D385 only 2 Press the MODE button to set Camera or Player 3 Press the MENU button The menu list will appear 4 Move...

Page 29: ...E DE LA TÉLÉCOMMANDE PAR LE CAMÉSCOPE REMOTE TÉLÉCOMMANDE MODÈLES SC D382 D385 UNIQUEMENT The remote function works in Camera Player M Cam M Player modes page 18 The remote function allows you to enable or disable the remote control for use with the camcorder 1 Set the Select switch to CARD or TAPE SC D385 only 2 Press the MODE button to set Camera or Player 3 Press the MENU button The menu list w...

Page 30: ...Lorsque le signal sonore est désactivé le bouton de mise sous hors tension n émet aucun son The beep sound function works in Camera Player M Cam M Player modes page 18 You can turn the beep sound on or off when on each press of a button sounds a beep 1 Set the Select switch to CARD or TAPE SC D383 D385 only 2 Press the MODE button to set Camera or Player 3 Press the MENU button The menu list will ...

Page 31: ...e bouton MENU RÉGLAGE DU SON DE L OBTURATEUR SHUTTER SOUND SON OBTURATEUR The shutter sound function works in Camera Player M Cam modes page 18 You can turn the shutter sound on or off when on with each press of the PHOTO button the shutter will sound 1 If you press the MODE button to set it to Camera set the Select switch to either CARD or TAPE If you press the MODE button to set it to Player set...

Page 32: ...age initial réglage du menu Système SELECTING THE OSD LANGUAGE LANGUAGE The Language function works in Camera Player M Cam M Player modes page 18 You can select the desired language to display the menu screen and the messages 1 Set the Select switch to CARD or TAPE SC D383 D385 only 2 Press the MODE button to set Camera or Player 3 Press the MENU button The menu list will appear 4 Move the Joystic...

Page 33: ... DÉMONSTRATION DEMONSTRATION DÉMONSTRATION Demonstration automatically shows you the major functions that are included with your camcorder so that you may use them more easily The demonstration function may only be used in the Camera mode without a tape inserted in the camcorder page 18 Before you begin Make sure that there is no tape inserted in the camcorder page 34 The demonstration operates re...

Page 34: ...jet au point de croisement des consignes vous obtiendrez une composition harmonieuse Les consignes ne peuvent pas être enregistrées avec les images en cours d enregistrement initial setting display menu setting SETTING THE GUIDELINE GUIDELINE Adjusting the LCD screen works in Camera M Cam modes page 18 Guideline displays a certain pattern on the LCD screen so that you can easily set the image comp...

Page 35: ...ton MENU Le réglage de l écran LCD n affecte ni la luminosité ni la couleur de l image qui sera enregistrée ADJUSTING THE LCD SCREEN LCD BRIGHT LCD COLOR Adjusting the LCD screen works in Camera Player M Cam M Player modes page 18 Your camcorder is equipped with a 2 7 inch wide color Liquid Crystal Display LCD screen which enables you to view what you are recording or playing back directly Dependi...

Page 36: ... la date JAN 1 2008 appuyez deux fois pour afficher l heure et appuyez une nouvelle fois dessus pour afficher la date et l heure à l écran réglage initial réglage du menu Affichage DISPLAYING THE DATE TIME DATE TIME The date time function works in Camera Player M Cam M Player modes page 18 The date and time are automatically recorded on a special data area of the tape 1 Set the Select switch to CA...

Page 37: ...ur sélectionner On Marche ou Off Arrêt puis appuyez sur le pavé 7 Pour sortir de la liste appuyez sur le bouton MENU SETTING THE TV DISPLAY TV DISPLAY The TV Display function works in Camera Player M Cam M Player modes page 18 You can select the output path of the OSD On Screen Display Off The OSD appears in the LCD screen only On The OSD appears in the LCD screen and TV Connecting to a TV pages 6...

Page 38: ...4 Enregistrement automatique Enregistrez vous en contrôlant la scène sur l écran LCD orienté vers l avant Faites pivoter l écran LCD avec délicatesse car une rotation excessive peut endommager l intérieur de la charnière qui relie l écran LCD au caméscope When inserting a tape or closing the cassette compartment do not apply excessive force as it may cause a malfunction Do not use any tape other t...

Page 39: ... Le caméscope Mini DV est doté de deux boutons Début fin d enregistrement L un se trouve à l arrière du caméscope et l autre se situe sur la façade LCD Sélectionnez le bouton adéquat selon l utilisation en cours MAKING YOUR FIRST RECORDING 1 Connect a power source to the camcorder page 17 A battery pack or a AC power adapter page 14 17 Insert a cassette page 34 If you want to record on a memory ca...

Page 40: ...vés les messages Release the Easy Q Relâcher Easy Q s affichent Bouton MENU Prendre une photo à l aide du bouton PHOTO en mode EASY Q désactive la fonction DIS enregistrement de base RECORDING WITH EASE FOR BEGINNERS EASY Q MODE basic recording The EASY Q function works only in Camera mode page 18 With the EASY Q function most of the miniDV camcorder settings are automatically adjusted which frees...

Page 41: ...n du zoom numérique Lorsque vous effectuez un zoom sur un sujet très proche de l objectif le caméscope Mini DV peut effectuer automatiquement un zoom arrière selon la distance jusqu au sujet Dans ce cas réglez Macro sur On Marche page 54 ZOOMING IN AND OUT The zoom function works in both Camera and M Cam modes page 18 Use the zoom function for close up or wide angle recording This miniDV camcorder...

Page 42: ...téristique par une coupure entre deux enregistrements La fonction Zero Memory est généralement disponible depuis la télécommande enregistrement de base SEARCHING QUICKLY FOR A DESIRED SCENE SETTING THE ZERO MEMORY SC D382 D385 only The zero memory function works in both Camera and Player modes page 18 You can mark a point on a tape that you want to return to following playback 1 Set the Select swi...

Page 43: ... La télécommande peut être orientée sans dysfonctionnement jusqu à 30 degrés de part et d autre de la ligne médiane de l appareil L utilisation d un trépied non fourni est recommandée pour les enregistrements retardés SELF RECORD USING THE REMOTE CONTROL SETTING THE SELF TIMER SC D382 D385 only The SELF TIMER function works only in Camera mode page 18 When you use the SELF TIMER function on the re...

Page 44: ...strement une déformation de l image peut se produire celle ci apparaissant à l écran sous forme de mosaïque Appuyer sur le bouton Début fin d enregistrement après la recherche d enregistrement permet d effacer les images enregistrées après cet endroit REVIEWING AND SEARCHING A RECORDING basic recording The Rec Search function works only in Camera mode page 18 Used to review previously recorded ima...

Page 45: ...er l enregistrement L image et le son disparaissent progressivement Fermeture en fondu USING THE FADE ON AND OFF The Fade function works only in Camera mode page 18 You can give your recording a professional look by using special effects such as fade in at the beginning of a sequence or fade out at the end of a sequence To Start Recording 1 Set the Select switch to TAPE SC D383 D385 only 2 Press t...

Page 46: ...ir de la liste appuyez sur le pavé Le témoin Manual focus M Focus et la barre d état s affichent sur l écran LCD Manual focus La mise au point manuelle n est pas accessible en mode EASY Q AUTOFOCUS MANUALFOCUS MISEAUPOINTAUTOMATIQUE MANUELLE enregistrement de base The Auto Focus Manual Focus function works in both Camera and M Cam modes page 18 In most situations it is better to use the automatic ...

Page 47: ...els sont prioritaires L image peut paraître moins lisse lorsque la vitesse de l obturateur est élevée Le caméscope repasse en réglage automatique de la vitesse de l obturateur et de l exposition lorsque vous revenez au mode EASY Q En enregistrant avec une vitesse d obturateur de 1 1000 ou supérieure assurez vous que l objectif n est pas en plein soleil SETTING THE SHUTTER SPEED EXPOSURE The Shutte...

Page 48: ... d image et de son Pour modifier les enregistrements audio sur votre caméscope sélectionnez 12Bit pour le modeAudio et SP pour le mode Rec Enr SÉLECTION DU MODE D ENREGISTREMENT ET DU MODE AUDIO Rec Mode Audio Mode Mode Enr et Mode Audio advanced recording ATTENTION The Record mode function works in both Camera and Player modes page 18 This camcorder records and plays back in SP standard play mode...

Page 49: ... Coupe Vent est arrêtée lorsque vous souhaitez que le microphone soit le plus sensible possible SUPPRESSION DU BRUIT DU VENT WINDCUT PLUS COUPE VENT The windcut plus function works in both Camera and Player Audio dubbing modes page 18 Use the windcut plus when recording in windy places such as the beach or near buildings The windcut plus function minimizes wind or other noises while recording When...

Page 50: ...reo Stéréo s affiche SÉLECTION DE LA FONCTION REAL STEREO STÉRÉO enregistrement avancé S The Real Stereo function works only in Camera mode page 18 Real stereo enhances the left and right input signals when using the internal microphone 1 Set the Select switch to TAPE SC D383 D385 only 2 Press the MODE button to set Camera 3 Press the MENU button The menu list will appear 4 Move the Joystick up or...

Page 51: ...ue le mode Auto est sélectionné SETTING THE PROGRAM AE PROGRAM AE The Program AE function works only in Camera mode page 18 The Program AE mode allows you to adjust shutter speeds and apertures to suit different recording conditions They give you creative control over the depth of field 1 Set the Select switch to TAPE SC D383 D385 only 2 Press the MODE button to set Camera 3 Press the MENU button ...

Page 52: ...n mode EASY Q Il est impossible de régler le mode Program AE Prog AE lorsque le shutter speed vitesse de l obturateur ou Exposure exposition sont en mode manuel RÉGLAGE DE LA FONCTION PROGRAM AE PROG AE enregistrement avancé Settings Contents On screen display Auto Auto balance between the subject and the background To be used in normal conditions The shutter speed is automatically adjusted from 1...

Page 53: ...cun témoin ne s affiche lorsque le mode Auto est sélectionné SETTING THE WHITE BALANCE WHITE BALANCE The White Balance function works in both Camera and M Cam modes page 18 The White Balance is a recording function that preserves the unique image color of the object in any recording condition You may select the appropriate White Balance mode to obtain good quality image color 1 Set the Select swit...

Page 54: ...culement vers le mode Auto peut permettre d obtenir de meilleurs résultats Si vous appuyez sur le bouton MENU pendant le réglage de l option Custom WB Bal Blancs ce réglage s annule et passe en mode Auto enregistrement avancé Settings Contents On screen display Auto This option is generally used to control the white balance automatically Daylight This controls the white balance according to the ou...

Page 55: ...e bouton MENU APPLICATION D EFFETS VISUELS VISUALEFFECT EFFETS VISUELS The visual effect function works only in Camera mode page 18 The visual effects enable you to give a creative look to your recording Select the appropriate visual effect for the type of picture that you wish to record and the effect you wish to create There are 10 visual effect modes 1 Set the Select switch to TAPE SC D383 D385...

Page 56: ...c Mosaïque Mirror Miroir Emboss2 Relief2 Pastel1 et Pastel2 sont désactivés La fonction Digital Zoom Zoom Num n est pas disponible avec les modes Mosaic Mirror Miroir Emboss2 Relief2 Pastel1 ou Pastel2 enregistrement avancé Settings Contents Off Disables the function Art This mode gives the images a coarse effect Mosaic This mode gives the images a mosaic effect Sepia This mode gives the images a ...

Page 57: ...E 16 9 WIDE MODE 16 9 WIDE The 16 9 wide function works only in Camera mode page 18 Recordings in 16 9 wide will play back naturally only when the TV supports 16 9 aspect ratio This product is set to 16 9 wide by the factory default 1 Set the Select switch to TAPE SC D383 D385 only 2 Press the MODE button to set Camera 3 Press the MENU button The menu list will appear 4 Move the Joystick up or dow...

Page 58: ...e pavé W T ou le bouton Zoom advanced recording USING THE TELE MACRO MACRO Tele Macro function works in both Camera and M Cam mode page 18 Effective focal distance in Tele Macro mode is 50 cm 19 7 inches to 100 cm 39 4 inches 1 Set the Select switch to CARD or TAPE SC D383 D385 only 2 Press the MODE button to set Camera 3 Press the MENU button The menu list will appear 4 Move the Joystick up or do...

Page 59: ...DIS la qualité de l image peut s en trouver SETTING THE DIGITAL IMAGE STABILIZER DIS The DIS function works only in Camera mode page 18 DIS Digital Image Stabilizer is a function that compensates for any shaking or hand movement while holding the camcorder within reasonable limits It provides more stable pictures when Recording with the zoom Recording a small object close up Recording and walking ...

Page 60: ...CONTRE JOUR BLC advanced recording BLC works in both Camera and M Cam modes page 18 Back lighting exists when the subject is darker than the background The subject is in front of a window The person to be recorded is wearing white or shiny clothes and is placed against a bright background the person s face is too dark to distinguish his her features The subject is outdoors and the background is ov...

Page 61: ...iver le mode C Nite si le mode Digital Zoom Zoom Num est déjà utilisé ZOOMING IN AND OUT WITH DIGITAL ZOOM DIGITAL ZOOM Maximum Digital Zoom works only in Camera mode page 18 You can select the maximum zoom level in case you want to zoom to a level greater than 34x the default setting during recording Up to 34x zoom is performed optically and after that up to 1200x zoom is performed digitally The ...

Page 62: ...nregistrement d une photo sur cassette En mode DIS le mode C Nite est désactivé advanced recording USING THE COLOR NITE C NITE C Nite function works only in Camera mode page 18 You can take a shot of an object in slow motion by controlling the shutter speed or a brighter image in dark places without compromising colors 1 Set the Select switch to TAPE SC D383 D385 only 2 Press the MODE button to se...

Page 63: ...mum USING THE LIGHT LIGHT SC D382 D383 D385 ONLY The Light function works only in Camera and M Cam mode page 18 The Light function enables you to record a subject in a dark place without compromising colors For example you can satisfactorily record the environment of nocturnal animals for observation when you use this function 1 Set the Select switch to CARD or TAPE SC D383 D385 only 2 Press the M...

Page 64: ... caméscope page 76 Appuyez sur le bouton PHOTO de la télécommande Le fait d appuyer sur le bouton PHOTO de la télécommande permet d enregistrer la photo avec une mise au point automatique SC D382 D385 uniquement advanced recording RECORDING A PHOTO IMAGE ON A TAPE TAPE PHOTO RECORDING Tape photo recording works only in Camera mode page 18 You can record a photo image on a tape The photo image is r...

Page 65: ... SEARCHING FOR A PHOTO IMAGE ON A TAPE PHOTO SEARCH The photo search works only in Player mode page 18 1 Set the Select switch to TAPE SC D383 D385 only 2 Press the MODE button to set Player 3 Press the MENU button The menu list will appear 4 Move the Joystick up or down to select Tape then press the Joystick or move the Joystick X to the right 5 Move the Joystick up or down to select Photo Search...

Page 66: ...nance du haut parleur Lorsque le câble Audio Vidéo est raccordé au caméscope aucun son n est émis par le haut parleur intégré et le volume ne peut pas être réglé lecture PLAYING BACK A TAPE ON THE LCD SCREEN The playback function and speaker works only in Player mode page 18 You can monitor the playback picture on the LCD screen 1 Insert the tape you wish to view page 34 2 Set the Select switch to...

Page 67: ...ant le ralenti avant Pour reprendre le ralenti avant appuyez sur le bouton X Pour reprendre la lecture normale appuyez sur le bouton X LECTURE VARIOUS FUNCTIONS WHILE IN PLAYER MODE This function works only in Player mode page 18 The PLAY PAUSE STOP FF and REW buttons are located on the remote control SC D382 D385 only and all of which you can manipulate with the Joystick W X on the camcorder The ...

Page 68: ...trées en mode LP contenant diverses fonctions de lecture Le son n est perceptible que pendant la lecture normale en mode SP ou LP Pour activer la télécommande réglez Remote Télécommande sur On Marche page 25 modèles SC D382 D385 uniquement playback Frame Advance To play back frame by frame SC D382 D385 only Press the F ADV button on the remote control while in pause mode Video sequence advances fr...

Page 69: ...la télécommande ou déplacez le pavé vers le bas pour arrêter le doublage Vous ne pouvez pas utiliser la fonction Postsonorisation lors de la lecture d une cassette vidéo protégée en écriture AUDIO DUBBING SC D382 D385 ONLY This feature enables you to dub your voice through the internal microphone or other audio equipment onto a pre recorded camcorder tape The original sound on the tape will not be...

Page 70: ... 1 ou MIX MIXAGE 1 2 la qualité sonore risque d en être diminuée playback DUBBED AUDIO PLAYBACK AUDIO SELECT The dubbed Audio playback function works only in Player mode page 18 1 Set the Select switch to TAPE SC D383 D385 only 2 Press the MODE button to set Player 3 Insert the dubbed tape and press the MENU button The menu list will appear 4 Move the Joystick up or down to select Tape then press ...

Page 71: ...iques stéréo télévision haut parleurs pour améliorer les effets sonores La fonction d effets sonores n est pas disponible avec la connexion DV AUDIO EFFECT EFFETS SONORES Audio effect function works only in Player mode page 18 Audio effect provides various playback effects to audio signals stored on a tape 1 Set the Select switch to TAPE SC D383 D385 only 2 Press the MODE button to set Player 3 In...

Page 72: ...nuel d utilisation du téléviseur 5 Lancez la lecture de la cassette page 69 Si vous connectez le câble à la prise AV le haut parleur du caméscope n émettra aucun son branchements TAPE PLAYING BACK ON A TV SCREEN The playback function works only in Player mode page 18 To play back a tape the television must be NTSC compatible page 100 We recommend that you use the AC power adapter as the power sour...

Page 73: ... Pour arrêter l action en cours déplacez le pavé vers le bas Le mode de lecture SP LP est sélectionné automatiquement Si seule l entrée audio mono est disponible sur votre téléviseur utilisez la prise blanche du câble audio audio G Connecting to a TV that has no Audio Video Input Jacks You can connect your camcorder to a TV through a VCR 1 Connect the camcorder to your VCR with the Audio Video cab...

Page 74: ...e connecter à une prise murale à l aide de l adaptateur secteur AC Ce caméscope permet également de copier des images vers d autres supports de stockage externes COPIED UNECASSETTEDECAMÉSCOPESURUNECASSETTEVIDÉO branchements The copying function works only in Player Mode page 18 Connect your camcorder to a VCR using the AV jack to copy the recording from a camcorder tape onto a VCR tape 1 Insert th...

Page 75: ...ériphérique externe est éteint Dans le cas contraire les haut parleurs du périphérique externe risquent d émettre un bruit extrêmement fort The Voice function works only in Player mode page 18 When you want to play back or record a tape recorded movie on other AV device you can transfer the voice sound incoming from the internal microphone of your camcorder instead of the audio signals on a prerec...

Page 76: ...e dernier 1 Go 1 000 000 000 octets la capacité de formatage actuelle peut être inférieure car le micrologiciel intégré utilise une partie de la mémoire digital still camera mode SC D383 D385 only USING A MEMORY CARD USABLE MEMORY CARD NOT SUPPLIED This camcorder can use SD memory cards and MMC Multi Media Cards Some cards are not compatible depending on the memory card manufacturer and memory car...

Page 77: ...hier de configuration d image 1 Les données des fichiers de photo DPOF par exemple sont stockées dans ce type de fichier Fichier d image vidéo 2 Le nom des images vidéo suit le schéma suivant SMOV_ AVI Le numéro de fichier augmente automatiquement lorsqu un nouveau fichier vidéo est créé Dès que le nombre de fichiers atteint 99 un nouveau dossier est créé sous le nom 101SSMOV The folder and file s...

Page 78: ...r contenu dans la carte mémoire à l aide d un ordinateur Il se peut que ce caméscope ne reconnaisse pas les fichiers modifiés Nombre d images sur la carte mémoire Le nombre d images pouvant être stockées sur une carte mémoire dépend de plusieurs éléments La carte mémoire peut contenir jusqu à 20 000 fichiers photos JPEG Taille photo 128MB 256MB 512MB 1GB 2GB 800x600 Env 600 Env 1200 Env 2400 Env 4...

Page 79: ...s chaque fichier se voit attribuer un numéro différent afin d éviter la duplication des noms de fichier Cela est pratique lorsque vous souhaitez gérer vos fichiers sur ordinateur SETTING THE FILE NUMBER FILE NO File number setting works only in M Cam mode page 18 File numbers are given to images in the order they were recorded when they are stored on the memory card File numbers may be set as foll...

Page 80: ...lisez pas l interrupteur POWER et ne retirez pas la carte mémoire tandis que vous enregistrez des photos Cela pourrait endommager la carte digital still camera mode SC D383 D385 only TAKING A PHOTO IMAGE JPEG ON THE MEMORY CARD You may take photo images while in M Cam mode and store the images on the memory card page 18 You can take photo images using the remote control 1 Set the Select switch to ...

Page 81: ...affichée au format vignette VIEWING PHOTO IMAGES JPEG This function works only in M Player mode page 18 You can play back and view photo images recorded on the memory card Be sure that the M Play Select is set to Photo in the menu page 84 1 Set the Select switch to CARD 2 Press the MODE button to set Player The last recorded image appears If there are no recorded images on the memory card No image...

Page 82: ...ire est positionné sur LOCK vous ne pouvez pas activer la protection de l image Les images protégées ne peuvent être supprimées même à l aide de la commande Delete All Tout Supprimer du menu digital still camera mode SC D383 D385 only PROTECTION FROM ACCIDENTAL ERASURE PROTECT The Protection function works only in M Player mode page 18 You can protect important images from accidental erasure If yo...

Page 83: ...cez le pavé W X vers la gauche ou la droite pour sélectionner Yes ou No puis appuyez sur le pavé DELETING PHOTO IMAGESAND MOVING IMAGES DELETE The Delete function works only in M Player mode page 18 You can erase the photo images and moving images recorded on the memory card To delete a protected image first cancel image protection Once you delete an image you cannot restore it Check the images to...

Page 84: ...imer tous les fichiers plus rapidement formatez la carte mémoire après avoir sauvegardé les fichiers sur un autre périphérique de stockage digital still camera mode SC D383 D385 only Deleting All Images at Once 1 Set the Select switch to CARD 2 Press the MODE button to set Player The last recorded image appears If there are no recorded images on the memory card No image is displayed 3 Move the Joy...

Page 85: ... effacées et ne pourront plus être récupérées AVERTISSEMENT FORMATTING A MEMORY CARD FORMAT The format function works only in M Player mode page 18 You can use the format functions to completely delete all images and options on the memory card including protected images The format function restores the memory card to its initial state 1 Set the Select switch to CARD 2 Press the MODE button to set ...

Page 86: ...t sur le bouton PHOTO au lieu du bouton Début fin d enregistrement page 76 4 Appuyez sur le bouton Début fin d enregistrement pour arrêter l enregistrement digital still camera mode SC D383 D385 only RECORDING MOVING IMAGES MPEG ONAMEMORY CARD You may record moving images while in M Cam mode and store the images on a memory card page 18 You can record moving images with audio on a memory card The ...

Page 87: ...e d endommager les données contenues sur la carte ou la carte elle même Couper l alimentation alors que vous êtes en train d accéder à la carte mémoire pourrait endommager les données qui y sont stockées ENREGISTREMENT DE FILMS MPEG SUR UNE CARTE MÉMOIRE Up tp 2000 MPEG files can be stored on a memory card MPEG files moving images can be recorded up to 2 GB per a moving file Before using the recor...

Page 88: ...dia Player de Microsoft dans la langue de votre choix sur le site Web de Microsoft http www microsoft com windows windowsmedia download default asp digital still camera mode SC D383 D385 only PLAYING THE MOVING IMAGES MPEG ON A MEMORY CARD M PLAY SELECT The moving Images playback function works only in M Player mode page 18 You can play the moving images on a memory card The playback picture will ...

Page 89: ...olution choisie RECORDING AN IMAGE FROM A TAPE AS A PHOTO IMAGE This function works only in Player mode page 18 Your camcorder can read moving image data recorded on a tape and record it as a photo image on a memory card Before operation Insert a recorded tape and a memory card into your camcorder 1 Set the Select switch to TAPE 2 Press the MODE button to set Player 3 Press the Joystick playback t...

Page 90: ...e digital still camera mode SC D383 D385 only COPYING A PHOTO IMAGE FROM A TAPE TO A MEMORY CARD PHOTO COPY The photo copy function works only in Player mode page 18 Using the search function you can automatically take in only photo image from tapes recorded in your miniDV camcorder and record them on a memory card in sequence Before operation Insert a tape recorded in your miniDV camcorder and re...

Page 91: ...e 000 à 999 Si la fonction Print Mark Voyant D Imp est réglée sur All Files Ts Fichiers vous pouvez paramétrer le nombre de copies sur 001 L option All Files Ts Fichiers peut prendre plus de temps selon le nombre d images stockées Des imprimantes compatibles DPOF sont disponibles sur le marché MARKING IMAGES FOR PRINTING PRINT MARK The print mark function works only in M Player mode page 18 This c...

Page 92: ...tiquement après un bref instant Le curseur met la fonction Print Impression en surbrillance pictbridge modèles SC D383 D385 uniquement PRINTING YOUR PICTURES USING THE PICTBRIDGETM PictBridgeTM function works only in M Player mode page 18 By connecting the camcorder to printers with PictBridge support sold separately you can send images from the memory card directly to the printer with a few simpl...

Page 93: ... est prise en charge Les films ne peuvent pas être imprimés Vous pouvez paramétrer différentes options d impression en fonction de l imprimante Veuillez vous reporter au manuel d utilisation de l imprimante pour plus de détails Selecting Images Move the Joystick W X left or right to select an image to print Each press of the MENU button toggles between turning PictBridge menu screen on or off Sett...

Page 94: ... les applications logicielles compatibles Veuillez noter qu il existe deux types de prises DV quatre et six broches Ce caméscope possède une prise à quatre broches transfert de données IEEE 1394 AVERTISSEMENT TRANSFERRING IEEE1394 I LINK DV STANDARD DATA CONNECTIONS Connecting to a DV Device DVD Recorder Camcorder etc Connecting to other standard DV products A standard DV connection is quite simpl...

Page 95: ... le mode DV IEEE 1394 est actif les modes DIS et C Nite se désactivent La fonction de recherche avant arrière est disponible uniquement en mode DV IEEE 1394 Lorsque vous utilisez ce caméscope en tant qu enregistreur les images apparaissant à l écran peuvent sembler de qualité inégale même si les images enregistrées ne sont pas endommagées Recording with a DV Connection Cable 1 Set the Select switc...

Page 96: ...ur les systèmes d exploitation Macintosh Les configurations système mentionnées ci dessus sont recommandées En fonction du système il n est pas garanti que les opérations soient effectuées correctement même sur des systèmes répondant aux exigences Interface USB modèles SC D383 D385 uniquement USING USB INTERFACE Transferring a Digital Image through a USB Connection The camcorder supports both USB ...

Page 97: ... Si vous connectez le câble USB à un ordinateur en utilisant un hub USB ou d autres périphériques simultanément vous risquez de créer un conflit et des dysfonctionnements Si tel est le cas retirez tous les autres périphériques USB et réessayez de vous connecter On a slower PC than recommended movie playback may not be smooth or video editing may take a long time On a slower PC than recommended mov...

Page 98: ...ge page 88 7 Pour sortir de la liste appuyez sur le bouton MENU interface USB modèles SC D383 D385 uniquement SELECTING THE USB DEVICE USB CONNECT USB connect function works only in M Player mode page 18 Using the USB cable you can connect your camcorder to a computer to copy your moving images and photo images from the memory card or to a printer to print your images 1 Set the Select switch to CA...

Page 99: ...ctionne correctement Pour lire des films sur un ordinateur installez les logiciels dans l ordre suivant DV Driver DirectX 9 0 Video Codec Installez la caméra web en suivant les étapes suivantes DV Driver DirectX 9 0 Video Codec INSTALLATION DU LOGICIEL PROGRAMME DV MEDIAPRO Before you start Turn on your PC Exit all other applications that are running Insert the provided CD into the CD ROM drive Th...

Page 100: ...pe et l autre extrémité sur la prise USB de votre ordinateur 4 Pour vérifier que le disque amovible a bien été reconnu ouvrez l explorateur Windows afin de le localiser Vous pouvez copier la vidéo ou les photos sur votre ordinateur pour les lire CONNECTING TO A PC 1 Connect a USB cable to the USB jack on the PC If a USB cable is connected to the camcorder s USB jack the Audio Video cable is disabl...

Page 101: ...ité sur le port USB de votre ordinateur Lancez une application de conversation vidéo telle que Windows Messenger et appréciez cette fonctionnalité Différentes applications bénéficient de la fonction Webcam Pour plus de détails reportez vous à la documentation des produits concernés While the PC camera or USB Streaming function is in use the 16 9 wide mode is not supported The screen displays in th...

Page 102: ...onditions de conservation des cassettes a Évitez la proximité d aimants ou les interférences magnétiques b Évitez les endroits humides ou poussiéreux c Conservez la cassette en position verticale et ne la stockez pas dans un endroit exposé à la lumière directe du soleil d Évitez de faire tomber ou de cogner vos cassettes AFTER FINISHING A RECORDING At the end of a recording you must remove the pow...

Page 103: ...atives à la cassette de nettoyage pour plus d informations Si le problème persiste après le nettoyage consultez votre revendeur Samsung le plus proche ou un centre de service technique agréé écran bleu CLEANING AND MAINTAINING THE CAMCORDER Cleaning the Video Heads To ensure normal recording and clear pictures clean the video heads when the playback pictures display square block shaped noise or di...

Page 104: ...anie Singapour République slovaque République tchèque Suède Suisse Syrie Thaïlande Tunisie etc Vous pouvez enregistrer avec votre caméscope Mini DV et visualiser des images sur l écran LCD n importe où dans le monde Entretien USING YOUR MINIDV CAMCORDER ABROAD Each country or region has its own electric and color systems Before using your miniDV camcorder abroad check the following items Power sou...

Page 105: ... une nouvelle carte mémoire Not formatted Non Formaté slow La carte mémoire doit être formatée Formatez une carte mémoire voir page 81 Now deleting Suppression En Cours slow Lorsque la suppression de fichiers est en cours Attendez la fin de la suppression Memory Card Error Erreurcartemémoire slow The inserted memory card is not recognized by the camcorder Éjectez la avant de la réinsérer Essayez a...

Page 106: ...ucune fonction exceptée l éjection de la cassette n est valide Ouvrez le compartiment à cassette et retirez la batterie Laissez le caméscope au repos pendant au moins deux heures dans un endroit chaud et sec Si ces instructions n apportent aucune solution à votre problème contactez le centre de service technique agréé Samsung le plus proche Dépannage Symptom Explanation Solution You cannot switch ...

Page 107: ...o film pour la lecture 84 Delete Supprimer Suppression de fichiers 79 Protect All Tout Supprimer Suppression de tous les fichiers 80 Protect Protéger Prévention des suppressions accidentelles 78 Print Mark Voyant D Imp Impression des images enregistrées sur une carte mémoire 87 Format Formatage de la carte mémoire 81 SETTING MENU ITEMS Main Menu Sub Menu Functions Available Mode Page Camera Mode P...

Page 108: ... s affichent sur l écran LCD La conception et les caractéristiques du caméscope et des autres accessoires sont susceptibles d être modifiées sans préavis Les modèles SC D381 D382 utilisent exclusivement des cassettes Les modèles SC D383 D385 disposent de deux supports de stockage la cassette et la carte Main Menu Sub Menu Functions Available Mode Page Camera Mode Player Mode M Cam Mode d M Player ...

Page 109: ...e Microphone interne Microphone stéréo à condensateur multidirectionnel Télécommande modèles SC D382 D385 uniquement En intérieur supérieur à 15 mètres 49 pieds en ligne droite En extérieur environ 5 mètres 16 4 pi en ligne droite Cette conception et ces spécifications techniques sont susceptibles d être modifiées sans préavis specifications MODEL NAME SC D381 SC D382 SC D383 SC D385 System Video ...

Page 110: ...TÉE La société SAMSUNG Electronics Canada Inc SECA garantit que ce produit est exempt de tout défaut matériel ou de fabrication De plus SECA s engage à sa discrétion à réparer ou à remplacer le produit s il ne fonctionnait pas correctement à cause d un défaut matériel ou de fabrication pendant la période de garantie Toute réparation effectuée dans le cadre de la garantie doit être réalisée par un ...

Page 111: ... SAMSUNG 726 7864 0 14 Min www samsung com HUNGARY 06 80 SAMSUNG 726 7864 www samsung com ITALIA 800 SAMSUNG 726 7864 www samsung com LUXEMBURG 0035 0 2 261 03 710 www samsung com be NETHERLANDS 0900 SAMSUNG 726 7864 0 10 Min www samsung com nl NORWAY 815 56 480 www samsung com no POLAND 0 801 801 881 022 607 93 33 www samsung com pl PORTUGAL 80820 SAMSUNG 726 7864 www samsung com pt SLOVAKIA 0800...

Page 112: ... Use of Certain Hazardous Substances in electrical And electronic equipment and we do not use the 6 hazardous materials Cadmium Cd Lead Pb Mercury Hg Hexavalent Chromium Cr 6 Poly Brominated Biphenyls PBBs Poly Brominated Diphenyl Ethers PBDEs in our products If you have any questions or comments relating to Samsung products please contact the SAMSUNG customer care center Samsung Electronics Ameri...

Reviews: