background image

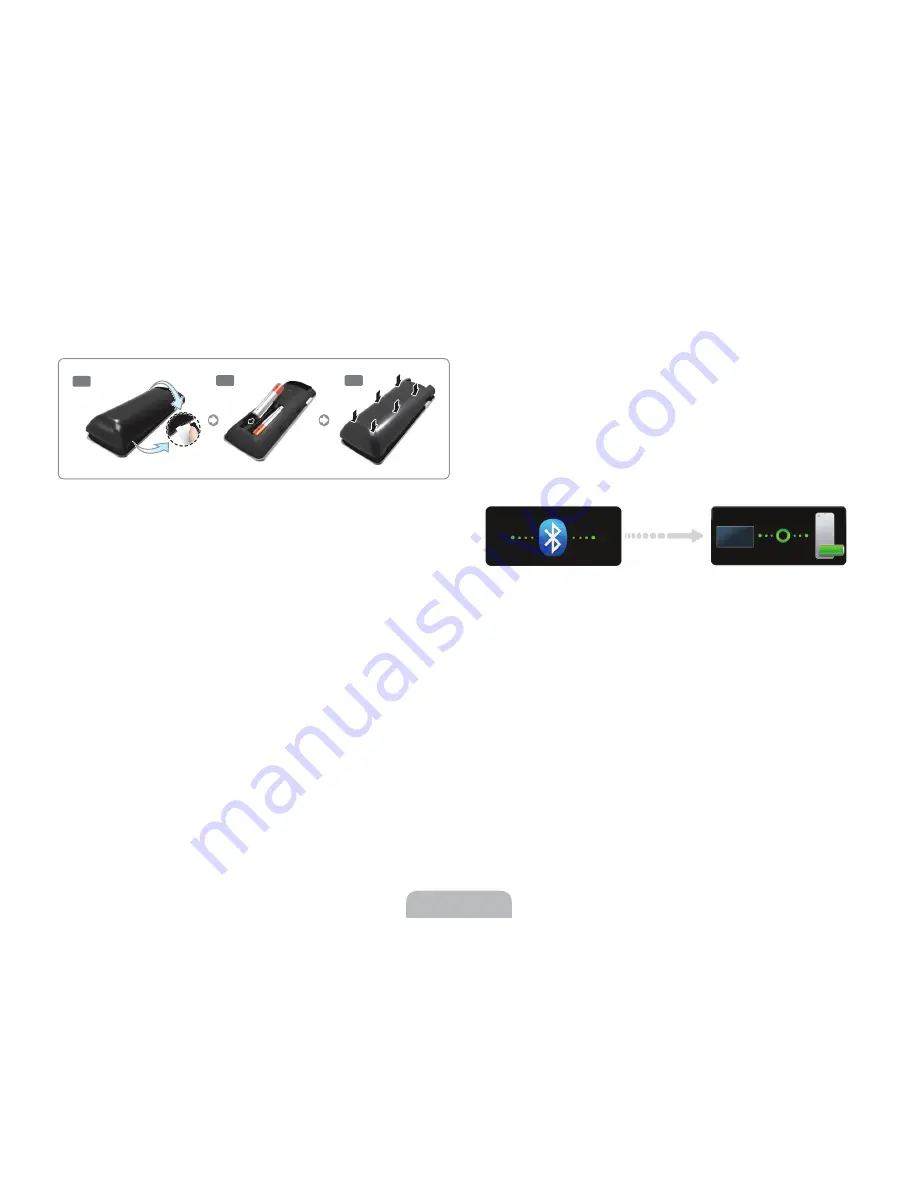
Inserting the Batteries (AAA X 2)

1

3

2

1. 

Insert a plastic card into the notch in the battery cover, and then rotate the 
card to loosen the battery cover. Carefully pull the cover up to remove it 
completely.


Check the location of the battery cover notch The notch's location 
may vary depending on the type of Smart Touch Control provided with 
the product.

2. 

Insert 2 AAA batteries, making sure to align the positive and negative ends 
correctly.

3. 

Align the battery cover with the back of the remote control, and then press 
down along the edges until it is completely attached to the remote control.

Connecting to the TV

To operate the TV using a Smart Touch Control, you must first pair it to the TV 
via Bluetooth. Note that the Smart Touch Control will only work with the paired 
Samsung TV.

1. 

To turn on the TV, point the Smart Touch Control at the remote control 
receiver of the TV and press the 

P

 button. The remote control receiver's 

location may vary depending on the model.

2. 

A Bluetooth icon will appear at the bottom left of the screen as shown 
below. The TV will then attempt to connect to the Smart Touch Control 
automatically.

<Attempting to connect>

<Connected>

3. 

If pairing is successful, the TV displays a small green circle between 
graphics representing the TV and the Smart Touch.

4. 

If the Smart Touch does not pair:

a. 

Remove the battery cover. 

b. 

Aim the Smart Touch at the TV's remote control receiver.

c. 

Use a pen tip to press and release the pairing button on the back of the 
Smart Touch. (See page 11 for its location.)

d. 

In a few seconds, you should see the Bluetooth icon described in Step 
2, and then the Smart Touch should pair.


Ř

The first time you turn on your TV, it will immediately start the initial setup.

English - 10

Summary of Contents for S9C

Page 1: ...this Samsung product To receive more complete service please register your product at www samsung com register If you have any questions or comments relating to Sansung products please contact the SAM...

Page 2: ...void electric shock never touch the inside of this apparatus Only a quali ed technician should open this apparatus Make sure to plug the power cord in until it is rmly seated When unplugging the power...

Page 3: ...Home Page 18 Searching the Index 18 Searching Pages 18 Closing the e Manual 18 Jumping to a Menu Item 18 Updating the e Manual Networ rk Con gu uratio on 19 Connecting to a Network 19 Network Connecti...

Page 4: ...book or Twitter Make video calls to friends using the TV s camera Apps Samsung Apps offers an extensive collection of free and paid news sports weather and gaming content you can download directly to...

Page 5: ...different ends one for the TV and one for the One Connect panel The TV end has a small TV icon on its surface See the diagrams below 57 TV end Connector One Connect end Connector One Connect The conn...

Page 6: ...One Connect Front English 6 Universal Remote Cantrol DVDPiayer I t ___ _________ USB Device 5V0 5A USBHDD harddllkdrtw DNee HOOSV 1 A...

Page 7: ...nated for a moment when pressed Using the remote control with this button set to On will reduce the battery usage time Gives direct access to channels Adjusts the volume Opens the OSD Menu Quickly sel...

Page 8: ...mbols in the battery compartment 1 3 2 NOTE Use the remote control within 23 feet of the TV Bright light may affect the performance of the remote control Avoid using when near special uorescent lights...

Page 9: ...e control See page 16 Turns the TV on and off Displays and selects the available video sources Returns to the previous menu Turn on the backlight for the buttons When on the buttons become illuminated...

Page 10: ...th the paired Samsung TV 1 To turn on the TV point the Smart Touch Control at the remote control receiver of the TV and press the P button The remote control receiver s location may vary depending on...

Page 11: ...he indicator shown in the illustration below appears on the bottom left of the TV screen Replace the old batteries with new alkaline ones Low battery alarm window Using the touch pad Use the touch pad...

Page 12: ...the status of your network connection and displays important noti cations about your TV and Samsung services For more information about using the Status and Noti cation banner refer to e Manual Smart...

Page 13: ...tual Remote Panel You can change which virtual remote panel is displayed on the TV screen To shift between panels move the focus highlight beyond the left or right edge of the displayed panel To chang...

Page 14: ...k is located at the lower left corner on the back of the TV Built in TV Camera This TV features a built in TV camera and microphone that you can use for the Motion Control Voice Recognition and Face R...

Page 15: ...nnected to the second HDMI connector press the SOURCE button From the Source list select HDMI2 The connector names may vary depending on the product Select Tools at the upper right corner of the sourc...

Page 16: ...function is only available when the USB device selected Universal Remote Setup Use to con gure universal remote control settings Using the universal remote control you can control external devices con...

Page 17: ...elect TV Input Source screen select the input source the device is connected to and then tap the Touch Pad 7 On the Control Test screen tap the Touch Pad to start the Function Test If the device turns...

Page 18: ...e Manual press and hold the RETURN button or select at the upper right corner of the screen or press EXIT button Jumping to a Menu Item To jump directly to the menu item that is described in the curre...

Page 19: ...f the channel set for the wireless router is currently being used by another device the result is usually interference and or a communications failure Most wireless networks have an optional security...

Page 20: ...Port on the Wall LAN Cable Not Supplied The TV does not support network speeds less than or equal to 10Mbps Use Cat 7 cable for the connection Samsung Multi View Samsung Multi View is a convenient fe...

Page 21: ...se Multi Screen View mode 2 To use Samsung Multi View press the button or alternatively select Samsung Multi View on the virtual remote panel 3 Select Multi Screen View from the pop up window 4 Choose...

Page 22: ...ou view 3D or Samsung Multi View videos To view 3D or Samsung Multi View videos you must use the Samsung Multi View 3D Glasses with a Samsung S9C TV The glasses establish a connection with the TV usin...

Page 23: ...have not used the glasses for an extended period of time or are not using the glasses regularly charge the battery once a month to keep it operational Using the 3D glasses Pairing the Samsung Multi Vi...

Page 24: ...red The pairing operation is required when you purchase and use another S9C TV released in 2013 Using the earphones Pulling the earphones out Gently hold the earphones and remove the cable along the g...

Page 25: ...econd when the battery is completely charged USB Micro USB cable USB port SAMSUNG TV PC Note Book To wear the Samsung Multi View 3D Glasses over eyeglasses To wear the Samsung Multi View 3D Glasses ov...

Page 26: ...abnormal TV sound Keep such devices including mobile communication devices as far away from the TV as possible The LED keeps blinking The glasses make a series of beeps while in use The battery is lo...

Page 27: ...iagnosis Picture Test Support Self Diagnosis Picture Test If the picture problem is caused by the TV the problem should be visible in the Picture Test If the problem is not visible next con rm that th...

Page 28: ...the problem is not the remote If the TV turns on refer to Remote control does not work below There is no picture video Check the cable connections Remove and reconnect all cables connected to the TV...

Page 29: ...enance If a sticker was attached to the TV screen some debris can remain after you remove the sticker Please clean the debris off before watching TV The exterior and screen of the product can get scra...

Page 30: ...of the TV may differ from the images in this manual depending on the model This device is a Class B digital apparatus For information about the power supply and more information about power consumptio...

Page 31: ...interference to radio or television reception which can be determined by turning the equipment off and on the user is encouraged to try to correct the interference by one of the following measures Re...

Page 32: ...e limits set forth for an uncontrolled environment This equipment should be installed and operated with minimum distance 20cm between the radiator your body This Class B digital apparatus complies wit...

Page 33: ...ip and only those encountered in normal use of the product Excluded but not limited to are any originally speci ed provisions for in home or on site services minimum or maximum repair times exchanges...

Page 34: ...mined by turning the equipment off and on the user is encouraged to try to correct the interference by one or more of the following measures Reorient or relocate the receiving antenna Increase the sep...

Page 35: ...product was not intended altered product or serial numbers cosmetic damage or exterior nishes accidents abuse neglect re water lightning or other acts of nature use of products equipment systems util...

Page 36: ...te Address CANADA 1 800 SAMSUNG 726 7864 www samsung com ca English www samsung com ca_fr French Samsung Electronics Canada Inc Customer Service 55 Standish Court Mississauga Ontario L5R 4B2 Canada U...

Page 37: ...head screwdriver and a soft flat surface larger than the TV such as the box 2 Stand cover Screws Stand M4 x L20 4 pieces M4 x L10 2 pieces x 4 x 2 Pull the stand out of the top Styrofoam cushioning a...

Page 38: ...ersal Remote Control Setup section on the User manual Step 3 Using the Smart Touch Control Insert the batteries into the remote control With the tip of a credit card or similar item use a twisting mot...

Page 39: ......

Page 40: ......

Page 41: ...sized earphone inserts Large sized and small sized inserts are supplied as a separate package f Getting StartEKJ Charging the battery If the red LED blinks every 2 seconds or you periodically hear a...

Page 42: ...ED is turned on for 3 seconds Using the earphones Pulling the earphones out Gently hold the earphones and remove the cable along the groove inside the glasses Placing the earphones back Insert the ear...

Page 43: ......

Page 44: ...sses must be connected to the TV to use Samsung Multi View Pairing the Samsung Multi View 30 Glasses What is pairing Pairing is a process that establishes a connection between the Samsung Multi View T...

Page 45: ...o use Samsung Multi View Alternatively select Samsung Multi View on the virtual remote panel 2 Choose Multi Screen View or 2 Player Gaming on the window that appears 3 1 If you have chosen Multi Scree...

Page 46: ...iliza unicamemeunpafloydequeloroda entre4 Italiano chedoYriessertsprumtod acqua4o6YOitepomaciSI70finarlodelicatamentein Espat lol y6vecesantesdepasarlosuavementeenunadireccicn Oespuesde limpiarIacaja...

Page 47: ...electromagnetiques le cable One Connect qui connecte le televiseur au dispositif One Connect Conformement a illustration ouvrez le tore magnetique et faites une boucle avec le cable One Connect autour...

Page 48: ...8 c O t 0 g en Et J Q cam en U C 0 c I E J 00 en 00 E ca 00 Q I 0 ro en Screws and Guide stand location Except F8000 Senes and h1gher Product LED TV Plasma TV Size 26 46 43 51 LED 55 LED TV I PI 59 I...

Page 49: ...ueba de Imagen o Sonido o Cambie el tamano de Ia imagen Proveedor de Servicio de Internet 3 Mala Calidad de Imagen o Verificar si su seiial es Alta Definici6n o Definici6n Regular Contactar a su prove...

Page 50: ...iture or surface on which it is placed Not hanging anything from or on the television Anchoring both the television and the furniture on which it is placed to a suitable support especially in the case...

Page 51: ...e that interference will not occur in a particular installation If this equipment does cause harmful interference to radio or television reception which can be determined by turning the equipment off...

Page 52: ...cy Interference EN55024 Electromagnetic Immunity of Information Technology Equipment EN61000 3 2 Power Line Harmonics EN61000 3 3 Voltage Fluctuations EN55013 Radio disturbance characteristics of broa...

Page 53: ...Only use attachments accessories specified by the manufacturer 12 Use only with cart stand tripod bracket or table specified by the manufacturer or sold with the apparatus When a cart is used use caut...

Page 54: ...alternative but to cut off the plug remove the fuse and then safely dispose of the plug Do NOT connect the plug to a mains socket as there is a risk of shock hazard from the bared flexible cord IMPORT...

Page 55: ...ny corresponding to your region of residence For those who reside in other countries please contact a nearest local Samsung dealer for recycling information for the products to be treated in environme...

Reviews: